GAI-Tronics 13363 Addressable Amplified Speakers Installation and Operation Manual User Manual
Page 48
Pub. 43004-034F
Model 13353, 13363, and 13373 Addressable Amplified Speakers
Page 43 of 52
e:\radio products-current release\43004\43004-034f\43004-034f.doc
03/15
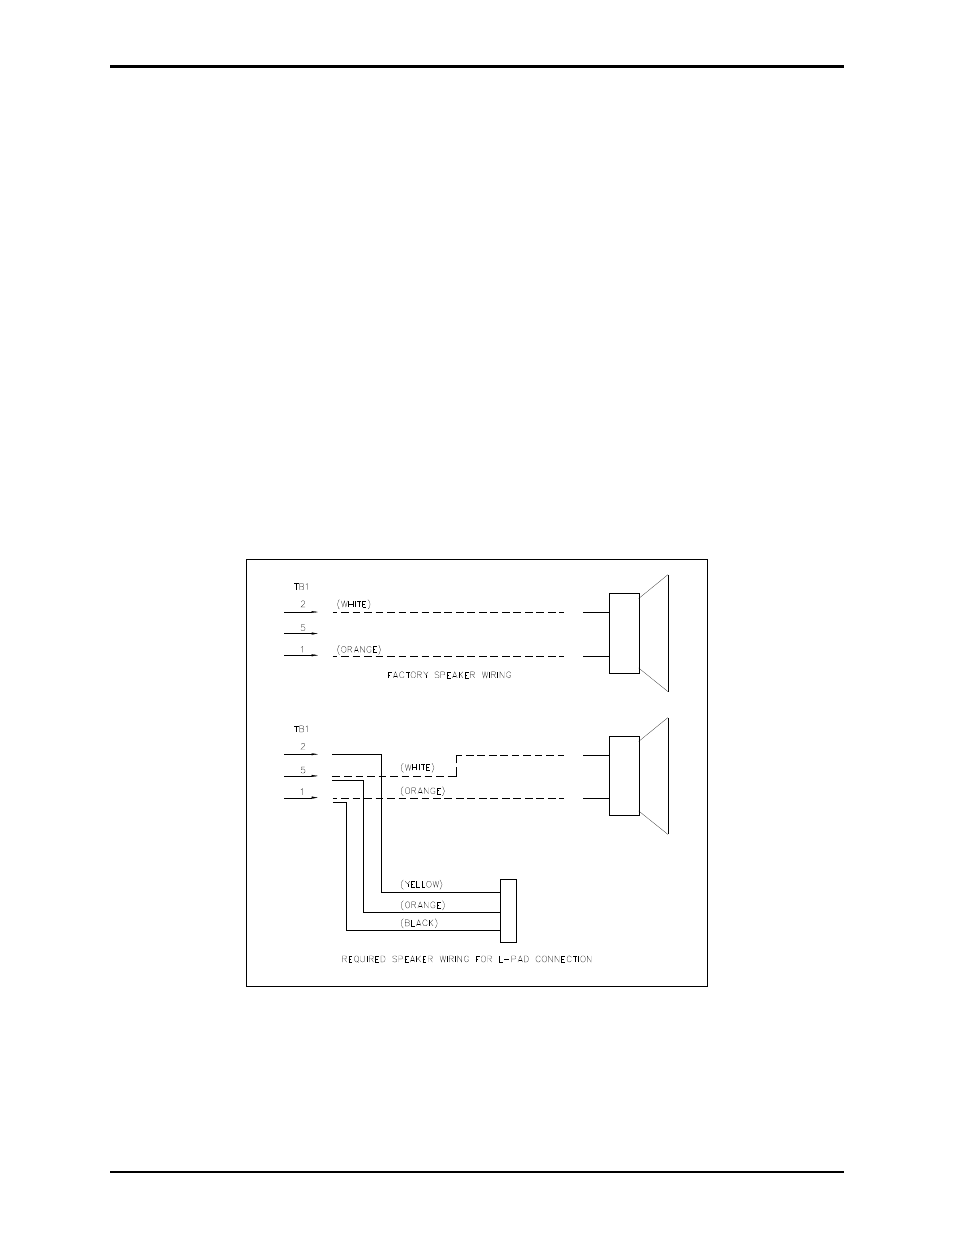
12506-001 Remote Volume Control Wiring Instructions
If the speaker requires local mechanical control of the output volume, an 8-ohm L-Pad volume control
(Part No. 12506-001) can be installed. The 12506-00l Remote Volume Control assembly is designed for
indoor installation but can easily be installed in a single gang outlet box, mounted inside a weatherproof
enclosure. Note that for full output volume range, the amplified speaker should be programmed for full
audio output power using the CARD Suite Software Application. Figure 17 shows the wiring
configuration needed for the use of the L-Pad connection for local volume adjustment.
Refer to Figure 7 or Figure 19 to locate TB1, the dual, 7-point connector. The “A” portion of the
connector (to the left while facing the speaker’s front section from the rear) includes the speaker wire
connections. This connector numbering begins with position 1 at the bottom and ends with position 7 at
the top.
1. Refer to the Mounting section on page 37 to open the speaker, separate the front section from the rear
section, and mount the rear of the speaker.
2. With the rear section securely mounted and field wiring in place, remove the white wire from TB1-2
and reroute the wire to TB1-5.
3. Connect the yellow wire from L-Pad to TB1-2.
4. Connect the orange wire from L-Pad to TB1-5.
5. Connect the black wire from L-Pad to TB1-1.
Figure 17.
When wire terminations have been completed, reconnect the dual, 7-point and dual 3-point connectors to
the PCBA and route the wires through both nylon ties. Refer to Figure 19 for connector orientation. Re-
twist the nylon ties to secure the wires. Refer to Figure 7 for wire routing. Assemble the speaker sections
and tighten front panel screws to 16 to 20 in-lbs. of torque.
N
OTE
: Be careful not to pinch wiring between the front and rear speaker sections when securing
them together.