2 – names and functions of parts, Top pane – Teac DR-100MKII User Manual
Page 12
12
TASCAM DR-100MKII
2 – Names and Functions of Parts
Top pane
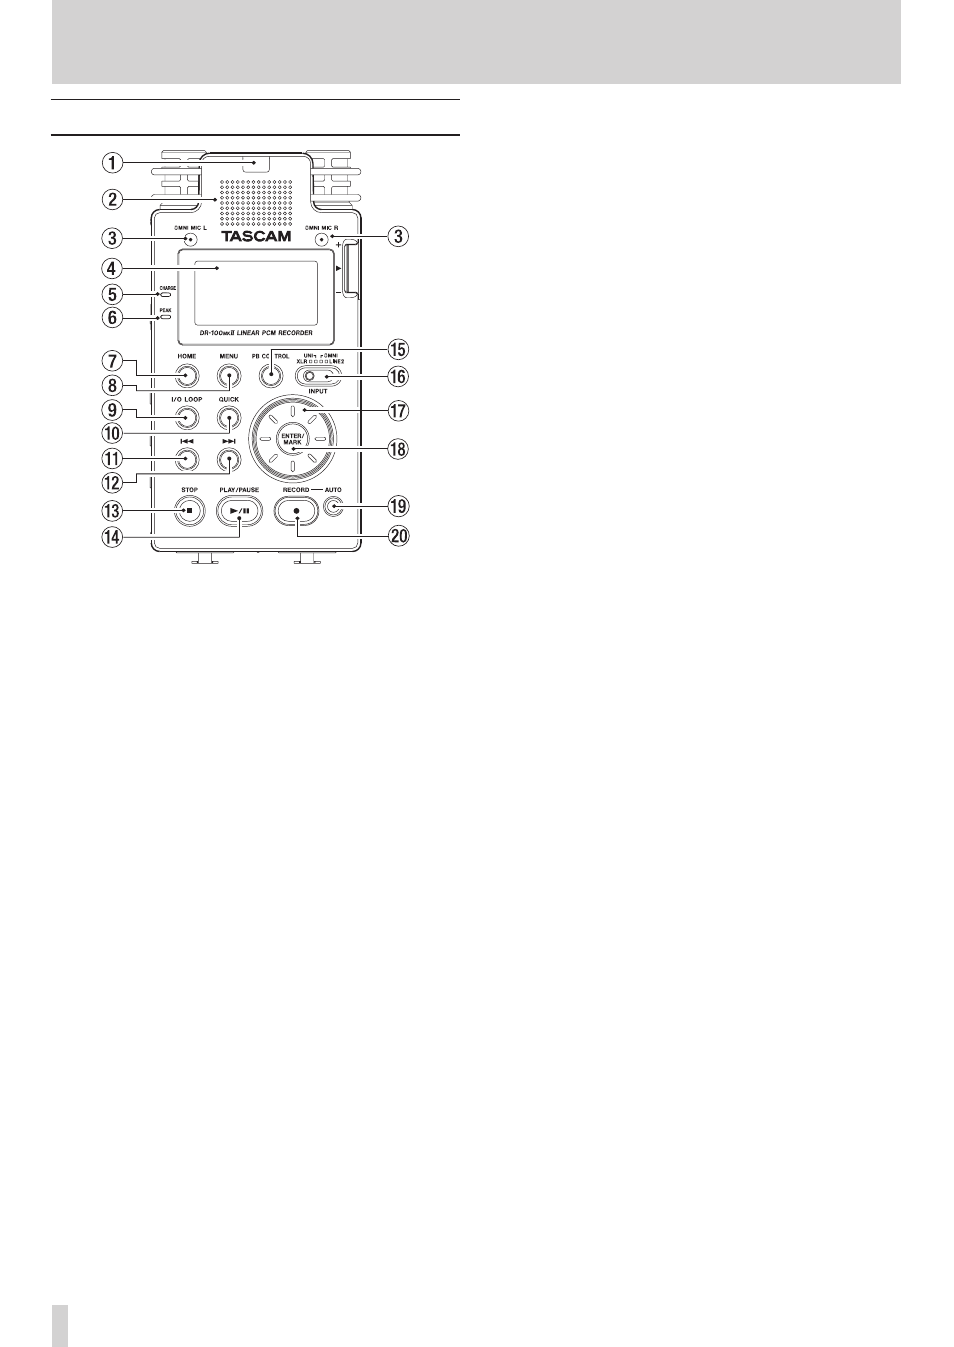
1
Remote sensor
Receives signals from the included remote control (RC-
10). When using the remote point it here. (See “Wireless
use” on page 22.)
2
Mono speaker
Use this built-in speaker to listen to recordings.
The speaker will not produce sound in the following
situations.
When in recording standby
•
When headphones are connected
•
When recording
•
When the speaker output setting is off
•
When in overdubbing mode
•
3
Omnidirectional stereo mic pair (OMNI MIC L/R)
Two built-in electret condenser mics allow recording in
stereo.
4
Display
Shows a variety of information.
5
CHARGE indicator
Lights when the lithium ion battery is being charged
and turns off when charging completes.
6
PEAK indicator
Lights red just before the recording volume level
becomes so high that distortion would occur.
7
HOME button
Press this button when one of the setting screens is
open to return to the Home Screen. When the Home
Screen is open, press this to switch between displaying
elapsed and remaining time.
8
MENU button
Press to open the
MENU
Screen when the Home Screen
is open.
When the Home Screen is open, press and hold this
button to switch the backlight setting between
ALWAYS
(always lit) and
OFF
(always unlit).
When one of the various settings screens is open, press
this button to return to the
MENU
screen.
9
I/O LOOP button
Press to set the starting (IN) and ending (OUT) points
to define the desired interval for loop playback. When
starting (IN) and ending (OUT) points have already
been set, pressing this button will clear those points.
(See “Loop playback” on page 45.)
0
QUICK button
When the Home Screen is open and the recorder is
stopped, paused or playing back, press this button to
open the QUICK popup menu. See “Add identification
tags to files (QUICK TAG)” on page 40 and "Delete the
selected file (QUICK DEL)" on page 41.)
q
. button
Press this button to return to the beginning of a
playback file that is playing or stopped in the middle.
If you press this button when a file is stopped at its
beginning, the unit will skip to the beginning of the
previous file.
Press and hold this button to search backwards.
Press this button while pressing and holding the
ENTER/MARK button to return to the previous mark.
On the setting screens, use this button to move the
cursor left.
On the
BROWSE
Screen, press this button to move up a
level.
w
/ button
Press this button during playback or when playback is
stopped to skip to the beginning of the next file.
Press and hold this button to search forward.
On the setting screens, use this button to move the
cursor right.
Press this button while pressing and holding the
ENTER/MARK button to move to the next mark.
On the
BROWSE
Screen, press this button to move down
a level. If a file is selected, the file is loaded and the unit
returns to the Home Screen and stops.
Press during recording to start a new track and
continue recording without pause.
e
STOP [8] button
During playback, press this button to pause playback at
the current position. When paused, press this button to
return to the beginning of the playback file.
Press this button during recording or recording standby
to cause the recording to stop.
Use this button to answer “NO” to a confirmation
message.