Avalon Firestyles 900 PI-1992 User Manual
Page 6
PAGE 6
PREPARATION FOR INSTALLATION Ð
PELLET STOVE (cont.)
Your Pellet Stove appliance comes completely assembled. Options are available for the different types of
installations. The options are listed below and are boxed separately from the appliance. They require assembly.
1.
Pedestal.
2.
Leg Kit, Black.
3.
Leg Kit, Brass.
4.
Leg Kit, Cast Black
5.
Vertical Pipe Adapter
When lifting the appliance, you may choose to remove the interior components to make it lighter. Refer to the
care & maintenance instructions in this manual for the proper sequence of removal and replacement of internal
components.
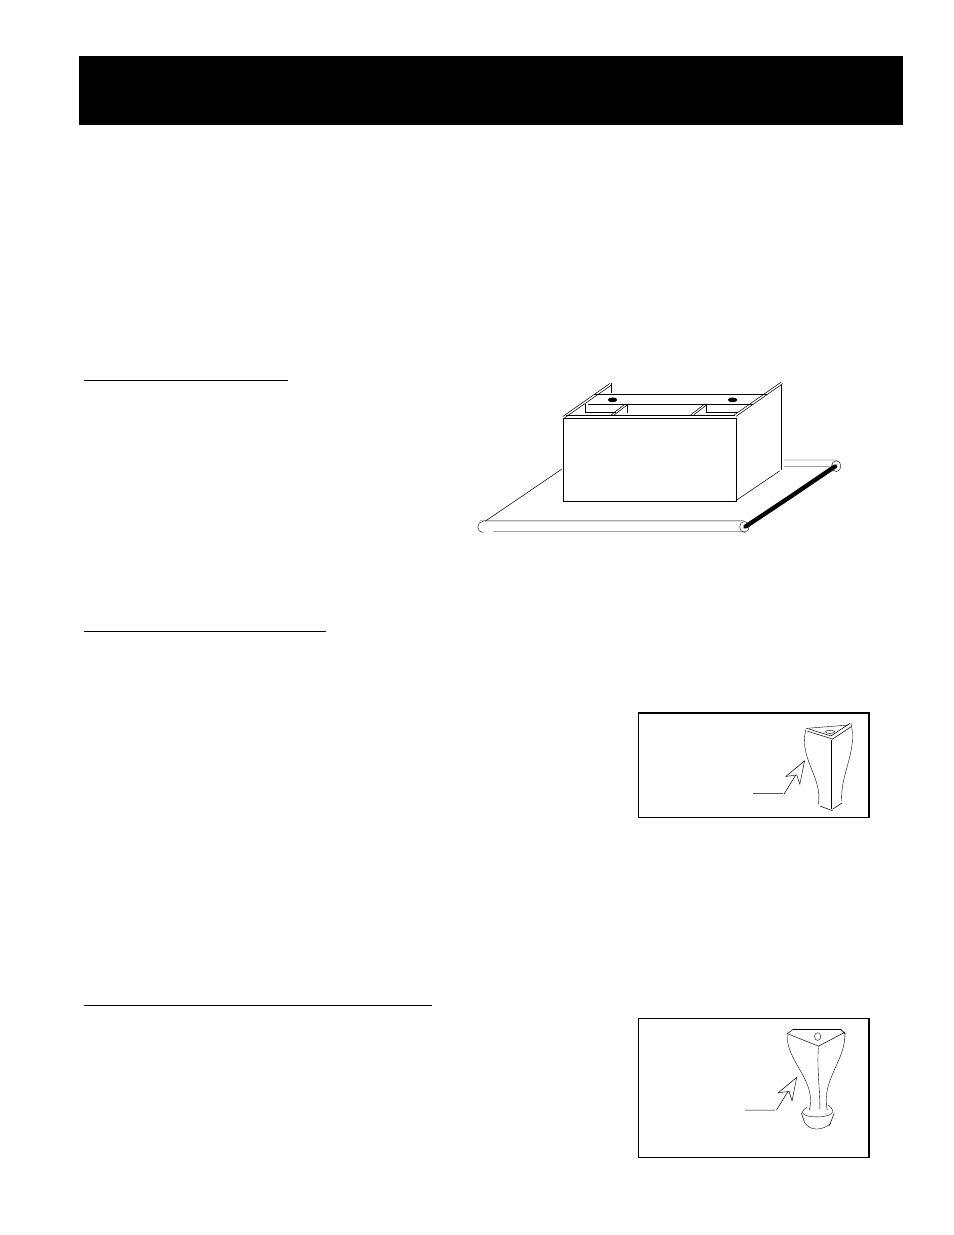
1.
Pedestal Assembly:
Open the box marked Pedestal and remove the
pedestal and the two attachment bolts and washers
(3/8" diameter - 16 X 3/4" hex. head bolt).
Lift the stove onto the pedestal. Line up the
threaded bolt holes in the bottom of the stove with
the two holes in the mounting angle of the pedestal
(some models use clips that attach to the side of
the pedestal -- the same directions apply).
Using a 9/16" open-end or socket wrench, fasten the pedestal to the stove with the supplied bolts and washers.
NOTE: Keep the two front leg bolts in place when installing on a pedestal -- otherwise air will enter through these
holes.
2.
Leg Kit, Black Assembly:
Open the box marked Leg Kit, Black and remove the four 6-1/2" high black steel legs, complete with rubber-
tipped leveling bolts (on certain models they are not rubber tipped Ð the same directions apply), the four
attachment bolts (3/8" diameter - 16 X 3/4" hex. head bolt) and the washers.
Raise the stove on some pieces of lumber to a height of about 7". Make sure
to level the stove at this point using shims under the pieces of lumber. Line up
the hole in the top of the leg with the threaded bolt hole in each corner of the
stove bottom. Using a 9/16" open end or socket wrench, fasten the leg to the
stove with the supplied attachment bolts and washers, making sure the legs are
flush with the corners of the stove.
Attach Bolt (with
washer) to Stove
From Below
To level the stove, first make sure the leveling bolts with the rubber ends (some models come with steel bolts --
the same directions apply) are screwed into position and backed off just enough to penetrate below the steel
portion of the leg. Unscrew each leveling bolts just enough so each leveling bolt is an equal distance from the
floor. You may wish to use a piece of wood or other spacer to measure this distance. As long as the lumber
holding the stove in place is properly leveled, the stove will be level when the leveling bolts are adjusted properly
and the lumber is removed. Next, lower the stove onto the ground and check for a level position. If slight
adjustments need to be made, make sure to first raise the stove before turning the leveling bolts. The rubber tips
of the leveling bolts will tear if they are adjusted while weight is applied to them.
3. & 4.
Leg Kit, Brass or Cast Black Assembly:
Open the box marked Leg Kit, Brass (or Cast) and remove the four 7-7/8"
high legs, complete with rubber-tipped leveling bolts(on certain models they are
not rubber tipped Ð the same directions apply), the four attachment bolts (3/8"
diameter - 16 X 3/4" hex. head bolt) and the washers.
Use the same directions listed above for the Leg Kit, Black assembly. The one
difference is that the Brass (or Cast) legs are taller, and the stove should be
lifted approximately 8 1/2" above the floor before attachment.
Attach Bolt (with
washer) to Stove
From Below