Nsert, Nstallation – Avalon Firestyles 900 PI-1993 to 1996 User Manual
Page 24
P
AGE
24
I
NSERT
I
NSTALLATION
(C
ONT
.)
Installation into a Zero Clearance (Metal) Fireplace
The pellet insert can be installed into a zero clearance (metal) fireplace with a positive
connection (full reline). Make sure to follow all of the requirements listed in the section "Insert
Requirements" as well as those listed below. The steps below detail the order of installation.
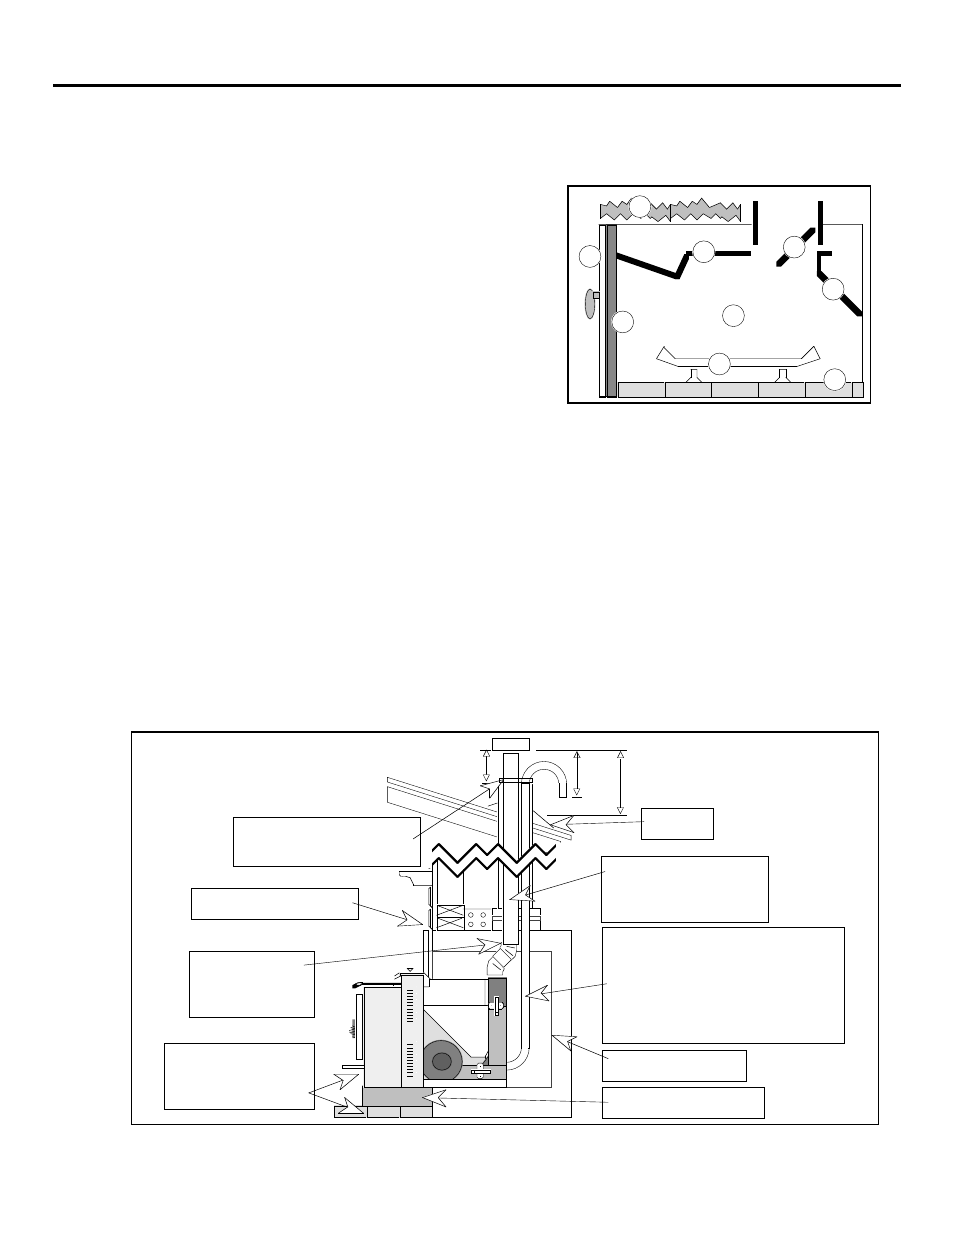
A
Clean the zero clearance fireplace and repair any
damage before proceeding. The illustration to
the right labels the various parts of a typical zero
clearance fireplace. The damper (A) and grate
(B) must be removed. The smoke shelf (C),
internal baffles (D), metal screen (E), glass
screen or doors (F) may be removed (if
applicable). The masonry lining (G), insulation
(H), and any structured rigid frame members
(metal sides, floor , door frame, face of the
fireplace, etc. Ð (I)) may not be removed.
C
B
F
I
D
E
A
G
H
B
Install the pellet vent through the existing chimney, making sure to seal all joints. A
cover plate is required at the top of the chimney and must be sealed with silicone. Take
into consideration the optional exhaust vent configurations (horizontal or vertical) when
installing the vent. Install the outside air connection (if applicable).
C
Install the optional igniter if it is being used. If the fireplace is stepped down, insert two
leveling bolts (included with the owner's pack) into the threaded nuts at the bottom rear of
the baseplate. Then adjust the bolts to the same height the fireplace is stepped down to.
If the fireplace is elevated, follow the directions for using the optional front support in the
section "Optional Equipment" or use a pair of front legs if the height is correct.
D
Place the insert into the fireplace. The outside air connection may need to be attached
before the insert is fully in place.
NOTE: Do not pick the insert up by the hopper or any other internal component.
E
Attach the pellet vent to the insert by reaching over the top or to the right of the insert.
Screw the pellet vent to the exhaust tube and seal the joint.
F
Install the panels and brass trim to complete the installation. Read the section "Operating
the Heater" prior to plugging in the insert and operating.
6"
Min.
12"
Min.
Type "L", stainless steel
single wall, or stainless
steel flexible vent
Cover plate must be sealed
air tight with silicone
Joints must be
screwed together
and sealed
If using outside air, it must be
obtained by running an outside air
duct from the top of the chimney to
the unit. NO MODIFICATION TO
THE FIREBOX OF THE Z.C.
(METAL) FIREPLACE IS ALLOWED.
Hearth and/or hearth
pad must extend at
least to the faceplate
2' Min.
Flashing
Z.C. (Metal) firebox
Optional Front Support
3/8" Space (Do not seal)