Cata ME 910 User Manual
Page 34
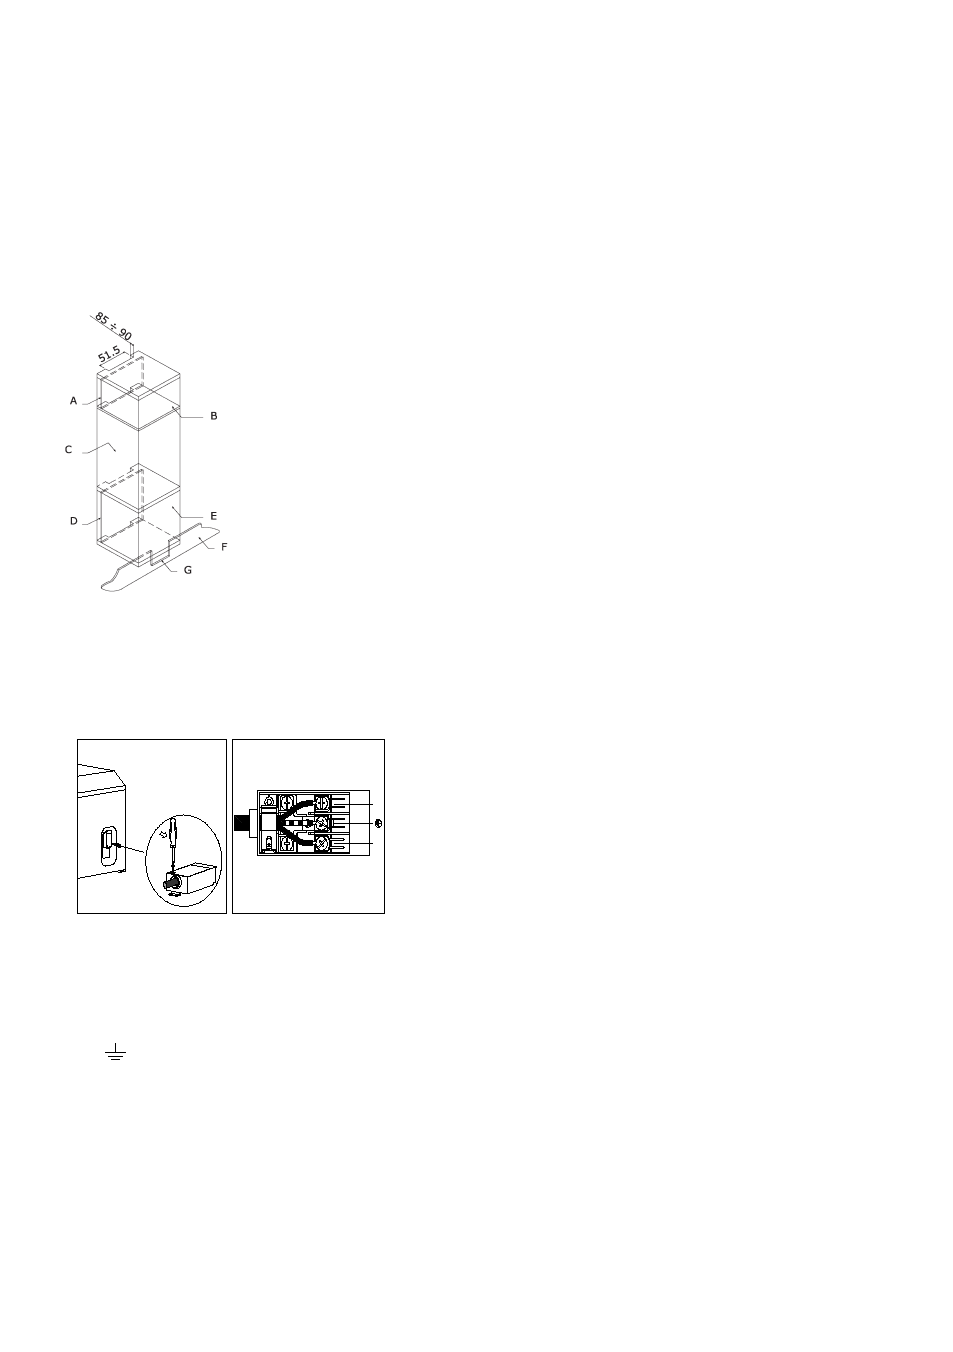
Fig. 8: Ventilation and gap requirements for the installation of a
simple electric oven in an upper cupboard.
A. Rear panel
B. Storage space
C. Remove the rear part of this section
D. Real panel
E. Storage space
F. Base
G. Minimum ventilation gap 80 cm2
ELECTRICAL CONNECTION
Those ovens equipped with a three-pole power supply cable
are designed to operate with an alternating current .The wire
for earthling the appliance is yellow-green in color.
Fitting on a Power Supply Cable
L
N
Opening the terminal board:
· Using a screwdriver ,prize the bolt on the side tabs of the
terminal board cover ;
· Unscrew the bolt, pull open the cover of the terminal board .
To install the cable, proceed as follows:
· Remove the wire clamp screw and the three contact screws
L-N -
· Fasten the wires beneath the screw heads using the fo-
llowing color scheme: Blue (N) Brown (L) Yellow-Green
· Fasten the supply cable in place with the clamp and close
the cover of the terminal board .
Connecting the supply cable to the mains
Install a standardized plug corresponding to the load indicated
on the data plate. When connecting the cable directly to the
mains, install an omni polar circuit breaker with a minimum
contact opening of 3 mm between the appliance and the mains
.The omni polar circuit breaker should be sized according to
the load and should comply with current regulations (the earth
wire should not be interrupted by the circuit breaker).
The supply cable should be positioned so that it does not re-
ach a temperature of more than 50℃with respect to the room
temperature ,anywhere along its length , or protected by insu-
lation sleeping having an appropriate rating.
Before making the connection, check that:
· The electrical safety of this appliance can only be guaran-
teed if the cooker is correctly and efficiently earthed ,in com-
pliance with regulations on electrical safety. Always ensure
that the earthling is efficient; if you have any doubts call in a
qualified technician to check the system .The manufacturer
declines all responsibility for damage resulting from a system
which has not been earthed.
· Before plugging the appliance into the mains ,check that the
specifications indicated on the date plate (on the appliance
and /or packaging )correspond to those of the electrical mains
system of your home .
· Check that the electrical capacity of the system and sockets
will support the maximum power of the appliance ,as indicated
on the data plate .If you have any doubts, call in a qualified
technician.
· If the socket and appliance plug are not compatible ,have the
socket replaced with a suitable model by a qualified techni-
cian . The latter, in particular, will also have to ensure that the
cross section of the socket cables are suitable for the power
absorbed by the appliance. The use of adapters, multiple
sockets and /or extensions, is not recommended. If their use
cannot be avoided, remember to use only single or multiple
adapters and extensions which comply with current safety re-
gulations .In these cases, never exceed the maximum current
capacity indicated on the single adapter or extension and the
maximum power indicated on the multiple adapter .The plug
and socket must be easily accessible.
MAINTENANCE
Before carrying out maintenance, disconnect the appliance
from the power supply.
During the guarantee period, if necessary all services should
be commissioned to the Manufacturer’s Technical Assistance
Service Department. Bear in mind that intervention or repair
by unauthorised personnel will invalidate this guarantee.
REPLACEMENT OF THE OVEN LIGHTBULB
(Not covered by the appliance guarantee.)
The oven has a light with the following characteristics: 15 W or
25 W, 300 ºC and type E-14
WARNING: Disconnect the appliance from the electricity
supply, remove the oven door (as described above), as well
as the oven shelves.
Remove the glass cover that protects the light bulb by turning
it anti-clockwise. Fig. 9 (A)
Unscrew the old light bulb and dispose of it safely and ecolo-
gically, change it for one as specified in the Specifications and
replace the cover.