Herrmidifier Herrtronic MD User Manual
Page 15
Herrtronic
®
MD Series
I n s t a l l a t i o n , O p e r a t i o n , & M a i n t e n a n c e M a n u a l
15
www.herrmidifier-hvac.com
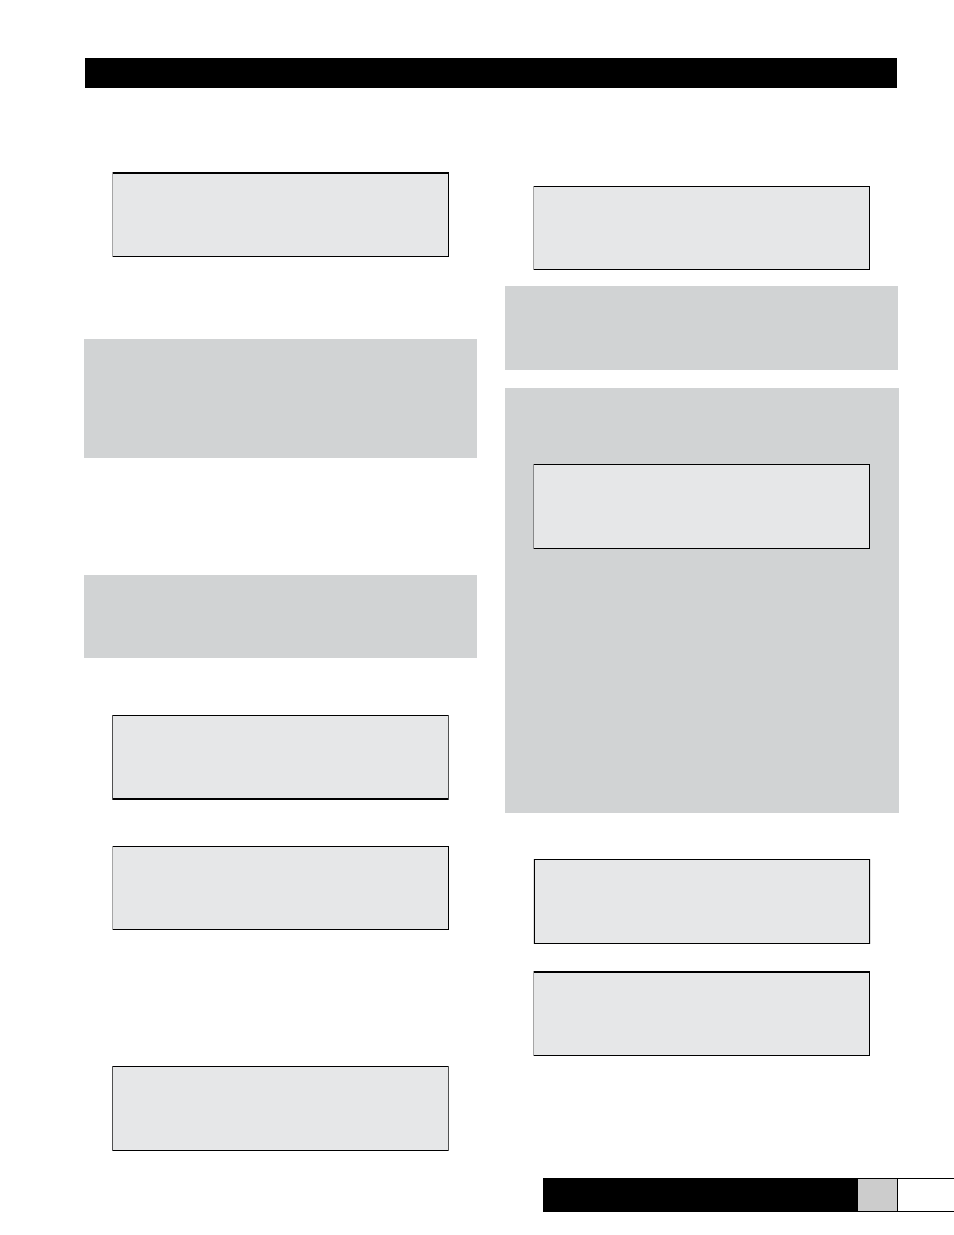
LEAVING SLAVE PRESS
BACK FOR MASTER MENU
NO REPLY ENTER TRY
AGAIN BACK TO EXIT
POLLING SLAVE PRESS
BACK FOR MASTER MENU
SYSTEM OFF 000% 3 01
MENU 5
ENTER SLAVE
NUMBER 01
10. After establishing the “password”, repeat steps 3 through 5
to program Menu 3. Press “Back” to return to MAIN MENU.
(Menu 1)
11. Press “up” arrow for Menu 5. The LCD will read:
12. Repeat steps 3 and 4 to complete Menu 5. The press “Back”
to return to the MAIN MENU (Menu 1)
NOTE!
Programming of the setpoints for the unit is now complete. If
there are multiple Herrtronic MD’s networked together OR you
are programming a MDD (110-250 lbs/hr.) unit, continue to
step 13. Otherwise proceed to STARTUP with CHECK LIST,
page 16.
Access Menu 4 for MDD Models only (2 tanks) or Networked
Units. This allows you to program the slave circuit board.
NOTE!
The address in the below screen is now 00. This allows the
‘Master” unit access to any “Slave” in the “Network.” Only one
Master unit “00” per Network can be used.
13. Press the “up” arrow for Menu 4. The LCD screen will read:
14. Press “Enter”. The LCD will read:
This screen will appear only when power has been initially ap-
plied or reapplied. Wait about (5) minutes to allow the micropro-
cessor to “Poll” the network.
15. After returning to the screen described in step 13, press
“Enter”. The LCD will read:
16. Press “up arrow” if you would like to access slave 2 and “up
arrow” again for slave 3, etc.
17. From the screen described in step 15, press “Enter” to ac-
cess Slave 01. The LCD will read:
NOTE!
On MDD units, the address of the slave unit is factory set as
01. To reprogram the Slave, repeat steps 1 through 12 de-
scribed on previous page.
NOTE!
If communications are not successful, the LCD will read:
Possible sources for failed communication attempt:
A. Chosen Slave does not exist.
B. Slave unit does not have power connected.
C. Faulty communications wiring
1. Improper polarity of RS-485 (Controls Terminal
Strip Poles 11 & 12).
2. Resistor required to signify the beginning and end
of the “Network” is not installed correctly. On indi-
vidual MDD units, these resistors are not neces-
sary. See “Installation/Networking” section for clari-
fication.
D. It is possible for high levels of Electro-Magnetic Interfer-
ence (EMI) to impede communications between units.
Press “Enter” to try communications again, or “Back” to
return to “Master” units’ Main Menu.
18. To return to “Master” unit (unit address 00) press the “up”
arrow (3) times. The LCD will read:
19. Press “Enter”. The LCD will read:
20. Press “Back” and return to “Master” unit (unit address 00)
Main Menu.
21. To program additional slaves, repeat steps 13-20. Program-
ming is complete. Proceed with START- UP section.
SYSTEM OFF 000% 3 00
MENU 4
SYSTEM OFF 000% 2 01
MENU 1
SYSTEM OFF 000% 2 01
MENU 4