MacroSystem Photo-Studio 2 User Manual
Page 18
18
19
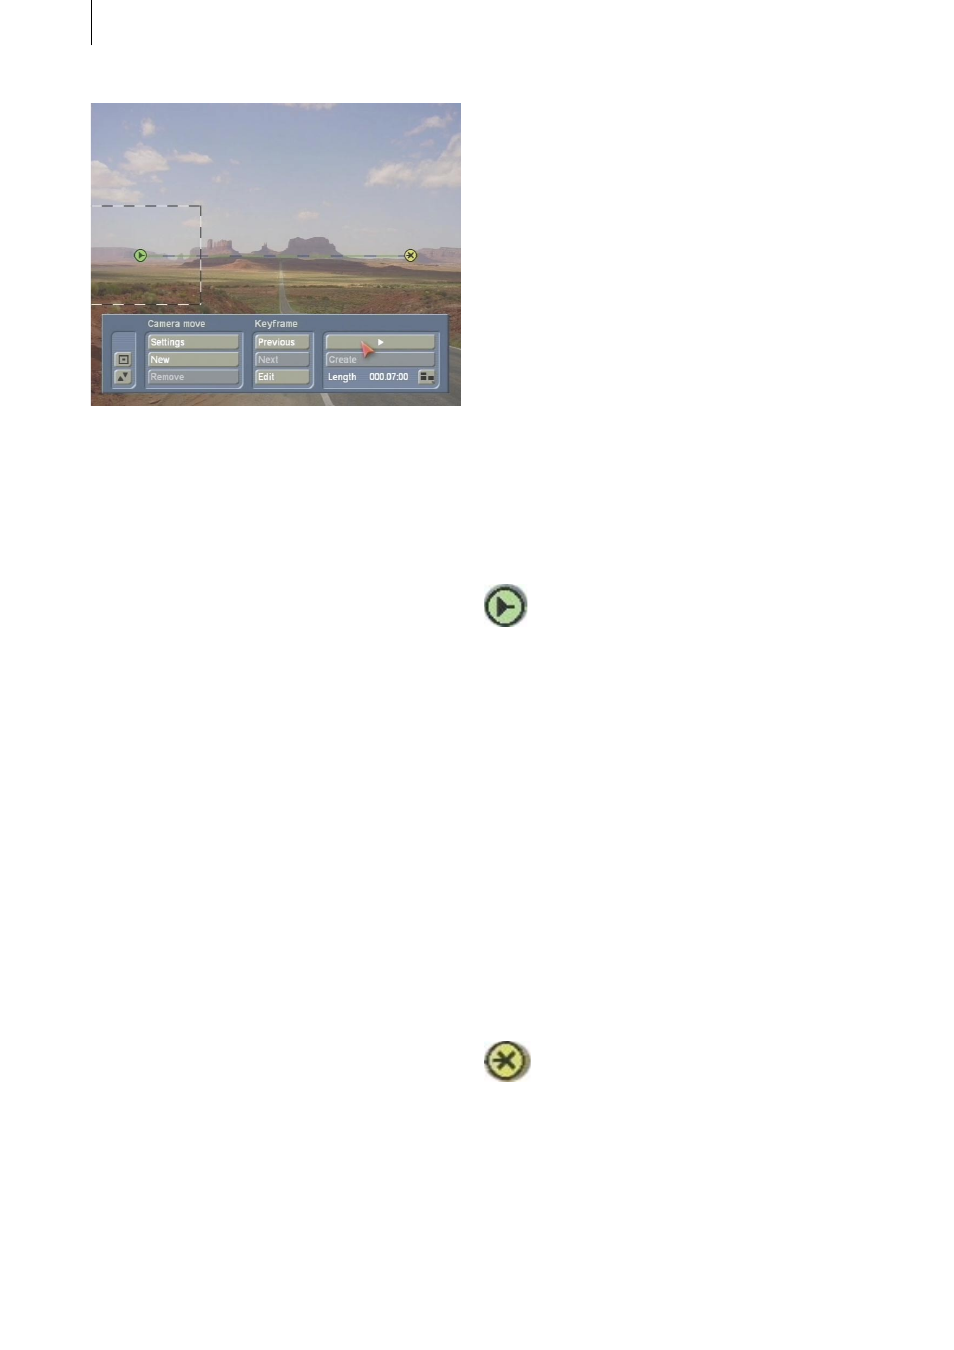
Two points have been added to the photo
indicating the starting and finishing points of
your animation.
There is a small box above the starting point
that represents the picture area shown by the
“camera” in that position later on during the
animation. If you want to change the size of the
box proportionally (the smaller it is the more
the “camera” zooms into the picture), position
the screen pointer over one of the four corners
so that a white double-headed arrow appears.
Now click on the left trackball button and roll
the trackball until you have the size that you
want. While this is happening, you will see the
zoom-in/zoom-out factor displayed at the edge
of the screen. Do not be put off by the fact that
the factor increases if you decrease the size of
the box. Since the area of the picture inside the
little box fills the screen during the animation,
the factor indicates the magnification of the box
– i.e. the smaller the box the more magnified the
contents of the box will be!
Note: Since pictures taken with a digital camera
have a higher resolution than TV images,
your photos will still retain TV quality despite
you zooming into them. However, the quality
threshold value is reached at a zoom factor of 1,
since that is equivalent to video quality. Using a
higher zoom factor will result in poorer quality.
First, lets us explain the appearances of the
points:
Yellow: normal point
Green: current point
Blue: moving point
You can activate a normal inactive (yellow) point
by clicking on it, which makes it turn green. To
move the active (green) point, you can grab it by
clicking it again (it turns blue).
As an alternative, you can grab the inactive point
using the small, left trackball button, if your
trackball is provided with four buttons.
Markers appear smaller and contain a dot.
Key points are as large as the starting and
finishing points but contain a black dot.
All points can be deleted using the small, right
trackball button (four button mode) or using the
big, right button (two button mode).
To define the path taken by the “camera” during
the animation, you must first specify the starting
point.
To do so, click using the big left trackball button
on the point shown above (arrow in a circle)
inside the little box so that the point turns blue;
then roll the trackball until the point (and the
little box) is in the position that you want. If
you click on the big left trackball button again,
the point turns green again and the little box is
in position. (Clicking on the big right trackball
button cancels the repositioning operation.)
You can of course also set the position and size
of the waypoint using the toolbar described
below (in the Keyframe, Edit section).
You will notice that an additional point (cross
in a circle) is displayed on your photo and that
it is connected to the starting point by a green
dashed line.
This point is the finishing point and the line
represents the path that the “camera” will
move along during the animation – you will be
modifying this path in just a moment.
You can also add markers to the path. Markers
are used to define the path’s course and they
enable you, for instance, to add a curve to the