Nustreams-p9m panel functions overview – Xtramus NuStreams-P9M V2.1 User Manual
Page 7
7
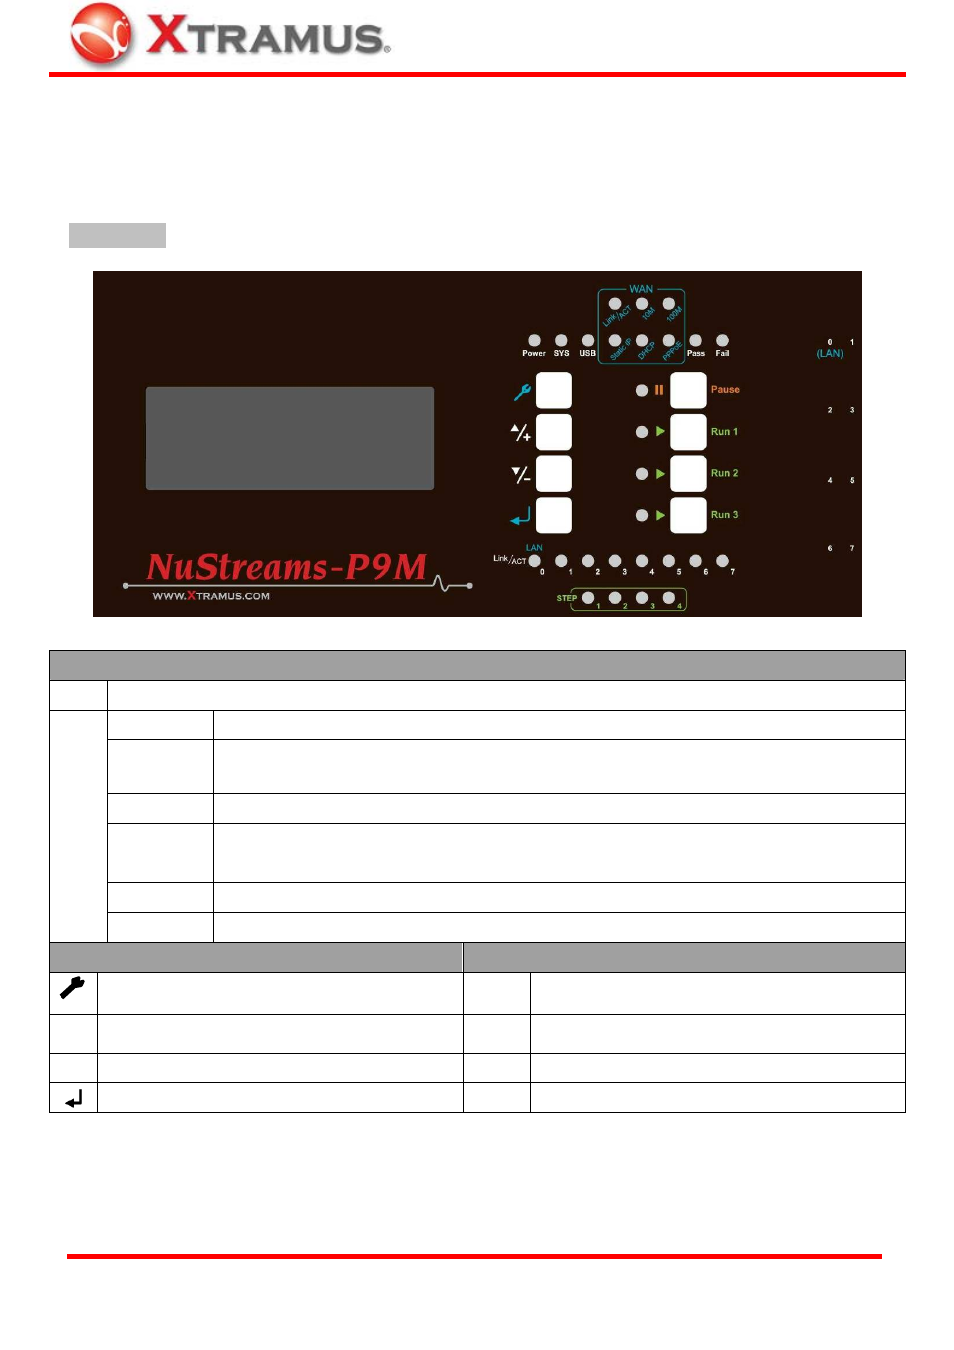
1.3. NuStreams-P9M Panel Functions Overview
NuStreams-P9M’s LEDs, buttons, and interface ports are located on its Front, Left and Right Side
Panels.
Front Panel
System Status & Testing Result Feedback Interface
LCD
4 x 20 characters LCD that display system information, status, and menu
System
¾
Power: Power ON
¾
SYS: System ready
¾
USB: USB connection status
¾
Link/Act: Connected with DUT WAN port
¾
10M: 10 Mbps connection linked
¾
100M: 100 Mbps connection linked
WAN
¾
Static IP: Using static IP as router WAN
connection
¾
DHCP: Using DHCP as router
WAN connection
Test
¾
Pass: DUT passes the test
¾
Fail: DUT does not pass the test
¾
|| Pause: Pause current running test
¾
► Run 2: Test Task of Run 2 is running
Hotkey
¾
► Run 1: Test Task of Run 1 is running
¾
► Run 3: Test Task of Run 3 is running
LAN Link/ACT
NuStreams-P9M’s LAN ports are connected to DUT’s (switch or router) LAN ports. LAN LED 0~7 will be on accordingly
LEDs
STEP
NuStreams-P9M’s testing process includes 4 steps. STEP LED 1~4 will show the testing process accordingly
Configuration Buttons (Left Side)
Operation Buttons (Right Side)
Enter main menu, return to the previous menu, or cancel the
changes you’ve made
|| Pause
Pause the test that is currently running
▲/+
Move selection cursor up or change test parameters
► Run1
Start Run 1 test. Up to 4 tasks can be configured in each Run
hotkey. Press this button and all tasks stored within will start
▼/-
Move selection cursor down or change test parameters
► Run2
2
nd
hotkey as above
Enter selected menu or apply the changes you made
► Run3
3
rd
hotkey as above
Note: For more information regarding to NuStreams-P9M’s LED status, please refer to “1.4. NuStreams-P9M LED Status”.
XTRAMUS TECHNOLOGIES
®
E-mail: [email protected]
Website: www.Xtramus.com