Step 7 embroidering – Baby Lock Palette 10 (ECS10) Instruction Manual User Manual
Page 182
181
Tutorial 9-1: Creating Split Embroidery Designs
1
When large-size embroidery designs are
transferred to the embroidery machine, the
patterns appear on the embroidery machine
display as shown below. For this example,
select the first embroidery pattern section
(Aa).
2
Attach the embroidery hoop to the embroidery
machine, and then using the machine's layout
adjusting functions, align the needle position
with the intersection of the lines drawn on the
fabric.
3
Embroider the selected pattern.
4
Remove the embroidery hoop from the
embroidery machine, and then remove the
fabric from the hoop.
5
Hoop the fabric for the next design section.
cc
"Hooping the fabric" on page 180
a
• Place the fabric and hoop on a level surface, and
then make sure that the inner ring is pressed in
well enough that the top edge of the inner ring
aligns with the top edge of the outer ring.
• If the embroidery sheet is not used, the marks on
the embroidery hoop can be used to hoop the
fabric vertically and horizontally.
However, since the center point on some
embroidery machines is off center, the
embroidery sheet should be used for best
results.
• Another way to hoop the fabric is to use sticky
stabilizer that can be hooped separately, tear
away the protective paper, then carefully align
the fabric onto the sticky surface using the
embroidery sheet as a guide.
• Tip: The sticky stabilizer should be removed
right away after the embroidery design is
finished.
• Tip: The fabric can be hooped more easily if
double-sided tape is affixed to the back of the
inner ring, which is placed on top of the fabric,
and then the fabric is clamped between the inner
ring and the outer ring.
Step 7
Embroidering
b
If there is no stitching in section Aa, select the first
section that contains stitching. Click on
[Application] button, and then click [Design
Property] to check the embroidering order.
b
When an embroidery design created in a custom
Design Page is saved or transferred to an original
card, alignment stitching (single lines of running
stitches with the color [NOT DEFINED], with a
pitch of 7.0 mm, and starting with fixed stitches
with a pitch of 0.3 mm) is added at the edges of the
design sections. (The alignment stitching appears
in the print preview and is printed in red.)
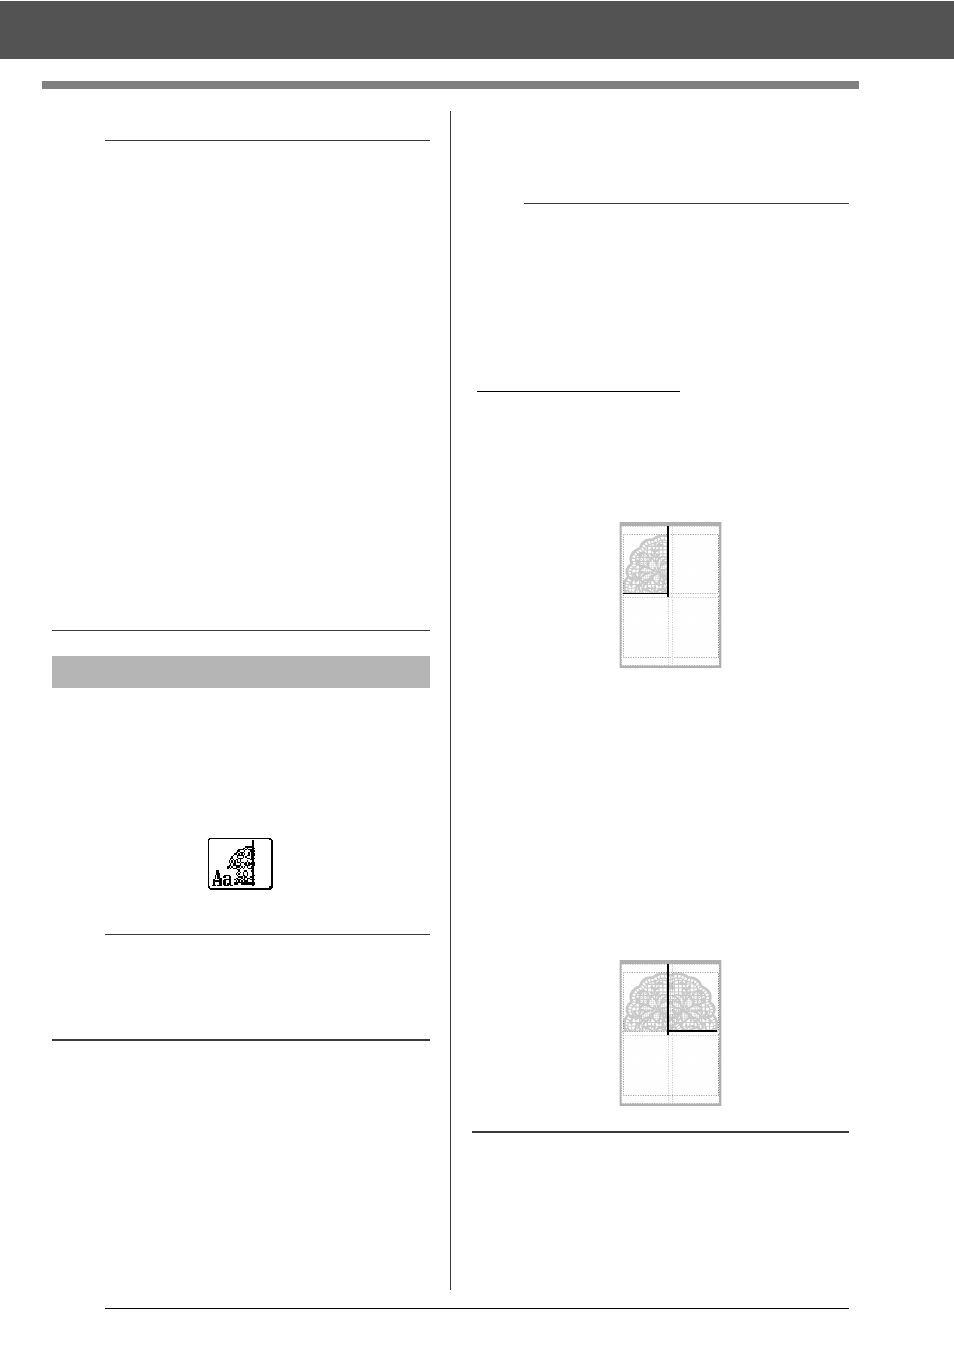
Sample data for this tutorial
1) Embroider the upper-left design section.
Alignment stitching is sewn below and on
the right side of the embroidered design
section.
2) Hoop the fabric for the upper-right design
section with the left side of the hoop aligned on
the alignment stitching on the right side of the
design section sewn in step 1, and then
embroider the design.
Before the design section is embroidered,
alignment stitching is sewn on the left
side. Make sure that this alignment
stitching aligns with the alignment
stitching sewn in step 1. After the design
section is embroidered, alignment
stitching is sewn below the design
section.