Maintenance - routine, Maintenance - fall, Bearings – Greenheck IGK (472084) User Manual
Page 17: Continued, Gas line, Gas train, Burners and orifices, Heat exchanger, Flue collector box, Electrical wiring
17
Model IGK Make-Up Air
®
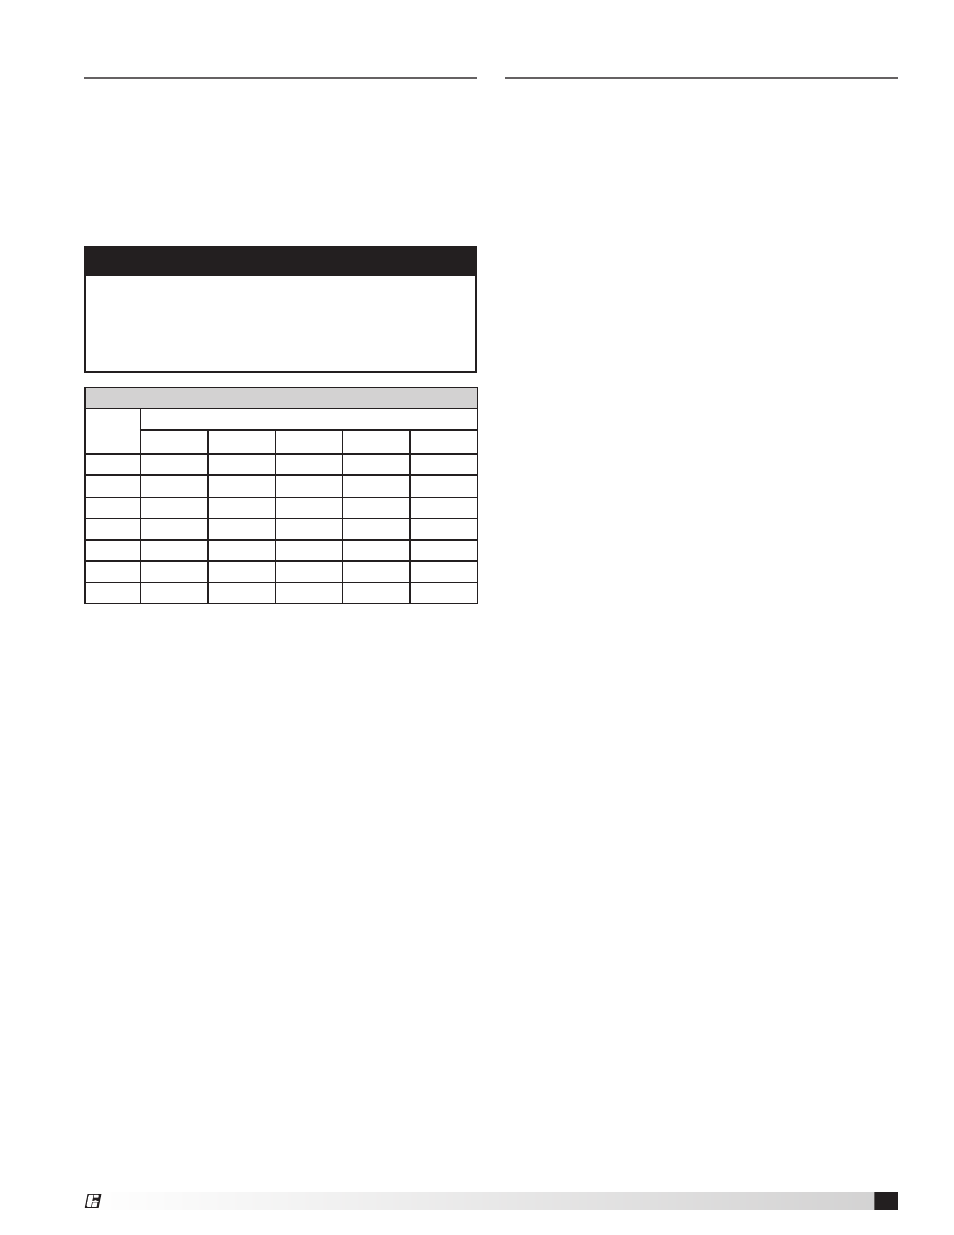
Bearings
The bearings for Greenheck fans are carefully selected
to match the maximum load and operating conditions
of the specific class, arrangement and fan size. The
instructions provided in this manual and those provided
by the bearing manufacturer will minimize any bearing
problems.
IMPORTANT
Lubricate bearings prior to periods of extended
shutdowns or storage and rotate shaft monthly to
aid in corrosion prevention. If the fan is stored more
than three months, purge the bearings with new
grease prior to start-up.
Recommended Bearing Lubrication Schedule (in Months*)
Fan
RPM
Bearing Bore Size (inches)
1
⁄
2
- 1
1
1
⁄
8
- 1
1
⁄
2
1
5
⁄
8
- 1
7
⁄
8
1
15
⁄
16
- 2
3
⁄
16
2
7
⁄
16
- 3
250
6
6
6
6
6
500
6
6
6
5
4
750
6
5
4
3
3
1000
5
3
2
1
1
1250
5
3
2
1
1
1500
5
2
1
1
0.5
2000
5
1
1
0.5
0.25
*Suggested initial greasing interval is based on 12 hour per
day operation and 150°F maximum housing temperature.
For continuous (24 hour) operation, decrease greasing
interval by 50%
• If extended grease lines are present, relubricate while in
operation, only without endangering personnel.
• For ball bearings (operating) relubricate until clean grease
is seen purging at the seals. Be sure not to unseat the seal
by over lubricating.
• For ball bearings (idle) add 1-2 shots of grease up to 2
inch bore size, and 4-5 shots above 2 inch bore sizes with
a hand grease gun.
• For roller bearings add 4 shots of grease up to 2 inch bore
size, and 8 shots for 2-5 inch bore size with a hand grease
gun.
• Adjust relubrication frequency based on condition of
purged grease.
• A high quality lithium based grease conforming to NLGI
Grade 2 consistency, such as those listed here:
Mobil 532
Mobilux #2
Texaco Multifak #2
Texaco Premium #2
B Shell Alavania #2
Exxon Unirex #2
Maintenance - Routine
continued
Maintenance - Fall
Gas Line
Remove the drip leg and clean any liquid or debris
that may have accumulated. Once the drip leg is
cleaned, reattach it.
Gas Train
Gas connections, joints and valves should be inspected
for tightness. Apply a soap and water solution to all
piping; watch for bubbling which indicates a leak. Other
leak testing methods can be used.
Burners and Orifices
Before each heating season, examine the burners and
gas orifices to make sure they are clear of any debris
such as spider webs, etc. Clean burner as follows:
• Turn off both electrical and gas supplies to the unit.
• Disconnect union between manifold and gas valve.
• Remove manifold and burner assembly.
• Inspect and clean orifices and burners as necessary.
Avoid using any hard or sharp instruments which
could cause damage to the orifices or burners.
- Remove any soot deposits from the burner with a
wire brush.
- Clean the ports with an aerosol degreaser or
compressed air.
- Wipe the inside of the burner clean. Cleaning the
burner with a degreaser will slow the future build-
up of dirt.
• Before reinstalling the burner assembly, make sure
the heat exchanger tubes are clear of any debris.
• Reinstall manifold and burner assembly, reconnect
wire leads and gas supply piping.
• Turn on the electrical power and gas supply.
• Follow the start-up procedure to light the burners
and verify proper operation.
Heat Exchanger
The heat exchanger should be checked annually for
cracks. If a crack is detected, the heat exchanger
should be replaced before the unit is put back into
operation. Airflow across the heat exchanger should be
checked to make sure the blower is operating properly.
Flue Collector Box
The flue passage and collector box should be
checked prior to each heating season and cleared of
any debris.
Electrical Wiring
The electrical wiring should be checked annually for
loose connections or deterioration.
Replacement Parts
When ordering replacement parts, include the unit
model and serial number listed on the nameplate.