LSC Lighting EKO User Manual
Page 6
EKO Quick Reference
EKO Dimmer System
Operator Manual V2.3
Page 2
LSC Lighting Systems (Aust) Pty. Ltd
Press [1:1 Patch] then type in the DMX start slot
number (0 to 512) for dimmer channel 1 in this
EKO
frame, then press;
[Patch Series] [Save Patch] [Done] [Done].
The “User Patch” allows you to individually patch
each EKO dimmer channel to a DMX slot of your
choice. Press [User Patch]. To select a channel,
press that channel number then press [Patch].
Type in the DMX slot number (0 to 512) for the
selected channel then press [Patch @ Slot].
When all patches have been made, press;
[Done] [Save Patch] [Done] [Done].
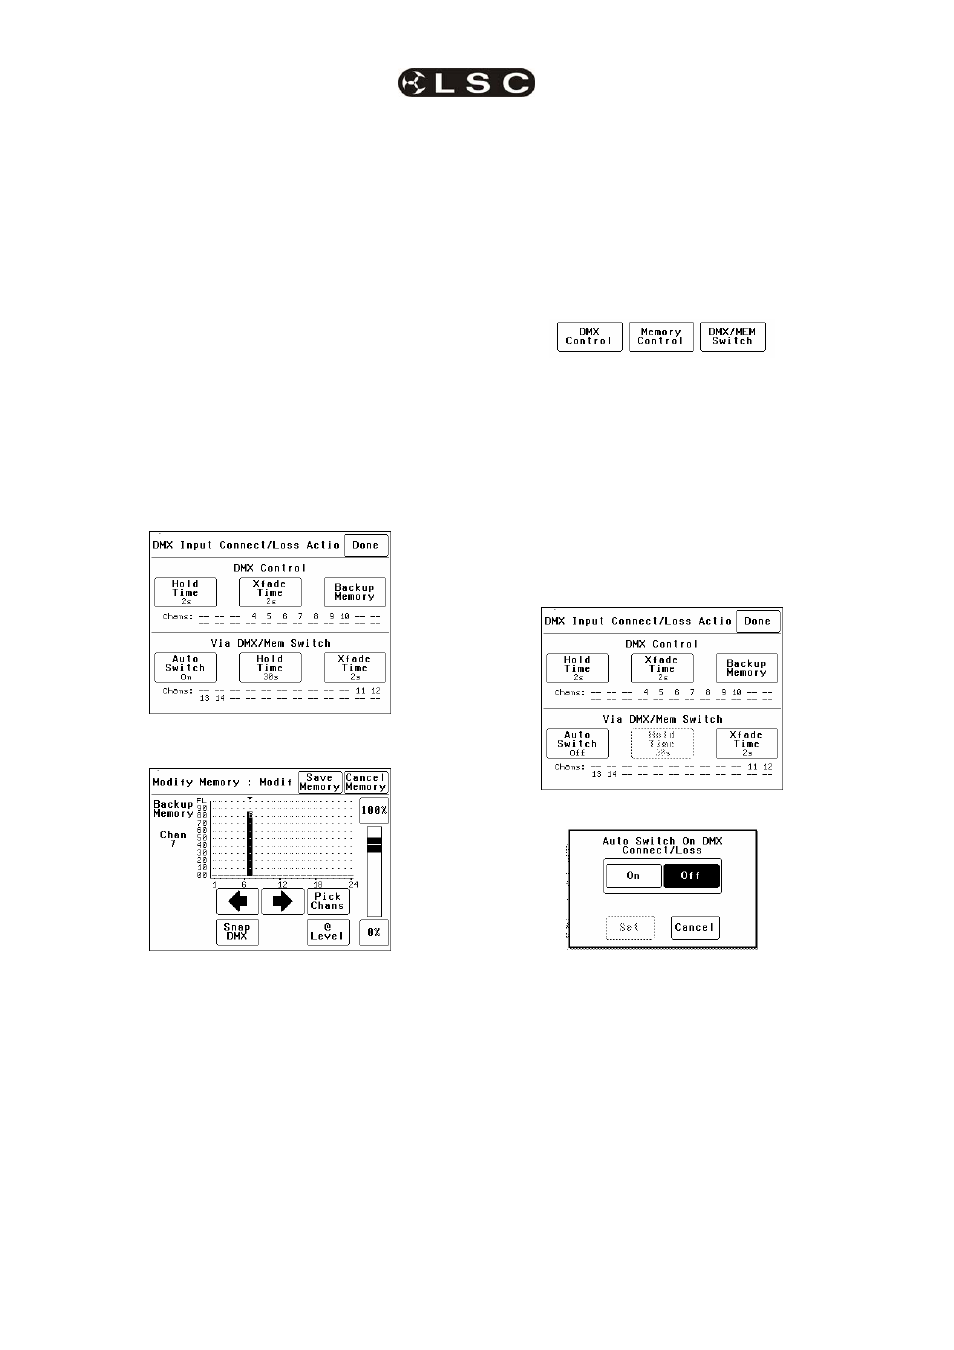
1.1.3.2 DMX BACKUP MEMORY
To create or edit the DMX “Backup Memory”,
press; [Menu] [DMX Input] [Connect Loss
Action
].
Set the [Hold Time] to any time other than
“Infinite” then press [Set].
To replace the current EKO output with the
Backup Memory press; [Backup Memory].
The Backup memory screen appears;
You can either create your own memory using the
controls on the screen or press [Snap DMX] to
take a copy of the current DMX input signal.
When a channel(s) is selected (indicated by a
small triangle (b) above the channel) it can be
faded up or down by sliding your finger over the
virtual fader or instantly set to off or full using the
[0%] or [100%] buttons.
When the channel levels are correct, press;
[Save Memory].
Normal output is restored.
1.1.4 SWITCH Control
All channels set to “DMX/MEM SWITCH” can be
switched between Memory or DMX control. The
“switch” can be operated from either the LCD
touch screen
or from a suitably programmed
ePlate
.
To set a dimmer channel to “SWITCH” control,
press; [Menu] [Dimmer Channels] [Setup].
The screen shows the “Control Source” for each
dimmer channel.
To change the “Control Source” of a dimmer
channel(s), highlight the required dimmer
channel(s) by touching them, then press;
[Control Source]. The three choices for dimmer
channel control source are;
Press [DMX/MEM Switch].
Press; [Save Setup] [Done] [Done].
To operate the switch use either a suitably
programmed ePlate button or from the LCD touch
screen press: [Menu], [Net Setup] [DMX/MEM
Switch
]. Select either; [DMX] or [Memory] then
press [Set].
1.1.5 AUTO Switch
To configure the “Switch” (above) to
automatically
switch to DMX whenever a valid
DMX signal is connected to the EKO press;
[Menu] [DMX Input] [Connect Loss Action].
Press; [Auto Switch]
Press; [On] [Set] [Done] [Done] [Done].
1.1.6 TOUCH SCREEN Control
EKO dimmer channels can also be controlled from
the EKO’s front panel LCD touch screen. This
method of control is primarily used for testing
dimmer circuits.
To test a dimmer channel(s) press;
[Menu] [Dimmer Channels] [Chan Test]. Select a
channel(s) then fade the channel(s) up or down
with the virtual fader on the LCD screen or
instantly set them to off or full using the [0%] or
[100%] buttons
Channel test only allows one level to be set for all
selected channels. To set individual channels
levels use the “DMX Backup Memory” above.