Remote control unit, 4 – names and functions of parts – Teac MD-CD1MKIII User Manual
Page 19
TASCAM MD-CD1MKIII
19
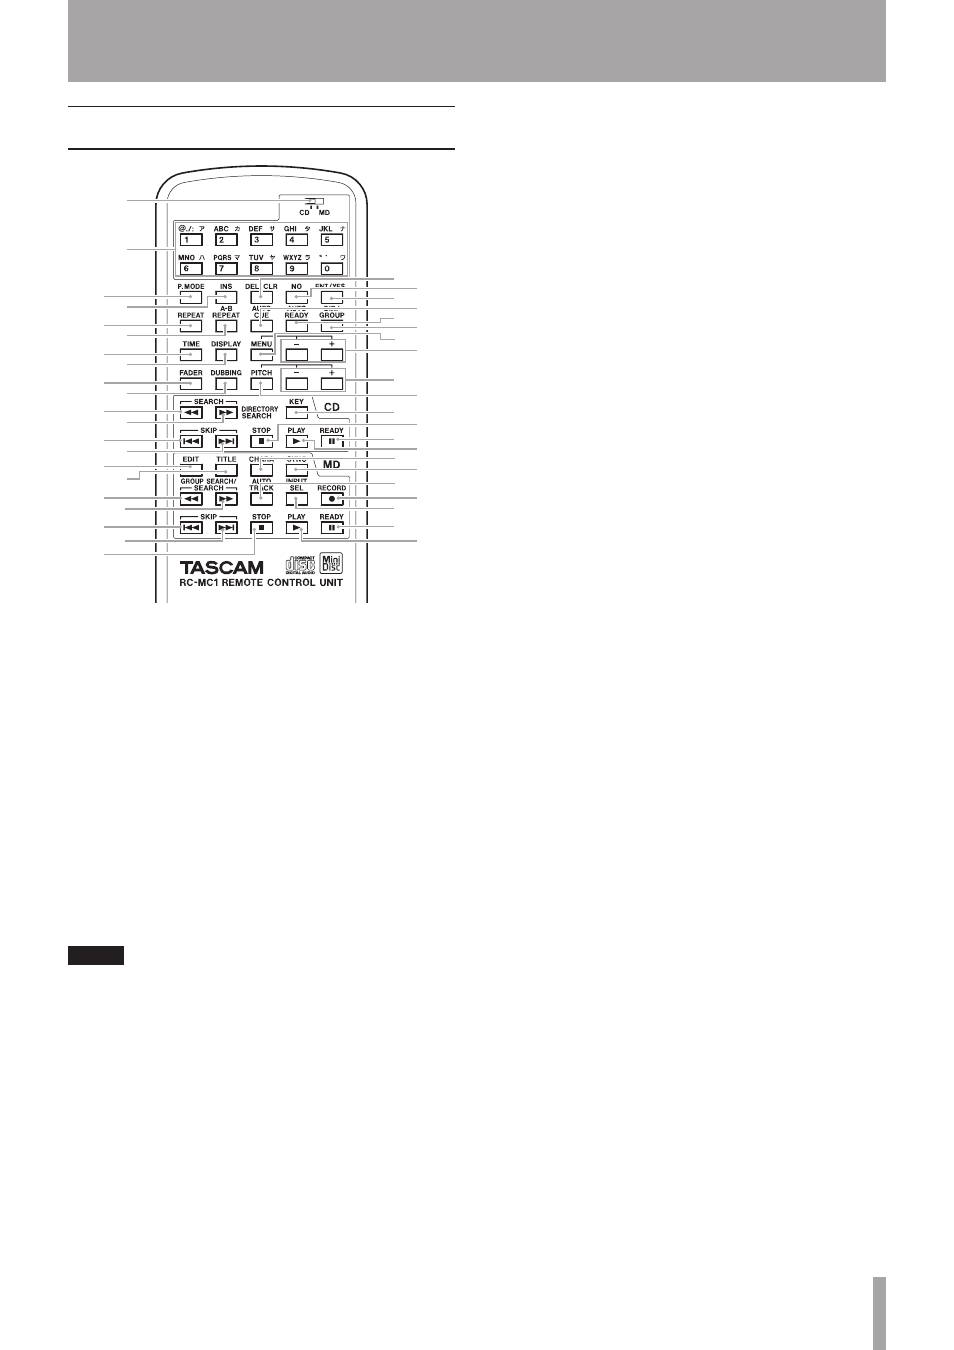
Remote Control Unit
1
2
3
4
6
7
8
9
0
q
5
e
w
r
t
y
u
i
o
p
n
l
;
z
x
c
v
m
,
.
/
b
j
a
s
d
f
g
h
@
k
!
Shared operation buttons
ª
CD/MD selector 1 is used to select CD or MD deck
operation, while buttons 2 and beyond are shared
operation buttons. 3 and subsequent buttons control
the deck selected usign CD/MD selector 1 as the
“remote control master”.
1
CD/MD selector
Selects the remote control master. Refer to “Display
master and remote master settings” on page 27.
2
Number buttons (0 – 9)
These are used to select track numbers and for time
search. During MD Title Input mode, they can be
used to input letters, codes, numbers and Japanese
characters. Characters that can be input are indicated
above the buttons.
NOTE
Track number selection and time search can only be
•
performed for the display master deck. These functions
cannot be operated for the deck selected as the remote
control master.
While these buttons can also be used for character
•
input during title input operation, in this manual they
are referred to as “Number buttons.”
3
P. MODE button
This selects the playback mode. During selection,
the playback mode is indicated on the display in the
following manner.
Continuous playback (in disc order): no indication
Single playback: SINGLE lights up
Program playback: PROGRAM lights up
Random playback: RANDOM lights up
For the modes apart from continuous playback,
refer to “Single-track playback” on page 30, “Program
playback” on page 30 and “Random playback” on page
31.
Even when the power is turned off, the playback mode
setting is retained.
4
INS button
During MD Title Input mode, this button inserts a
space at the cursor position.
5
DEL/CLR button
During track number input, the track number is
cleared when this button is pressed.
During program input, the selected program number
track is deleted.
During title input, the character at the cursor position
is deleted.
6
NO button
This operates the same way as the NO button on the
unit.
7
ENT/YES button
This operates the same way as the YES and ENTER
buttons on the unit.
8
REPEAT button
This turns the Repeat Mode on and off. When it is on,
REPEAT
lights up in the display. Refer to “Repeat
playback” on page 29. Even when the power is turned
off, the Repeat Mode setting is retained.
9
A-B REPEAT key
This turns the A-B Repeat Mode on and off, and is used
to set the section for repeat playback. Refer to “A to B
repeat playback” on page 29.
0
AUTO CUE button
This turns the Auto Cue Mode on and off. When it is
on,
A.CUE
lights up in the display. Refer to “Auto cue”
on page 28. Even when the power is turned off, the
Auto Cue Mode setting is retained.
q
AUTO READY button
This turns the Auto Ready Mode on and off. When it is
on,
A.READY
lights up in the display. Refer to “Auto
ready (of a specified track)” on page 28. Even when the
power is turned off, the Auto Ready Mode setting is
retained.
w
DIR/GROUP button
When this button is pressed during stop, it turns on or
off the data CD directory playback mode (when the CD
deck is the remote control master) or the MD group
playback mode (when the MD deck is the remote
control master). Refer to “MP3 and WAV file directory
playback” on page 33, and “MD group playback” on
page 34.
e
TIME button
This operates in the same way as the TIME button on
the unit.
4 – Names and Functions of Parts