3 loading media – Microcom 322M User Manual
Page 20
Getting Started
Chapter 3
16
322M Operator’s Manual
3.2.1
Printer Power
Microcom Corporation offers a universal power adapter as an option for the Model 322M.
Any power adapter that conforms to the necessary specifications, listed below, may be
used. The printer requires a universal +24VDC power supply that operates in the 100-240
VAC; 50-
60 Hertz range; 2 Amps. The power adapter should operate in an “output foldback
mode” during an overload situation rather than a shutdown and restart attempt; sometimes
referred to as a “Hiccup” mode. Contact your Microcom Corporation representative for any
questions regarding power adapter requirements and/or specifications.
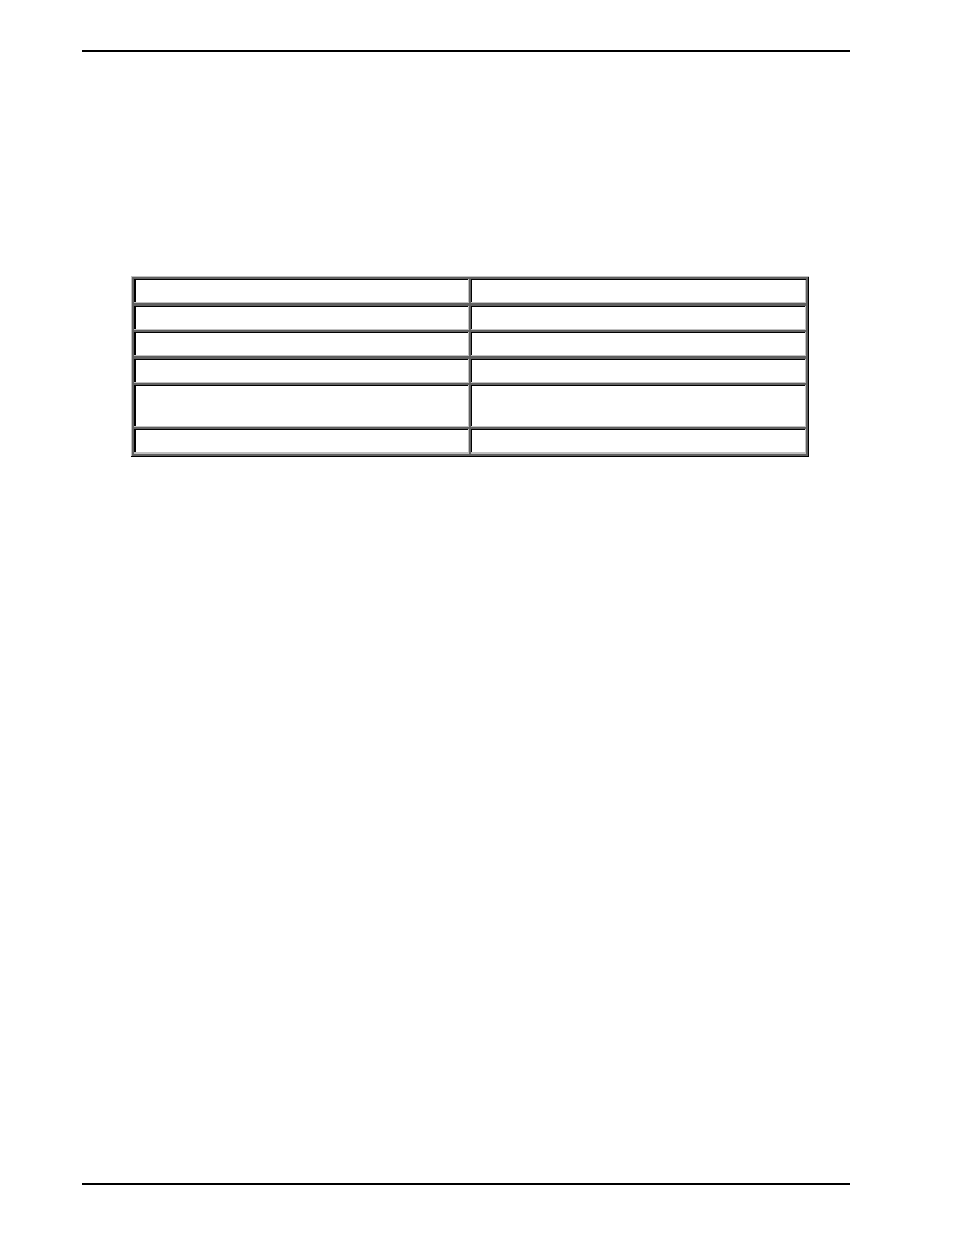
AC Input:
100-240 VAC, 50/60HZ, 2A
DC Output:
+24V @ 0.2 ~4.16A +/- 5%
Power Rating:
45 to 60 Watts
Overload Protection:
Output Voltage Foldback Mode
Maximum Transient Load:
12 cycles @ 2.1ms rep. rate;
35A, 650µs pulse
Printer Power Connector:
Standard 2.5mm Barrel Jack
Table 4
Power Adapter Specifications
Note: Verify that the power adapter jack is plugged into the printer before
plugging the power cord into an electrical outlet.
3.2.2
RS232 Serial Communication Interface
The 322M
can be interfaced to PC’s, mini-computers, main frames, and special purpose
machines. This printer offers a standard serial RS-232D port. The factory serial port
configuration is set to 9600 bits per second, no parity, 8 data bits, and 1 stop bit with both
hardware and software flow control hand-shaking enabled. Refer to Chapter 4 for additional
information.
3.2.3
Optional Cutter Interface
The 322M also provides a connector on the rear panel for the optional cutter interface. Use
this connector (see Figure 4) when a cutter is installed on the printer. To prevent damage to
the printer and/or cutter, connect the cutter when the printer power is off.
3.3
Loading Media
The easy to release printhead makes loading media into the Model 322M printer an easy
process. Follow the instructions below to properly load the media.
1. Feed the media into the paper path (see Figure 4), located on the back of the printer,
until you feel resistance.
2. Push and hold the Print Button to feed the media through the printer.
3. Once the media exits the front of the printer, release the button.