LSC Lighting e24V3 User Manual
Page 28
MENU SYSTEM
e24V3 Dimming System
Operator Manual V3.0
Page 24
LSC Lighting Systems (Aust) Pty. Ltd
not in a memory, its current level (if any) will not
be affected when that memory is recalled.
Note: This is a very important concept. It is
fully explained in section 8, ePlates and LSC
Net
You can see which channels are included in a
memory by the grid marks above the channels.
In the example above, channels 2, 5, 7, 10, 11,
12, 17 and 22 are included. Note that channel
10 is included but has a level of 0%.
Channels 1, 3, 4, 6, 8, 9, 11, 14, 15, 16, 18, 19,
20, 21, 23 and 24 are not included in this
memory.
If you have included a channel (by giving it a
level) and then decide to remove it from the
memory then you must select the channel and
press [No Level].
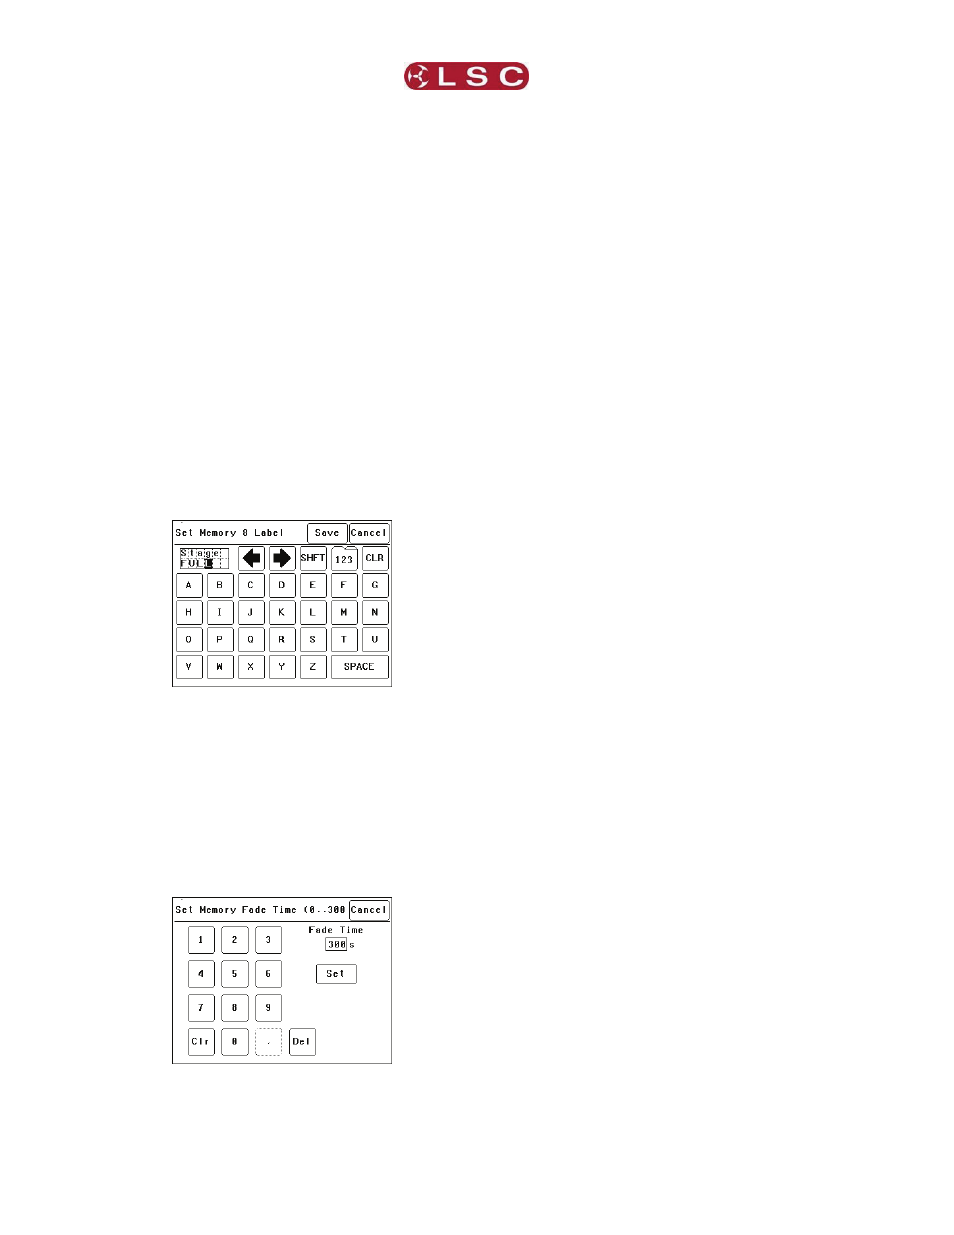
6.4.2.1 MEMORY LABELS
The default label for each memory is its number.
For example, “Memory 8”.
You can enter your own label by pressing
[Label].
Pressing [CLR] clears the current label. Press
[§] or [¨] to move the flashing cursor then
select the letters or press [123] to select
numbers. Press [Shift] for uppercase letters or
symbols instead of numbers.
When finished press [Save].
6.4.2.2 FADE TIME
The default Fade time for each memory is 1
second.
You can set your own fade time by pressing
[Fade Time].
A memory may have a fade time in the range 0
to 300 seconds (5 minutes). A time of less than
10 seconds may in the range 0.0 to 9.9 seconds.
From 10s the time is in increments of 1second.
When the fade time is correct press [Set].
Note: An ePlate button can be programmed
to replay a memory using the time saved in
the memory or the button can have its own
specific fade time. In this case the memories
fade time will be ignored.
To save the memory press;
[Save Memory] [Exit].
The original dimmer output is restored.
6.4.3 Edit Memory
To edit a memory press:
Press: [Menu], [Memories] [Edit Memory].
The current output of the e24V3 (if any) is
blacked out.
Select the memory to be edited. As each
memory is selected its contents are shown on
the output of the e24V3 and also on the channel
indicators. This allows you to preview the
contents of each memory on the output.
To confirm you selection press [Pick].
Editing a memory is the same as recording a
memory.
See section 6.4.1 Recording Memories for
details.
6.4.4 Copy Memory
To copy a memory press:
Press: [Menu], [Memories] [Copy Memory].
The current output of the e24V3 dimmer (if any)
is blacked out.
Select a “source” memory to be copied. As each
memory is selected its contents are shown on
the output of the e24V3 and also on the channel
indicators. This allows you to preview the
contents of each memory on the output and
make the correct choice.
When the correct source memory is selected
press [Pick].
Select a “destination” memory number then
press [Pick].
You can copy more memories or if finished
press [Exit], [Done] [Done].
6.4.5 Delete Memory
To delete a memory press:
Press: [Menu], [Memories] [Delete Memory].
The current output of the e24V3 dimmer (if any)
is blacked out.
Select a memory to be deleted. As each
memory is selected its contents are shown on
the output of the e24V3 and also on the channel
indicators. This allows you to preview the
contents of each memory on the output and
make the correct choice.
When the correct memory to be deleted is
selected, press [Pick]. To confirm, press [Yes].
You can delete more memories or if finished
press [Exit], [Done] [Done].
6.5 Net Setup Menu
The “Net Setup” menu is used to control the
manual operation of the DMX/MEM Switch.
Press; [Menu], [Net Setup].