Adjusting input gain (gain), Changing the input gain (gain), 5 - 3 adding reverb to inputs (reverb) – Tascam Portacapture X6 32-Bit 6-Channel Multitrack Field Recorder User Manual
Page 22: 5 - 4 setting the phantom power voltage, 5 - input and output settings
22
TASCAM Portacapture X6
5 - Input and output settings
Adjusting input gain (GAIN)
Slide the GAIN fader to adjust the input level.
o
While watching the level meter, adjust the GAIN so that the level
averages around −12 dB and the PEAK indicator does not light.
o
The recording sound might distort when the PEAK indicator lights.
NOTE
If the input level exceeds –2 dB, the PEAK indicator on the unit will
light.
NOTE
o
If an overload occurs with an analog circuit, the entire level meter will
become red.
Since this could cause the recorded audio to become distorted, make
the following adjustments.
• Change the INPUT GAIN to LOW.
• Distance the mic from the sound source.
• Lower the volume of the sound source.
o
After tapping the GAIN, the wheel can be turned to adjust it precise-
ly.
Changing the input gain (GAIN)
The two INPUT GAIN options are LOW and HIGH.
Tap the INPUT GAIN LOW/HIGH button to switch to the other option.
NOTE
o
Adjust the INPUT GAIN using the LOW setting first. If the gain is insuf-
ficient, switch to HIGH and adjust the gain.
o
The INPUT GAIN switches of stereo-linked inputs are also linked.
o
The INPUT GAIN switches of inputs 1–2 stay linked even when the
inputs are not stereo-linked.
5 - 3 Adding reverb to inputs (REVERB)
Set this with the GENERAL SETTINGS screen > I/O SETTINGS page >
REVERB item.
When this is on, reverb will be applied to the selected tracks (1/2, 3/4,
MIX).
NOTE
Reverb cannot be used if the sampling frequency setting is 96 kHz.
TYPE
This sets the type of reverb.
TYPE
Effect
LARGE HALL
(default)
This reverb is modeled on a large hall space.
SMALL HALL
This reverb is modeled on a small hall space.
ROOM
This reverb is modeled on a small indoor space.
STUDIO
This reverb is modeled on a studio-like space.
PLATE1
This emulates a plate reverb with a large plate.
PLATE2
This emulates a plate reverb with a small plate.
SOURCE
Use this to select the tracks affected by the reverb.
When MIX is selected, reverb is applied to the mixer output.
LEVEL
This sets the reverb level.
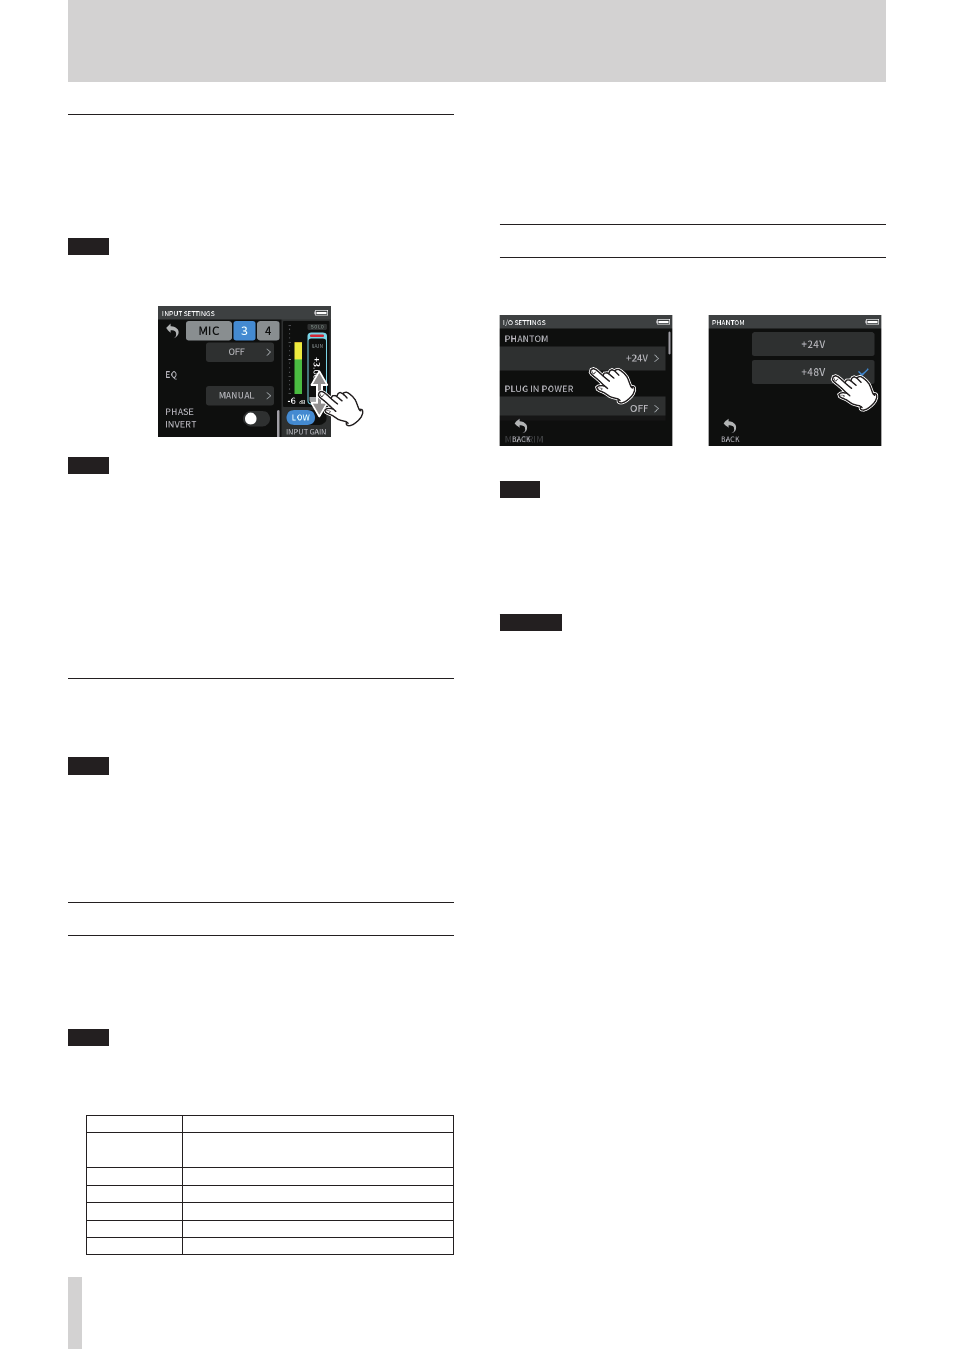
5 - 4 Setting the phantom power voltage
Set the phantom power voltage with the GENERAL SETTINGS screen > I/
O SETTINGS page > PHANTOM voltage item.
e
Tap the PHANTOM voltage item
Tap the desired voltage.
NOTE
o
Turn phantom power output on/off on the INPUT SETTINGS screen.
(page 20)
o
The default value is 48V.
o
Battery power will be consumed faster when set to 48V than when
set to 24V.
CAUTION
o
Do not connect or disconnect mics with the MIC/EXT IN jacks when
phantom power is on. Doing so could cause a loud noise and might
damage this unit and connected equipment.
o
Turn phantom power on only when using a condenser microphone
that requires phantom power. Turning phantom power on when a
dynamic mic or other external device, for example, that does not
require it is connected could damage this unit and the connected
equipment.
o
When using condenser mics that require phantom power and
dynamic mics together, be sure to use balanced dynamic mics.
Unbalanced dynamic mics cannot be used when phantom power is
enabled.
o
Supplying phantom power to some ribbon mics could break them. If
you are unsure, do not supply phantom power to a ribbon mic.
o
Some condenser microphones will not operate when phantom pow-
er is set to +24V.
o
Battery operation time will change according to the mics being used.
For details, refer to the operation manual of the mic, for example.
o
When using phantom power while running on batteries, the oper-
ation time might be reduced greatly depending on the mics being
used. We recommend using a TASCAM PS-P520U AC adapter (sold
separately).
Furthermore, when using an adapter that does not meet the recom-
mended specifications, supplying phantom power to multiple inputs
could cause the power to turn off automatically.
o
Do not connect or disconnect the AC adapter when using phantom
power. The unit could turn off even when batteries are installed,
resulting in recorded data becoming damaged or lost.
o
When using USB bus power, the unit might not be able to supply
phantom power depending on the computer. In this case, set the
unit to use battery power.