2 - names and functions of parts, 2 - 1 front, 2 - 2 bottom – Tascam Portacapture X6 32-Bit 6-Channel Multitrack Field Recorder User Manual
Page 7: 2 - 1 front 2 - 2 bottom
TASCAM Portacapture X6
7
2 - Names and functions of parts
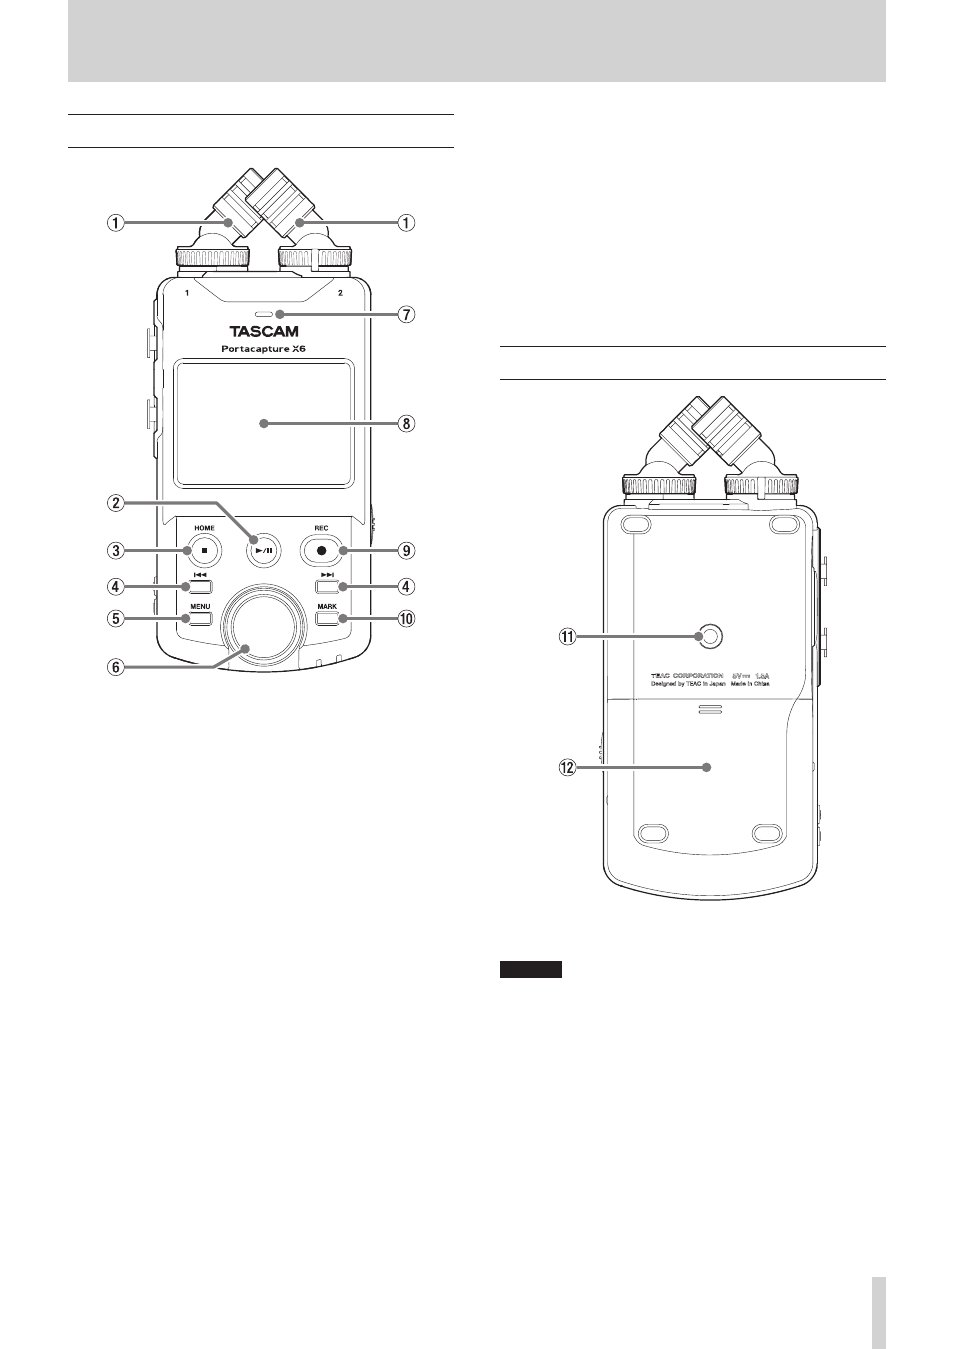
2 - 1 Front
1
Built-in mics (Input 1/2)
This is a stereo pair of electret condenser mics. They can be switched
between X-Y and A-B recording formats. (page 17)
2
y
/
9
button
Press when stopped to start playback.
Press during playback to pause.
Press when a file is selected on the Browse Screen to play that file.
3
HOME [
8
] button
Press during playback to stop playback and set the playback position
to the beginning of that file.
Press this when recording or paused to stop recording and return to
the HOME screen.
When the GENERAL SETTINGS screen is open, press this to return to
the LAUNCHER screen.
4
.
/
/
buttons
5
MENU (shortcuts) button
When stopped, this opens the Shortcut Menu on the Home Screen.
6
Wheel
Use this make fine adjustments to mixer fader and input level set-
tings.
7
Built-in speaker (mono)
Use this built-in speaker to listen to recordings.
Sound will not be output from the speaker in the following condi-
tions.
o
GENERAL SETTINGS screen > I/O SETTINGS page > SPEAKER item
set to OFF
o
When not playing back
o
When headphones are connected
o
When punching in/out
8
Touchscreen
This shows a variety of information.
Tap it and swipe it to make settings and operate the unit. (page 9)
9
REC [
0
] button
Press when stopped to start recording.
Press when recording to put the unit in recording standby.
The function changes according to the RECORDING GUIDE and REC
PAUSE settings. See “Recording operation flow” on page 24 for
details.
0
MARK button
Press when recording or playing back to add marks manually.
2 - 2 Bottom
q
Tripod mounting threads (1/4-inch)
Use to attach this unit to a tripod.
CAUTION
o
Ensure the tripod or mic stand screw is securely fastened to prevent
the unit from falling.
o
When attaching this unit to a tripod or mic stand, be sure to place it
on a level surface.
o
Some tripods have different screw specifications that make direct
connection impossible. Use a commercially-available adapter with
such tripods.
o
Screws that are longer than 4.5 mm cannot be used for attachment.
w
Battery compartment (AA batteries)
Install four AA batteries in this compartment to power the unit.