Pokyny pro sestavení vas, Eho bazénu, Výbe – Swim'n Play International Concord Oval User Manual
Page 7: R stanovis, Iii kontrola dílu, Preparing the ground, La préparation du terrain, Nl cz, Gb f
U bent zojuist de gelukkige bezitter ge-
worden van een Swim’n Play zwembad
tot het grootste genoegen van uw gezin.
Uw zwembad, dat ontworpen is door ex-
perts, voldoet aan alle vereisten op het
gebied van kwaliteit en veiligheid en zal
u weldra veel plezier verschaffen. U hoeft
het alleen nog maar te installeren. Lees,
voordat u begint, eerst de montagehan-
dleiding zorgvulding door.
KEUZE VAN DE PLEK
De juiste plaatsing van het zwembad is een
bepalende factor voor een goed gebruik na-
derhand.
Het is absoluut noodzakelijk een vlak terrein
te kiezen.
Het bad moet namelijk volledig waterpas
staan.
Plaats het bad uit de buurt van bomen om te
voorkomen dat het vol met bladeren komt.
Zorg er voor dat er een elektrische voeding
en een watertoevoer in de buurt is.
Voor de veiligheid van de kinderen, raden wij
aan het zwembad niet vlakbij een toegankeli-
jke overhang te installeren.
Tenslotte, wordt ten strengste afgeraden het
zwembad te monteren als er veel wind staat.
HET CONTROLEREN VAN DE
DOZEN EN DE ONDERDELEN:
Controleer zorgvuldig in elke doos of u alle
onderdelen heeft (zie complete lijst op blz.
2):
Doe hetzelfde bij de eventuele aanvullende
uitrustingen (fi lter, bassintrap, enz.)
Pokyny pro sestavení vas
∨
eho
bazénu
Tento bazén je odborne
∨
navrz
∨
en a nabízí
vám kvalitu a bezpec
∨
nost. Brzy uvítáte
skutec
∨
nost jak je snadné jeho pouz
∨
ití Pr
∨
ed
tím, nez
∨
se pustíte do jeho sestavování, je
nutné proc
∨
íst následující pokyny:
Výbe
∨
r stanovis
∨
te
∨
Výbe
∨
r vhodného stanovis
∨
te
∨
je velice
du
°
lez
∨
itý. Vyberte co nejrovne
∨
js
∨
í pozemek,
protoz
∨
e bazén musí být postaven na vodo-
rovné plos
∨
e
Stanovis
∨
te
∨
o blízkostí stromu
°
není vhodné,
protoz
∨
e padající listí, míza apod. znec
∨
is
∨
t’ují
hladinu bazénu a zate
∨
z
∨
ují filtrac
∨
ní jednotku.
Zajiste
∨
te, aby bylo stanovis
∨
te
∨
v dosahu elek-
trické síte
∨
a zdroje vody.
Z du
°
vodu bezpec
∨
nosti de
∨
tí doporuc
∨
ujeme
nestave
∨
t bazén v blízkosti ploch a pr
∨
edme
∨
tu
°
,
které jsou pro de
∨
ti pr
∨
ístupné a které jim
mohou usnadnit vstup do vody.
Nepokous
∨
ejte se sestavovat bazén za
ve
∨
trného poc
∨
así.
III Kontrola dílu
°
Doporuc
∨
ujeme pr
∨
ekontrolovat obsah
kaz
∨
dého balaní za pomoci seznamu dílu
°
(viz. str.2)
Postupujte stejuým zpu
°
sobem pro díly
pr
∨
idavných zar
∨
ízení (filtrac
∨
ní jednotka,
schu
°
dky atd.)
NL
CZ
7
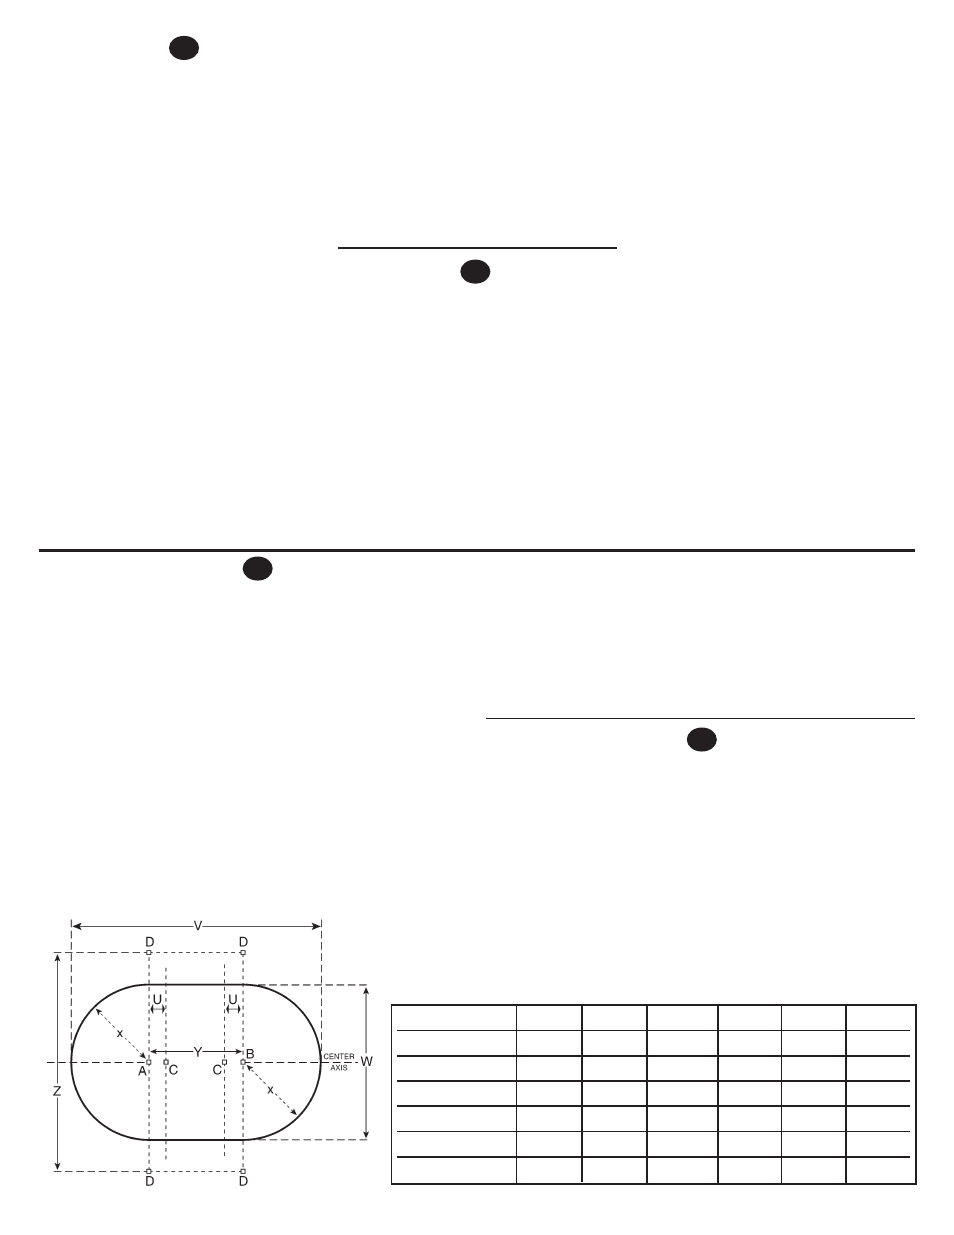
X
Y
V
W
Z
U
5,50 x 3,70 1,95m
1,80m
5,80m
4,00m
5,80m
30,5cm
7,30 x 3,70 1,95m
3,60m
7,60m
4,00m
5,80m
61,0cm
7,30 x 4,60 2,40m
2,70m
7,60m
4,90m
6,70m
15,2cm
9,10 x 4,60 2,40m
4,60m
9,40m
4,90m
6,70m
45,7cm
12,00 x 5,50 2,85m
6,40m
12,30m
5,80m
7,60m
15,2cm
13,70 x 5,50 2,85m
8,23m
14,10m
5,80m
7,60m
45,7cm
PREPARING THE GROUND
First of all, you must choose a spot which provides the space required
by the overall dimensions of your pool. The table below indicates
the exact general requirements, taking into account the extra 15cm
needed on all sides in order to prepare the terrain correctly.
Defi ne the central axis of your pool by setting two stakes at the pre-
scribed distance and pulling a string between them (outer stakes).
Now place two central stakes along this axis (A and B). Taking mea-
sure from the outer stakes, stakes A and B should be placed at a
distance equal to exactly half the width of the pool, respectively. Now
drive in other stakes along the outline of the area to be covered by the
pool. The correct spot is found by placing the stakes at right angles
from the central stakes at a distance equal to half the width of the pool
plus 90cm from the base of the struts.
Check all measurements with the help of the diagram. Finally, use
fl our to draw the outline of the pool on the ground, drawing a semi-
circle from the central stakes at half the width of the pool plus 15cm.
For better protection of the pool, Swim’n Play suggests that you
lay out a ground mat. Roll the mat out evenly. Before beginning
assembly of the pool mark its outline using a felt marker.
WARNING:
In order to ensure the stability of your swimming pool it is strongly rec-
ommended that you do not under any circumstances fi ll in but rather
dig out excess earth to level the ground.
Check for evenness particularly carefully along the lines of the bottom
rails. Finally rake and carefully clean the entire pool surface area.
LA PRÉPARATION DU TERRAIN
Vous devez en premier lieu choisir un emplacement correspondant
à l’encombrement total extérieur de votre piscine. Le tableau ci-des-
sous vous précise les principales dimensions compte tenu des 15 cm
supplémentaires nécessaires tout autour de la piscine pour la prépa-
ration du terrain.
Déterminez l’axe central de votre piscine en reportant sa longueur
entre deux piquets et rejoighezles par une fi celle (piquets extrêmes).
Plantez ensuite deux piquets centraux cet axe (A et B). Placezles par
rapport à chaque piquet des extrémités, à une distance égale à une
demi largeur de la piscine.
Plantez maintenant d’autres piquets qui vont matérialiser les contours
de la piscine. Pour cela, reportez sur les côtes à partir des piquets
GB
F