Quick reference: track16 connectors – MOTU Track16 - Desktop Studio FireWire/USB 2.0 Interface User Manual
Page 8
8
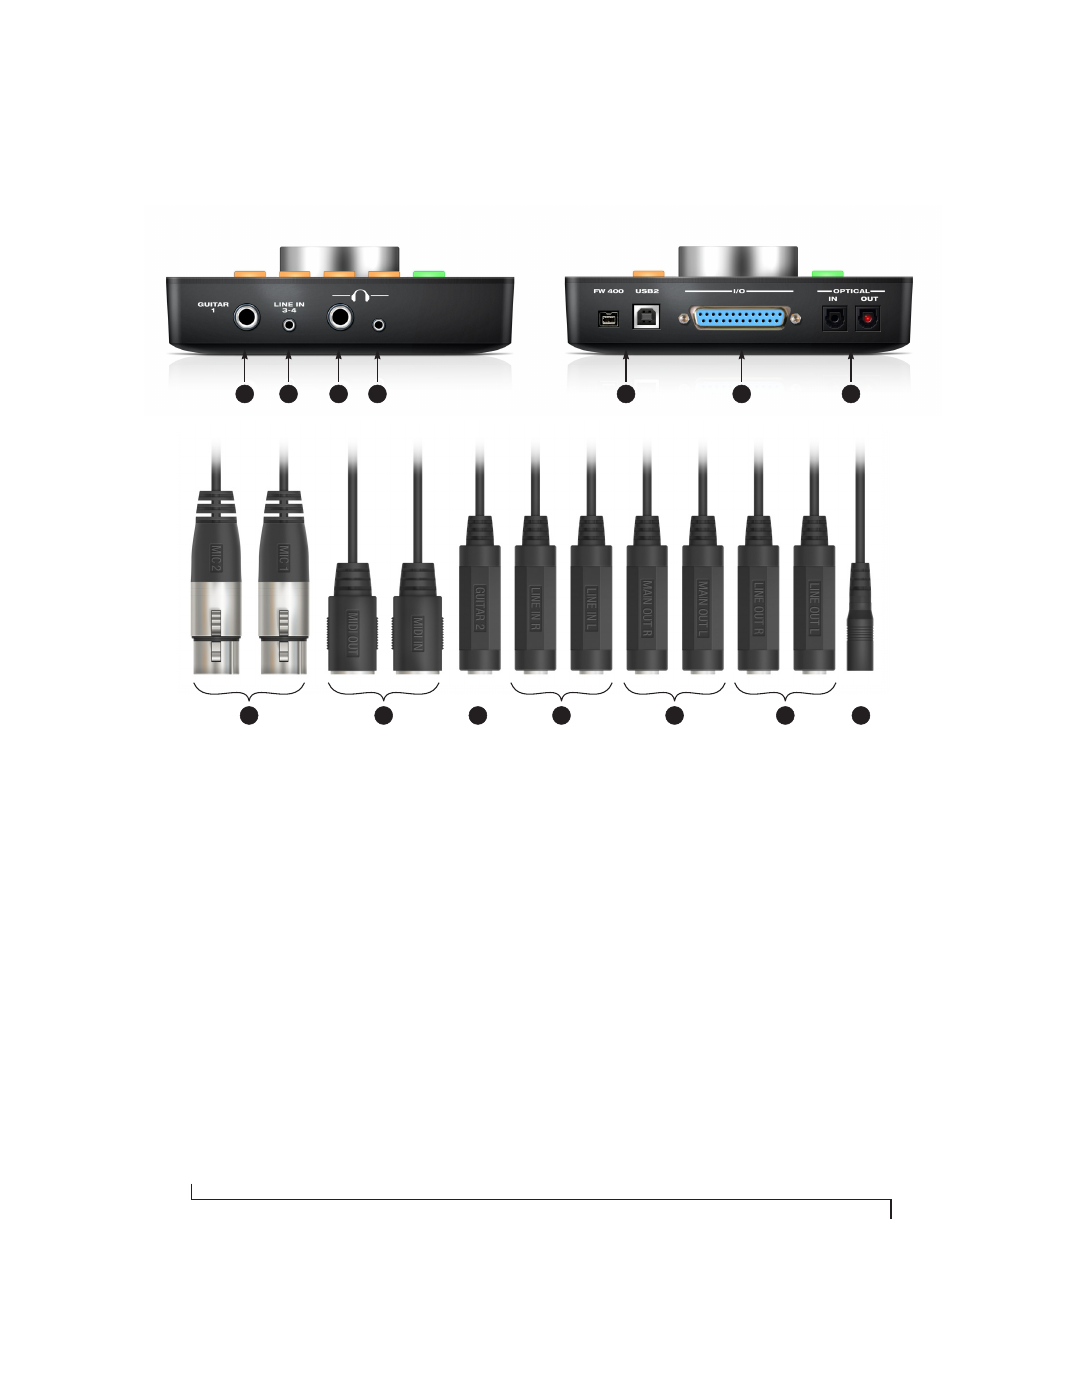
Quick Reference: Track16 Connectors
1. This is one of two hi-Z guitar inputs. The second
guitar input is on the breakout cable (10).
2. Line In 3-4 is a stereo eighth-inch “mini” jack for
connecting an iPod or other mobile audio device.
3. From the factory, the headphone jack is a discrete
output, but it can mirror any other output pair
(digital or analog).
4. If your headphones have a stereo mini connector,
connect them here. The signal on the two
headphone jacks (TRS and stereo mini) is the same.
5. Connect the Track16 to the computer here via either
FireWire or USB2, using either the standard 1394
FireWire B or USB cable provided with your Track16.
There’s not much difference, except that FireWire
offers bus-powered operation (without the DC
power supply).
Important note: it is best to turn
off the Track16 when plugging in the FireWire
cable, as this avoids the possibility of static
discharge, which can harm the electrical compo-
nents in the Track16 or your computer
.
6. Connect the breakout cable supplied with your
Track16 here.
For optimum performance, use
only the supplied Track16 cable.
7. These optical digital I/O connectors can be
connected either to an ADAT-compatible “lightpipe”
device (such as a digital mixer) or to a S/PDIF optical
(“TOSLINK”) compatible device, such as an effects
processor. Be sure to set the format in the MOTU
Audio Setup software. (See “Optical input/output”
on page 38 for details.) ADAT optical supplies eight
channels of 24-bit digital I/O per bank (4 channels
per bank at 96kHz). TOSLINK is stereo at sample
rates up to 96 kHz.
8. These XLR connectors accept a mic cable and are
equipped with a preamp. 48V phantom power and
20 dB pad can be applied via the controls on the top
panel. The knob provides 60 dB of gain.
9. Connect a MIDI device here using standard MIDI
cables. Connect the Track16’s MIDI OUT port to the
MIDI IN port on the other device. Conversely,
connect the Track16’s MIDI IN port to the MIDI OUT
port on the other device. You can connect different
devices to each port, such as a controller device to
the IN port and a sound module to the OUT port. You
can also daisy-chain MIDI devices, but be sure to
manage their MIDI channels (so that they don’t
receive or transmit on the same channel).
10. This is the second of two hi-Z guitar inputs. The first
guitar input is on the front panel (1).
11. These two analog line-level inputs are balanced
quarter-inch connectors. They do not have
preamps, so they are best used for synthesizers,
drum machines, effects processors, and other
instruments with line level signals (either -10 dB or
+4 dB). These inputs are also equipped with the
Track16’s Precision Digital Trim™ feature: digitally
controlled analog trims that let you adjust input
level in 1/4 dB increments. The trim can be adjusted
over a range of -96 to +22 dB.
12. These two balanced TRS jacks serve as the Track16’s
main analog outputs. You can connect them to a set
of powered studio monitors and then control the
volume by pressing the MAIN button.
To hear disk tracks in your audio software on these
main outs, assign the disk tracks (and master fader)
to these main outs. Also make sure the Main Out
Assign option is set to
Main Out 1-2
. See “Main Out
Assign” on page 38. You can also use CueMix FX to
monitor live Track16 inputs here as well.
13. These two analog line outputs are unbalanced
quarter-inch connectors referenced to +17 dBu.
14. This jack accepts any standard 9-18V DC power
supply with either tip-positive or tip-negative
polarity. Alternately, you can use FireWire bus
power.
4
3
2
1
5
6
7
8
Mic inputs 1-2
10
Guitar 2
11
Line In 1-2
12
Main out 1-2
13
Line out 1-2
9
MIDI IN/OUT
14
DC Power (14V)
Guitar
1
Line In
3-4
Phones
FireWire / USB2
DB25 Breakout cable
Optical I/O