Quick reference: ultralitemk3 hybrid front panel – MOTU UltraLite-mk3 - Hybrid FireWire/USB 2.0 Audio & MIDI Interface User Manual
Page 5
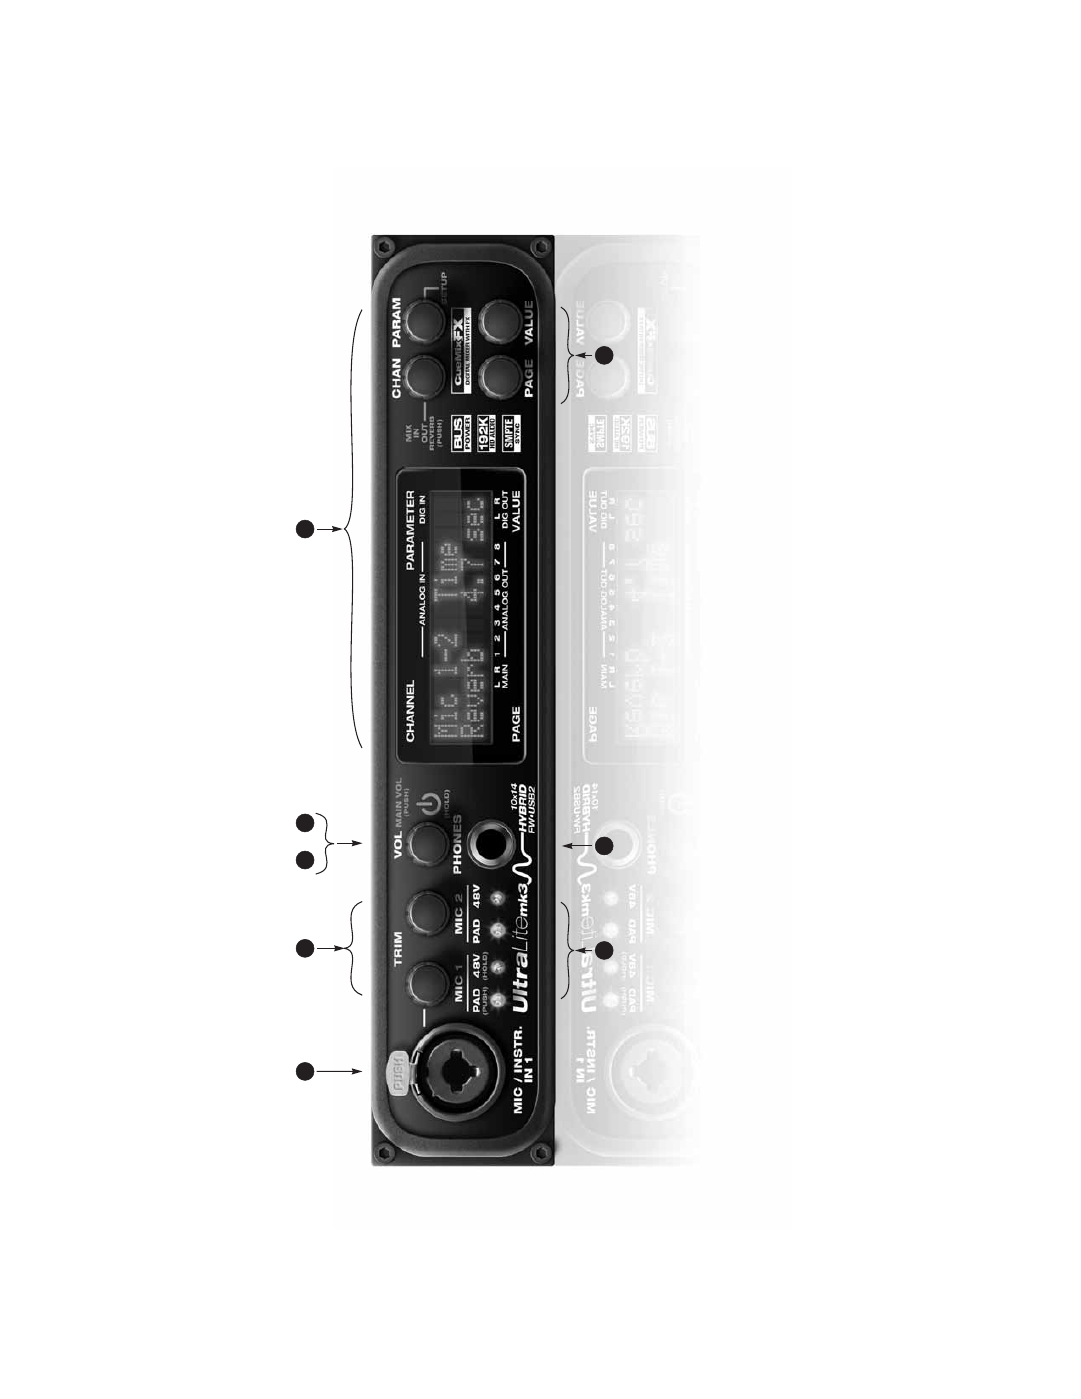
Quick Ref
e
re
nc
e:
Ultr
aLite-mk3 Hybrid F
ron
t P
a
nel
1.
Th
is XLR/TRS c
ombo jack acc
epts either a mic cable or a
cable with a quar
te
r-inch plug
. It is equipped with
appr
ox
ima
tely +60 dB of boost f
or the mic (XLR) input
and +32 dB of boost f
or the instr
umen
t (
TRS) input
.
Se
par
at
e settings ar
e main
tained for the XLR and
TRS
inputs for sa
ving with pr
esets.
T
he XLR (mic) input can
also be supplied with 20 dB pad and 48V phan
to
m
po
w
er
.
2.
Th
ese t
w
o P
recision Digital
Tr
im™ r
otar
y enc
oders
pr
ovide +60 dB and +32 dB of boost
, r
espec
tiv
ely
, for
the mic (XLR) and instr
umen
t (
TRS) inputs on the fr
on
t
and r
ear panel.
A
djustmen
t can be made in appr
ox
i-
ma
te
ly 1 dB incr
emen
ts.
B
oth ha
ve
pr
eamps
, so y
ou can
plug in just about an
ything:
a micr
ophone
, a guitar or
ev
en a syn
th.
F
or +4 dB signals
, use the r
ear panel
TRS
inputs.
U
se the trim knob and input le
ve
l met
er in the
LC
D t
o calibr
at
e the input signal le
ve
l. F
or the Mic (XLR)
input
, P
ush the
TRIM enc
oder t
o t
oggle a 20 dB pad;
push
and hold t
o t
oggle 48V phan
to
m po
w
er
.
3.
Tu
rn the
VO
L knob t
o c
on
tr
ol the headphone v
olume
. T
he
LC
D pr
ovides visual f
eedback for the headphone v
olume
setting as y
ou turn the knob
. P
ush the knob onc
e t
o view
the curr
en
t v
olume setting in the L
CD displa
y;
push it
again t
o c
on
tr
ol the Ultr
aLit
e-mk3’
s MASTER
VO
LUME
setting
. F
rom the fac
tor
y, MASTER
VO
LUME c
on
tr
ols the
(T
RS) MAIN OUT
S 1-2 on the r
ear panel,
but MASTER
VO
LUME can be pr
tion
of outputs
. S
ee “
details.
4.
W
hen po
w
er is off
, push the
VO
L knob t
o po
w
er on the
Ultr
aLit
e-mk3;
pr
ess and hold t
o turn it off
. W
hen
co
nnec
ted t
o the c
omput
er via F
ire
W
ire
, the
Ultr
aLit
e-mk3 is po
w
er
ed b
y its F
ire
W
ire
c
onnec
tion t
o
the c
omput
er
. W
hen c
onnec
ted via USB
, it must be
po
w
er
ed with the included DC po
w
er adapt
er
.
5.
Th
e multi-purpose back
lit L
CD pr
ovides met
ering for all
of the Ultr
aLit
e-mk3’
s inputs and outputs
. It also giv
es
yo
u acc
ess t
o the Ultr
aLit
e-mk3’
s built-in mix
er and
other settings
. T
her
e ar
e eigh
t independen
t st
er
eo mix
busses.
Each mix
es all inputs (or an
y subset y
ou wish) t
o
a st
er
eo output of y
our choic
e.
Th
e four knobs t
o the righ
t
of the L
CD c
orr
espond dir
ec
tly t
o the four labeled
sec
tions of the L
CD
. P
ush the P
AR
AMETER knob r
epea
t-
edly t
o c
ycle thr
ough the thr
ee main L
CD displa
y modes:
METER,
CUEMIX and SETUP
.
METER mode pr
ovides lev
el met
ers for each input and
output.
Th
e labels abo
ve
and belo
w the L
CD r
efer t
o all of
the Ultr
aLit
e-mk3’
s inputs and outputs (both analog and
digital).
CUEMIX mode lets y
ou pr
ogr
am the Ultr
aLit
e-mk3’
s on-
boar
d C
ueMix FX mix
er
. U
se the CHANNEL k
nob t
o
choose the input
, output or mix y
ou wish t
o edit.
P
ush it
to
swit
ch among inputs
, outputs and busses
, then turn it
to
choose the desir
ed channel or bus
. U
se the P
AGE
,
PA
RAM and
VA
LU
E knobs t
o acc
ess the settings f
or the
chosen channel.
SETUP mode lets y
ou acc
ess gener
al settings.
U
se the
PA
RAMETER knob t
o br
ow
se settings
, and use the
VA
LU
E
knob t
o adjust them.
6.
Th
is is a standar
d quar
te
r-inch st
er
eo headphone jack.
Fr
om the fac
tor
y, its output ma
tc
hes the main outs on
the r
ear panel.
But it can be pr
ogr
ammed t
o mirr
or an
y
other output pair (digital or analog).
It can ev
en be
pr
ogr
ammed t
o ser
ve as its o
w
n independen
t output.
U
se the v
olume knob abo
ve
to
c
on
tr
ol its le
ve
l.
7.
Pu
sh the
TRIM r
otar
y enc
oder t
o t
oggle the 20 dB pad
independen
tly for each mic input
. Hold it in momen-
tarily t
o t
oggle 48V phan
to
m po
w
er independen
tly for
each mic input
.
1
2
5
5
6
3
7
4