Audio operations, Signal flow – Roland VR-4HD HD AV Mixer User Manual
Page 32
32
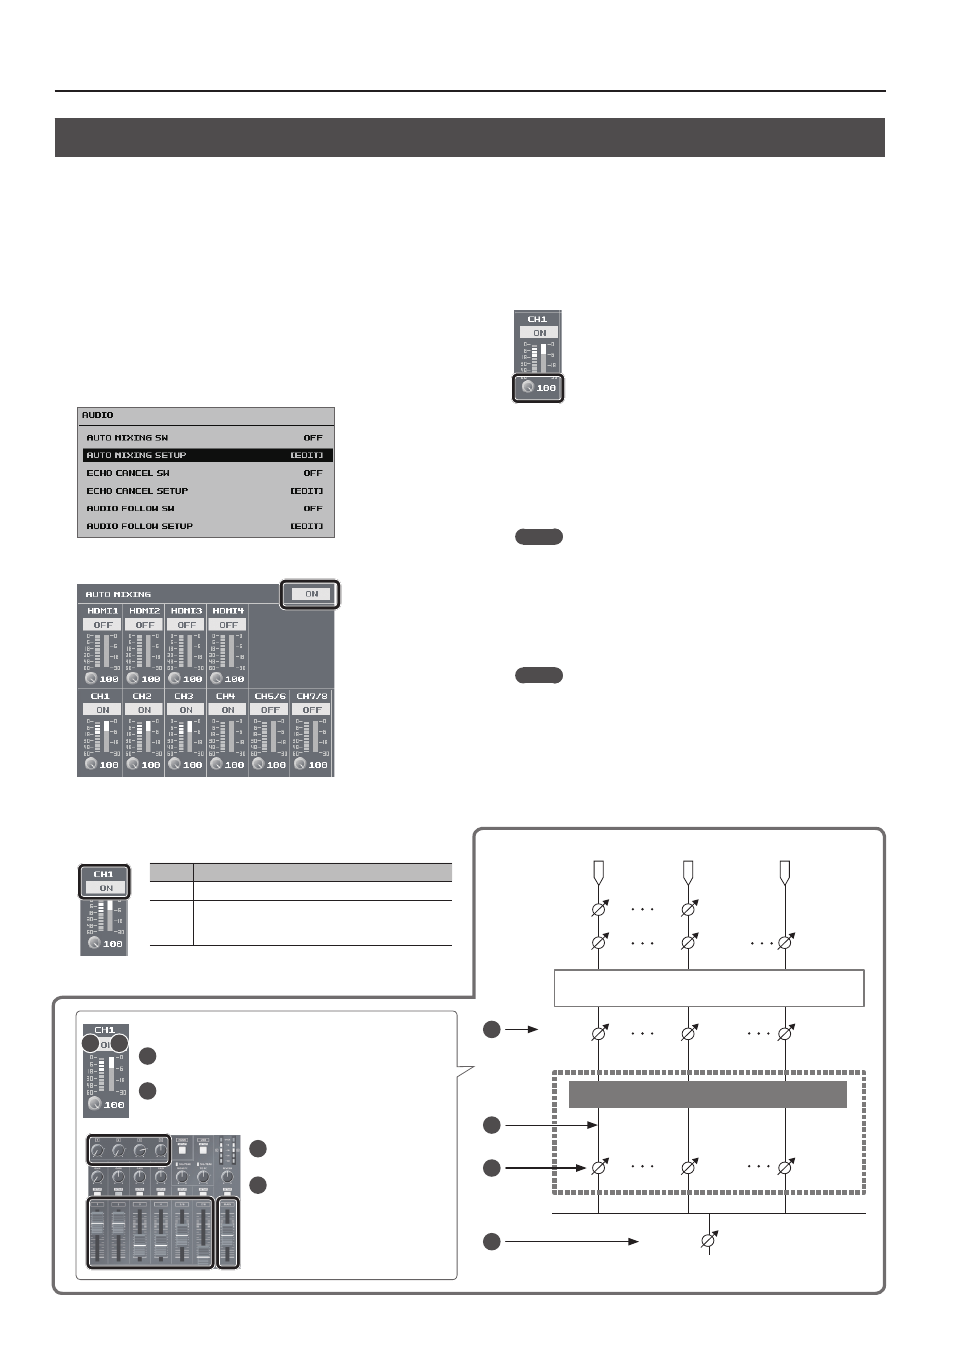
Audio Operations
Controlling Fader Operation Automatically (Auto Mixing)
This automatically controls fader operations that normally are performed by an operator (Auto Mixing feature). It lets you rely on the VR-4HD to perform
complex fader operations, enabling use in circumstances where no dedicated operator is assigned.
This is especially useful for meetings, discussions, debates, and other situations where multiple microphones are used.
1.
Follow the procedure in “Adjusting Input Gain” (p. 26) to
adjust the input gain for channels 1 through 7/8 and HDMI
1 through 4.
2.
Press the [SYSTEM SETUP] button to display the setup screen.
3.
Select <AUDIO> to display the AUDIO menu.
4.
Select <AUTO MIXING SETUP> to display the AUTO MIXING
screen.
5.
Set the Auto Mixing switch to “ON.”
The Auto Mixing feature is switched on.
6.
Use the channel switches to set the channels where Auto
Mixing is to be used to “ON.”
Value
Explanation
ON
Auto Mixing is used.
OFF
Auto Mixing is not used. Set channels where Auto
Mixing is not needed, such as background music
channels, to “OFF.”
7.
For each channel, select the weight level, then use the
[VALUE] knob to set the priority of volume-level distribution
(from 0 to 100).
While in a state where only ambient sound (background
sound) is being input, adjust so that the Auto Mixing
level meters for the respective channels (the meters on
the right side) fluctuate evenly.
5
If there is a channel that you want to make more prominent, such as
when you want to raise the volume level of an emcee microphone,
raise the weight level of the channel to emphasize and lower the
weight level for other channels.
This completes the settings for Auto Mixing.
MEMO
5
On channels for which Auto Mixing is set to “ON,” setting the
weight level to “0” results in no audio output.
5
When air-conditioner noise or the like is a concern, set the weight
level to a low value.
8.
Press the [SYSTEM SETUP] button several times to quit the
setup screen.
MEMO
5
You can assign the Auto Mixing feature to a USER button and use
the button to switch it on and off.
For information on how to use the USER buttons, refer to
“Assigning Functions to USER Buttons” (p. 37).
5
You can also switch the Auto Mixing feature on and off by using
the [SYSTEM SETUP] button
g
<AUDIO>
g
making the setting for
<AUTO MIXING SW>.
3
4
Signal Flow
1
2
Level Meters
1
This indicates the Auto Mixing input level. This is the level after
passing through weight control.
2
This indicates the Auto Mixing level. This is the level of the
internal Auto Mixing faders operated by the mixer itself.
1
2
3
Channel faders
HDMI [1]–[4] knob
4
[MAIN] fader
MAIN OUT
MAIN BUS
INPUT
MAIN LEVEL
CH1 GAIN
CH1 D.GAIN
CH1 LEVEL
CH4 GAIN
CH4 D.GAIN
CH4 LEVEL
HDMI 4 D.GAIN
HDMI 4 LEVEL
Channel Processor (GATE/COMP/3Band EQ)
Weight Control
Auto Mixing
AUTO MIXING LEVEL