Panel descriptions – Roland VR-4HD HD AV Mixer User Manual
Page 7
7
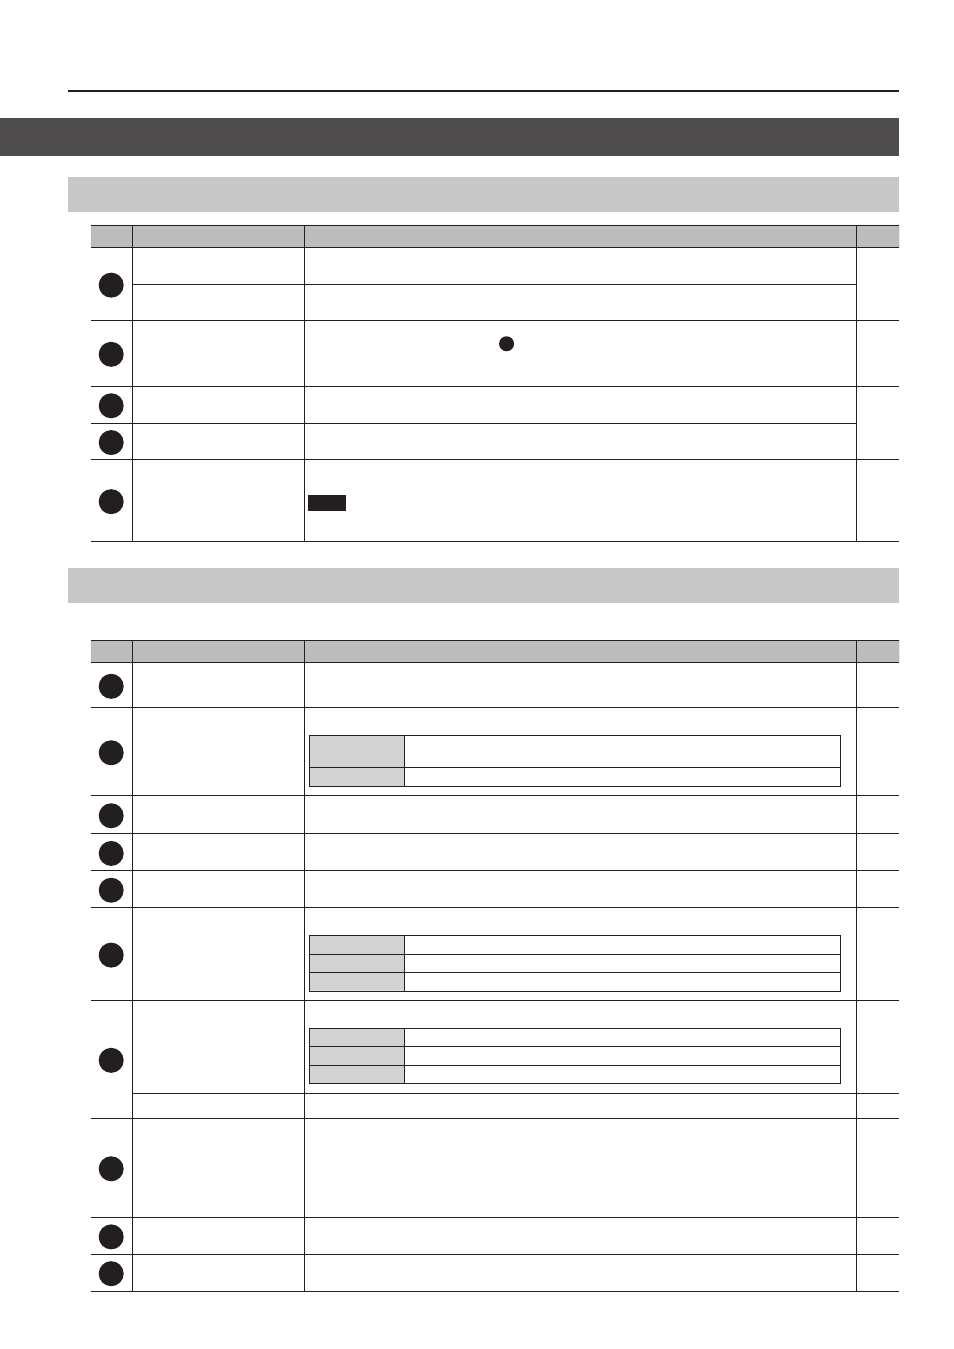
Panel Descriptions
Common Section
No.
Name
Explanation
Page
7
USER [1]–[5] buttons
You use these to switch assigned functions on and off, and to display screens for accessing functions.
* By factory default, the functions shown on the operation panel are assigned to the USER buttons.
USER [SETUP] button
This displays the setup screen for USER buttons on the built-in monitor.
8
Monitor
(touch screen)
5
This displays the incoming video from the sources, output video, a volume level meter, and setup screens. To
change the monitor’s view mode, use
13
the [INPUT] or [OUTPUT] buttons.
5
You can change the picture and select menu items by tapping the screen.
* Don’t touch the screen in two or more locations simultaneously; the locations will not be detected correctly.
9
[SYSTEM SETUP] button
This displays the setup screen for items related to video, audio, and the unit on the built-in monitor.
10
[VALUE] knob
Use this knob to move the cursor to setup screens and other areas, and to change setting values. Pressing the
[VALUE] knob accepts the setting item that has been selected or applies the change made to a setting value.
11
Heat-radiating ports
These release internal heat to inhibit temperature rises inside the VR-4HD. Heat-radiating ports are also found on the
bottom panel.
NOTE
5
Never obstruct the heat-radiating ports. Obstructing the heat-radiating ports can result in temperature rises
inside the VR-4HD, leading to risk of malfunction due to heat.
—
Video Section
This section is for making picture transitions, compositing video, and making effect settings.
No.
Name
Explanation
Page
12
[IN/OUT SETUP] button
This displays the input/output setup screen for video on the built-in monitor. Use this to specify the VIDEO IN
connector to assign to video channel 4. Also use it to specify the video to output via the PVW OUT connector and the
USB 3.0 port.
13
[INPUT] button
[OUTPUT] button
These switch the view mode of the built-in monitor and preview output (the PVW OUT connector).
[INPUT] button
This displays the input video from the respective source devices as a four-way split screen.
You can change the video by tapping the channel screen on the built-in monitor.
[OUTPUT] button
This displays the results of video mixing (main output video).
14
[VIDEO FX/KEY LEVEL] button
This displays on the built-in monitor the screen for adjusting the amount of filter effects applied and the degree of
extraction for key composition.
15
HDCP indicator
This lights up, flashes, or goes dark according to the VR-4HD’s “HDCP” setting and the connected status of HDCP-
compatible equipment.
16
[FREEZE] button
This stops (freezes) input video. The [FREEZE] button lights up during a freeze.
17
[PinP] button
[SPLIT] button
[QUAD] button
These select video composition effects. The selected button lights up during use.
[PinP] button
This composites video in an inset screen over a background video.
[SPLIT] button
This composites two video streams in a split screen.
[QUAD] button
This composites the input pictures on video channels 1 through 4 in a single screen.
18
[CUT] button
[MIX] button
[WIPE] button
These select video transition effects. The selected button lights up.
[CUT] button
The picture switches instantly.
[MIX] button
The two pictures are blended together as the video is switched.
[WIPE] button
In this transition, the original video is broken into by the next video.
[TIME] knob
This sets the video transition time (in seconds).
19
[OUTPUT FADE] button
5
This performs a fade-in or fade-out for the main output video. The [OUTPUT FADE] button indicates the status of
the fade.
Lighted: Fade-out
Flashing: Fade-in/fade-out in progress
Dark:
Normal output
5
This outputs a captured still image or a still image sent from the dedicated VR-4HD RCS program.
20
[KEY] button
This switches key composition on or off. When on, the [KEY] button lights up.
21
VIDEO INPUT SELECT
[1]–[4] buttons
Use these buttons to switch the video. The selected button lights up indicating selected live channel.