Appendices, Troubleshooting – Roland VR-4HD HD AV Mixer User Manual
Page 43
43
Appendices
Troubleshooting
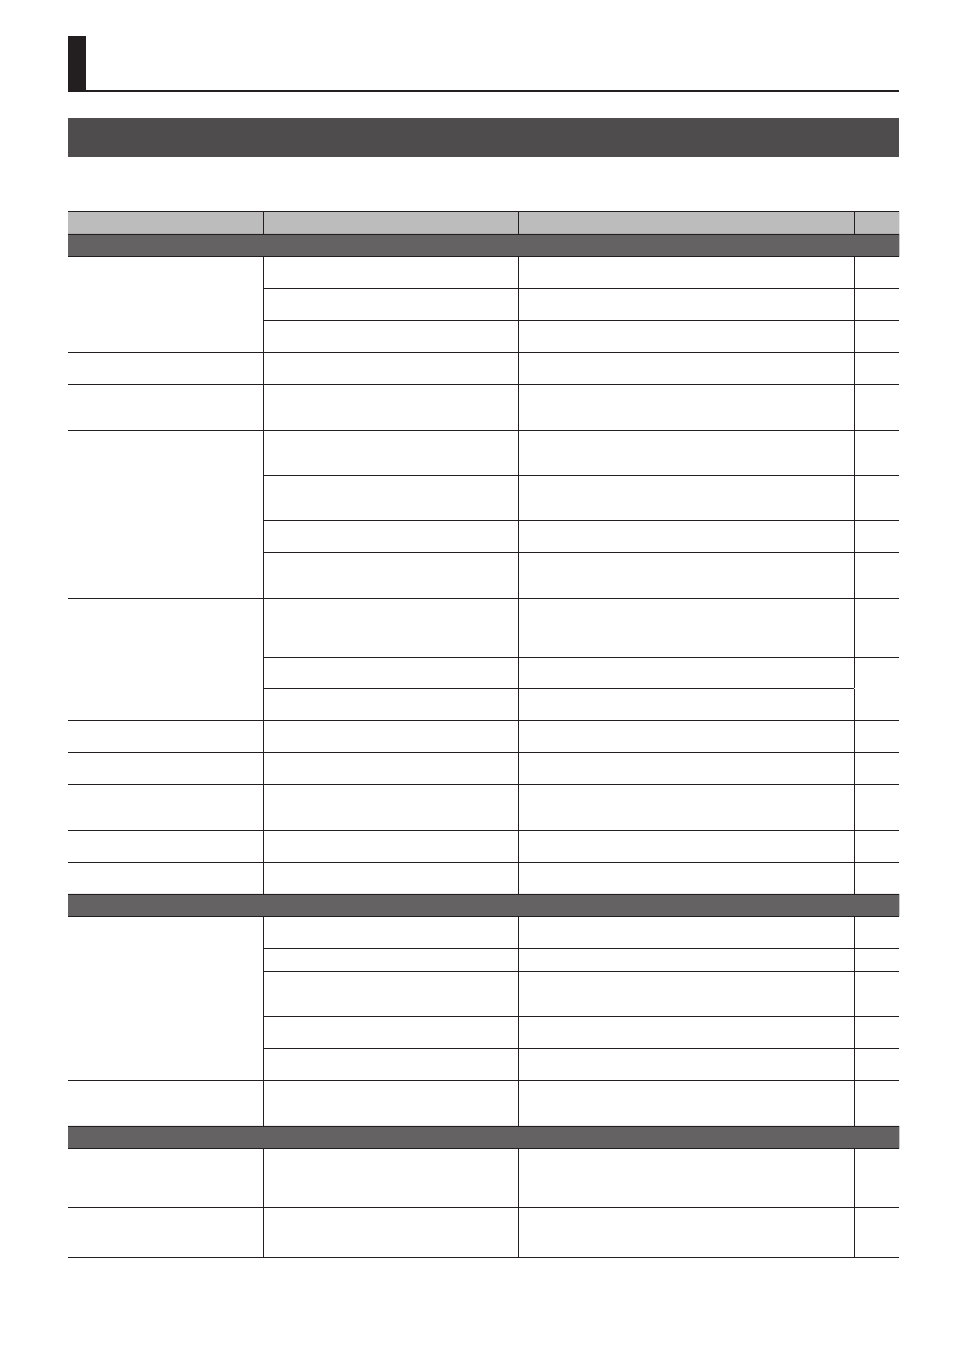
If you suspect a malfunction, please check the following points. If this does not resolve the problem, contact a nearby Roland Service Center.
Problem
Items to check
Action
Page
Video-related problems
No picture is input.
Is the system format set correctly?
Video in a format that differs from the setting on the VR-4HD is being
input. Set the system format to match the connected device.
Has the video source been correctly assigned to
channel 4?
Specify the video source to assign to channel 4.
Is copyright-protected (HDCP) video being input?
When inputting copyright-protected (HDCP) video signals, go to the
SETUP menu and set “HDCP” to “ON.”
Video from the computer is not
displayed.
Is the format of the video output from the computer
compatible with the VR-4HD’s input formats?
The supported input formats on channels 1 through 3 are 1080p,
1080i, and 720p. Only channel 4 supports VESA-standard resolutions.
Video from the computer is corrupted.
When a rapidly moving video is input from a
computer, out-of-sync motion, flicker, or other
picture corruption may occur.
This is called “tearing,” and does not indicate an equipment
malfunction.
—
No picture is output.
Is “HDCP” set to “ON”?
When “HDCP” is set to “ON,” video is output only from the HDMI
OUT and PVW OUT connectors. No video is output via the RGB/
COMPONENT connector and USB 3.0 port.
Is the [OUTPUT FADE] button lighted?
When the [OUTPUT FADE] knob is lighted, a fade is applied to the main
output video. To output the video, press the [OUTPUT FADE] button to
make it go dark.
Is the monitor connected correctly?
When outputting copyright-protected (HDCP) video, connect an
HDCP-compatible display.
Does the color-space setting on the VR-4HD match
the output device (external display, projector, or the
like)?
Use “OUTPUT COLOR SPACE” or “PREVIEW COLOR SPACE” to change the
color-space setting.
No connection can be made using
USB 3.0, or the picture is jerky.
Is the connection using an extension cable or USB
hub?
Making the connection using an extension cable or USB hub
might result in the computer failing to recognize the VR-4HD. We
recommend using a direct connection between the VR-4HD and the
computer.
—
—
Go to the setup screen for USB and select <RESET>, then redo the USB
connection.
Is a USB 2.0 cable being used to connect the VR-4HD
and the computer?
When outputting video via USB, use a USB 3.0 cable to connect the
USB 3.0 port on the VR-4HD to a USB 3.0 port on the computer.
“Snowy”-noise video is output.
It is possible that the HDMI signal is not being sent
and received correctly.
Reconnect the HDMI cable.
—
Video cannot be switched by tapping
the screen.
Is the setup screen displayed?
The touch screen cannot be used for switching video while the setup
screen is displayed. Exit the setup screen.
—
Colors are incorrect.
Does the color-space setting on the VR-4HD match
the output device (external display, projector, or the
like)?
Use “OUTPUT COLOR SPACE” or “PREVIEW COLOR SPACE” to change the
color-space setting.
HDMI output shown on a display has
its periphery cut off.
Are the display settings compatible?
In the case of HDMI signals, automatic overscan occurs on some
displays. Change the display’s settings.
—
Compositing a logo or video cannot
be accomplished.
Have the correct key type and extraction color for
key composition been selected?
Select a key type and extraction color that match the logo or video
background color.
Audio-related Problems
No audio is output.
Audio volume is low.
Is the volume turned down on the VR-4HD?
Adjust each input-audio stream to an appropriate volume level. Also,
use the [MAIN] fader to adjust the overall volume level.
Is the volume of USB output audio turned down?
Turn the [TO PC] knob to adjust to an appropriate volume level.
Is there input audio for which the Solo feature is
turned on?
When Solo is set for an input-audio stream, only the input audio for
which Solo has been turned on is heard through headphones. Turn off
the Solo feature.
Has the input gain of audio been turned down?
When input gain is turned down, no audio is output even when the
volume level is raised. Adjust the input gain.
Is a condenser microphone connected?
When connecting a condenser microphone or other device requiring
phantom power, set the [PHANTOM] switch to “ON.”
No reverb is applied when the
[REVERB] knob is turned.
Is the amount of audio sent to Reverb set at an
appropriate level?
If the send level for audio to Reverb is too low, the amount of reverb
effect might be difficult to discern. Adjust the send level of the audio
to Reverb.
Other Problems
When the screen is tapped, the
responsive location is different from
the place tapped.
Due to the characteristics of the touch panel, the
detected location on the screen when tapped
can become misaligned with the location actually
tapped, but this does not indicate a malfunction.
Perform calibration of the tap points.
Nothing happens when tapped.
Buttons and knobs cannot be
operated.
Is panel lock enabled?
Set “PANEL LOCK,” “MONITOR BUTTON LOCK,” and “TOUCH PANEL
LOCK” to disabled (OFF).