Super Systems 9210 Series User Manual
Page 33
M4557 - Model 9210 Nitriding Controller
SSi Manual SERIES 9210-M4557-Nitriding
Page 33 of 33
numeric keypad that can range from 0 to 100. The “Auto Valve Event” selection will allow the user to
either turn the valve event on or off with a running program using the
Set Valve
opcode. This can be
either On or Off.
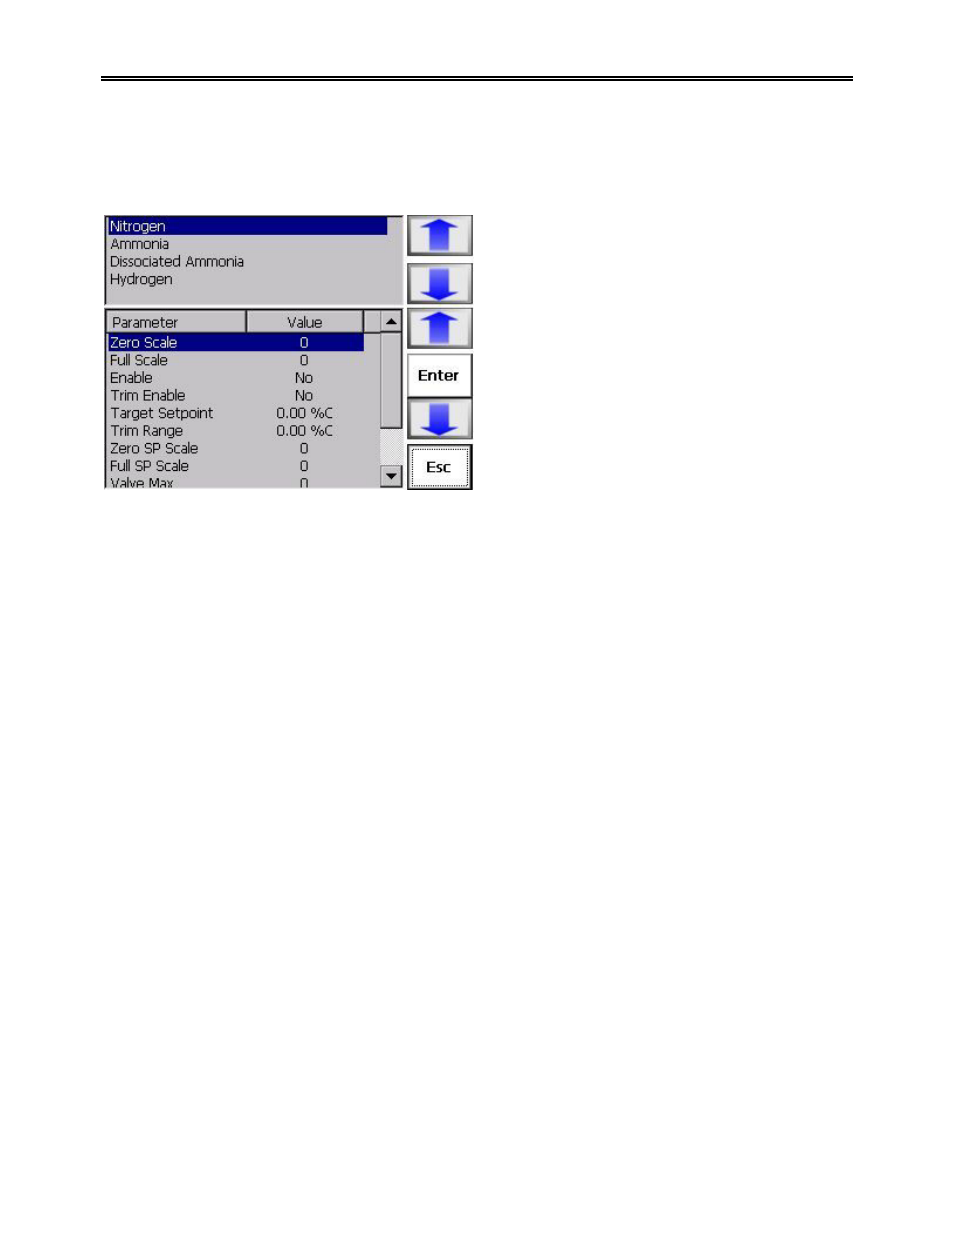
Valve Setup
This screen is used to setup the 9210 based on how
the flow meter boards are setup. This allows the
9210 to know how display each individual gas flow.
There are four gases to select: Nitrogen,
Ammonia, Dissociated Ammonia, and
Hydrogen. Once a gas flow has been selected,
the values for that flow will be displayed in the
lower level. The “Zero Scale” selection will allow
the user to set the zero scale for the flow. This will
display a numeric keypad that can range from 0 to
30,000. The “Full Scale” selection will allow the
user to set the full scale for the flow. This will
display a numeric keypad that can range from 0 to
30,000. Selecting the “Enable” selection will allow
the user to enable the flow. This will cycle between
Yes and No. Selecting the “Trim Enable” selection
will allow the user to enable the trim flow. This will cycle between Yes and No. The “Target Setpoint”
selection will allow the user to set the target setpoint for the flow. This will display a numeric keypad that
can range from 0 to 2000. The “Trim Range” selection will allow the user to set the trim range for the
flow. This will display a numeric keypad that can range from 0 to 2000. The “Zero SP Scale” selection will
allow the user to set the zero scale for the setpoint for the flow. This will display a numeric keypad that
can range from 0 to 30,000. The “Full SP Scale” selection will allow the user to set the full scale for the
setpoint for the flow. This will display a numeric keypad that can range from 0 to 30,000. The “Valve
Max” selection will allow the user to set the valve maximum for the flow. This will display a numeric
keypad that can range from 0 to 30,000. The “Flow deviation setpoint” selection will allow the user to set
the setpoint for the flow deviation alarm. This will display a numeric keypad that will range from 0 to
30,000. A setpoint of 0 will disable the deviation alarm for the valve. The “Dev. Alarm delay (sec)”
selection will allow the user to set the number of seconds before the deviation alarm will sound. This will
display a numeric keypad that will range from 0 to 30,000.
Note: The deviation alarm delay is entered in
1/10 minutes (6 seconds), so a 2 entered will be displayed as 12 seconds
.
User Calibration
The user will need a thermocouple calibrator capable of outputting a thermocouple signal to calibrate the
zero, span or cold junction value of the 9210 instrument. The user will need to connect the calibrator to
one of the inputs on the instrument that will be calibrated. It is recommended to let everything (calibrator
and instrument) sit for approximately thirty minutes to allow the temperature to achieve equilibrium. Set
up the calibrator for the specific thermocouple type of the thermocouples in the 9210 instrument, i.e. type
K, type J, etc. Then, source a specific temperature, like 1000
°F, or millivolt to the connected input. It is
recommended that the actual temperature used be similar to an appropriate process temperature. For
example, if your equipment normally operates at 1700
°F, then perform the cold junction calibration using a
1700
°F signal. It is important to note that when performing a zero or span calibration,
do not use
regular
thermocouple wiring. Instead, use any kind of regular sensor wire, or even regular copper wire. To
perform the calibrations, the user will need a calibrator that is capable of outputting volts, millivolts, and
temperature.
Note: The buttons on the screen always have the same functionality. The ÅBack button will display the
previous screen, if any. The Skip button will skip the current screen and display the next screen, if any.
The Next
→ button will display the next screen, if any. The Done button will close out the
User