1 defining the vsm-4x4a, Defining the vsm-4x4a, 6vsm-4x4a – overview – Kramer 4 x 4 Seamless AV Matrix Switcher/Multi-Scaler User Manual
Page 13
6
VSM-4x4A
–
Overview
3.1
Defining the VSM-4x4A
This section defines the
VSM-4x4A
.
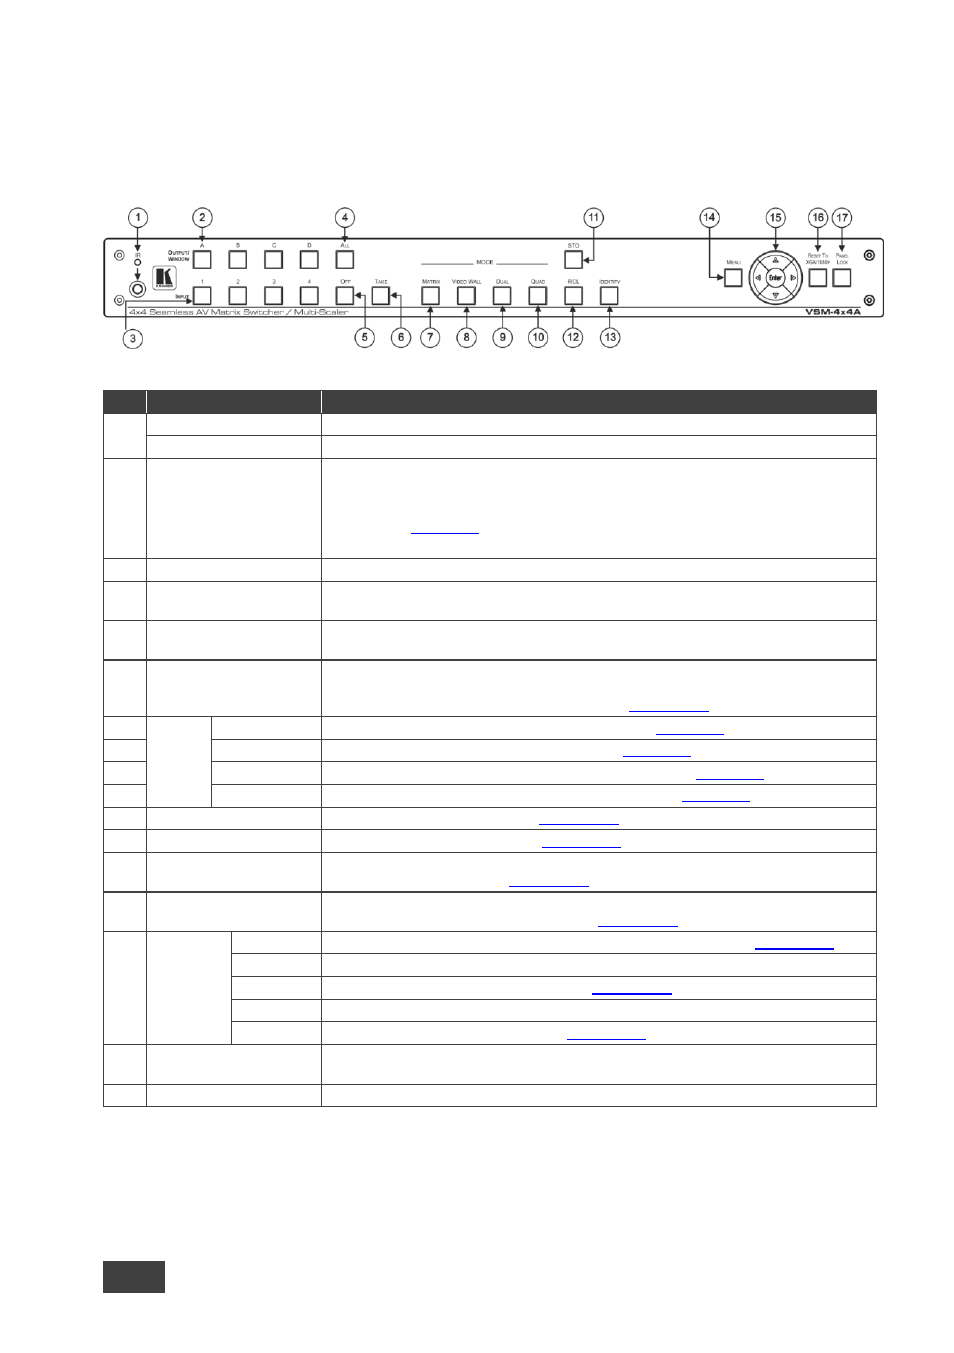
Figure 1: VSM-4x4A 4x4 Seamless AV Matrix Switcher/Multi-Scaler Front Panel
#
Feature
Function
1
IR LED
Lights when the unit accepts IR remote commands
IR Receiver
Receives signals from the remote control transmitter
2
OUTPUT/WINDOW
Selector Buttons
In the MATRIX mode: select the output to which the input is switched (A, B, C or D)
In the VIDEO WALL mode: not used
In the DUAL mode: select one of the two DUAL windows: A or B for DUAL A; C or D for
DUAL B (see
Section 5.3
In the QUAD mode: not used
3
INPUT Selector Buttons
Press to select an HDMI input (from 1 to 4) to switch to the output
4
ALL Button
Press ALL followed by an INPUT button to connect that input to all the outputs (not
available for the video wall mode)
5
OFF Button
Press after pressing an output button to disconnect the selected output from the inputs.
To disconnect all the outputs, press ALL followed by OFF
6
TAKE Button
Press to toggle between the Confirm mode (when in the Confirm mode, the TAKE button
lights ) and the At Once mode. When in TAKE mode, front panel buttons actions are
implemented after pressing the TAKE button (see
Section 6.1.2
7
MODE
Buttons
MATRIX
Press to operate the system as a matrix switcher (see
Section 5.1
8
VIDEO WALL
Press to operate as a 2x2 or 1x4 video wall (see
Section 5.2
9
DUAL
Press to operate as a 4x2 switcher with PIP capabilities (see
Section 5.3
10
QUAD
Press to display all four inputs on each of the outputs (see
Section 5.4
11
STO Button
Press to store a configuration (see
Section 6.1.3
12
RCL Button
Press to recall a configuration (see
Section 6.1.3
13
IDENTIFY Button
Press to indicate on each output, which input is displayed on the output. The display time
is set via the OSD menu (see
Section 6.2.1
14
MENU
Press to access the OSD menu, exit the OSD menu and, when in the OSD menu, move
to the previous level in the OSD screen (see
Section 6.1.2
15
Navigation
Buttons
ENTER
Press to access sub-menu items and select from several settings (see
Section 6.1.2
Press to decrease numerical values or select from several definitions
Press to move up the menu list values (see
Section 6.1.2
Press to increase numerical values or select from several definitions
Press to move down the menu list (see
Section 6.1.2
16
RESET TO XGA/1080p
Button
Press and hold for about 4 seconds to toggle resetting the video resolution to XGA or
1080p
17
PANEL LOCK Button
Press and hold for about 2 seconds to lock/unlock the front panel buttons