Basic operations, Turning the power on and off, Operating the menu – Roland V-60HD Multi-Format HD Video Switcher and UVC-01 USB Video Capture Kit User Manual
Page 11: P. 11, Er on and off (p. 11), Turning the power on, Turning the power off, About the auto off function
11
Basic Operations
Turning the Power On and Off
* Before turning the unit on/off, always be sure to turn the
volume down. Even with the volume turned down, you might
hear some sound when switching the unit on/off. However, this
is normal and does not indicate a malfunction.
Turning the power on
* If still images are saved on the unit (p. 18), startup takes longer
time according to image size and the number of still images
saved.
1.
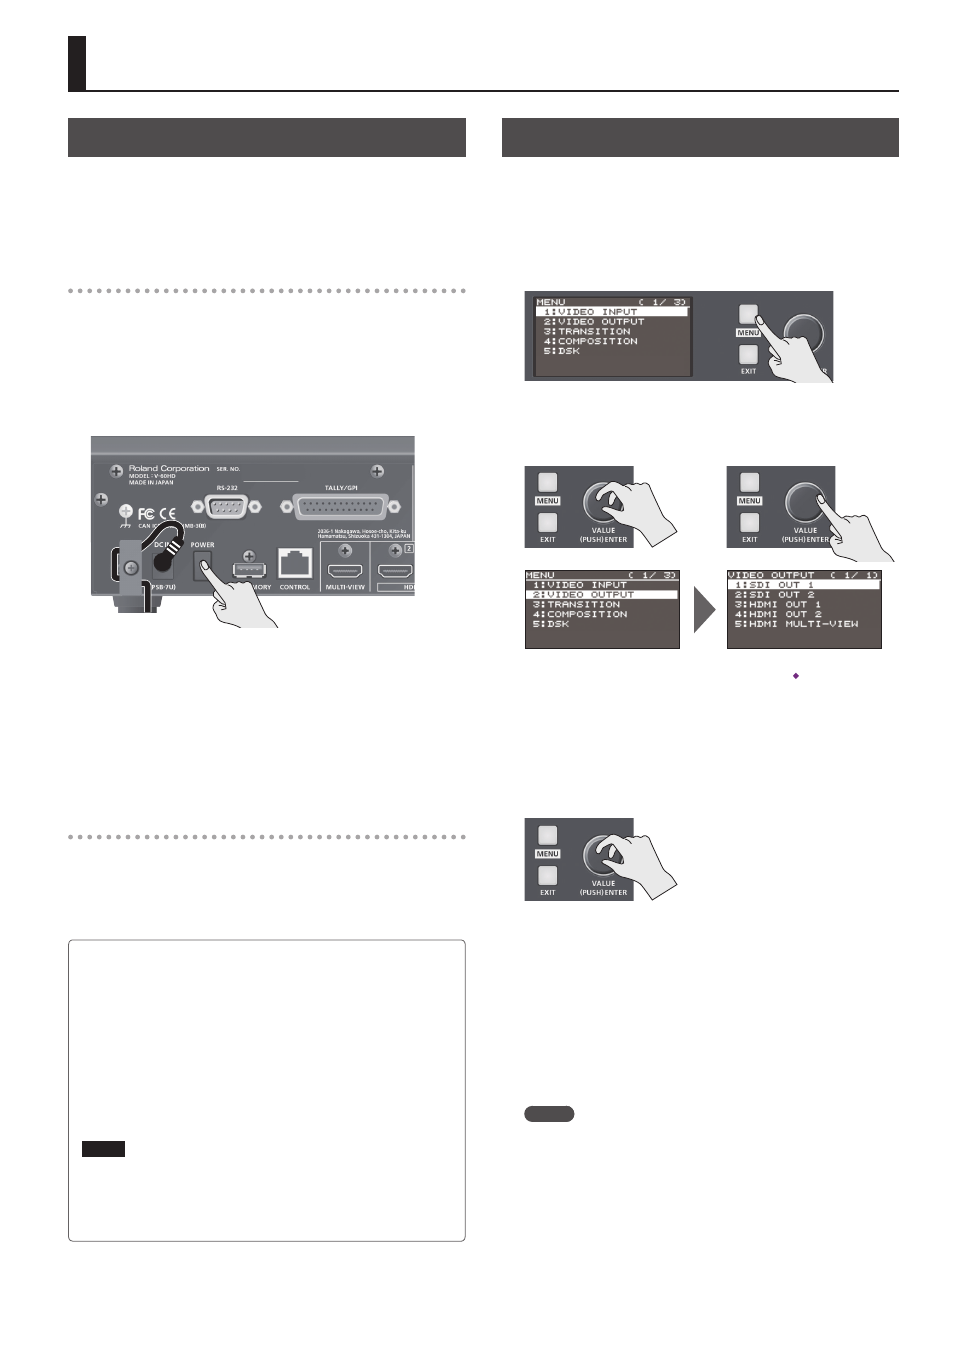
Make sure all devices are turned off.
2.
Press the [POWER] button to turn on the power.
3.
Turn on the power of the source devices.
Turn on the power of the source devices that are connected to the
V-60HD’s input connectors, such as video cameras.
4.
Turn on the power of the output devices.
Turn on the power of the devices that are connected to the
V-60HD’s output connectors, such as projectors.
Turning the power off
1.
Turn off the power in the order of output devices
0
source
devices.
2.
Press the V-60HD’s [POWER] button to turn off the power.
About the Auto Off function
The power to the V-60HD turns off automatically when all of the
following states persist for 240 minutes (Auto Off function).
5
No operation performed on the V-60HD
5
No audio or video input
5
No equipment is connected to the HDMI OUT connectors
If you do not want the power to be turned off automatically,
disengage the Auto Off function. Select the [MENU] button
0
“SYSTEM”
0
set “AUTO OFF” to “OFF.”
NOTE
5
Any settings that you are in the process of editing will be lost
when the power is turned off. If you have any settings that you
want to keep, you should save them beforehand.
5
To restore power, turn the power on again.
Operating the Menu
This makes menus appear on the built-in display for making
settings for video and audio or for the V-60HD itself.
* The OSD menu is similarly also displayed on the multi-view
monitor connected to the MULTI-VIEW connector (p. 10).
1.
Press the [MENU] button to display the menu.
The [MENU] button is lit, and the menu categories are displayed.
2.
Turn the [VALUE] knob to select a category, and press the
[VALUE] knob to confirm.
The menu for the selected category is displayed.
3.
Turn the [VALUE] knob to select a menu item, then press the
[VALUE] dial to confirm.
The cursor moves to the setting value.
5
If the menu item is located at a deeper level, repeat step 3.
5
Pressing the [EXIT] button moves you back one level higher.
4.
Turn the [VALUE] knob to change the value of the setting.
5
By turning the [VALUE] knob while pressing it, you can change
the value more greatly.
5
Pressing and holding the [VALUE] knob returns the current
menu item you’re setting to its default value.
5
To execute an operation, press the [VALUE] knob.
5.
Press the [VALUE] knob to apply the setting.
The cursor returns to the menu item.
6.
Press the [MENU] button to quit the menu.
MEMO
For details on the menu items, refer to the “Reference Manual”
(PDF) which you can download from the Roland website.
https://proav.roland.com/manuals/