Switching aux output, Using imported still images, Capturing a still image from input/output video – Roland V-60HD Multi-Format HD Video Switcher and UVC-01 USB Video Capture Kit User Manual
Page 18: P. 18, O “switching aux output” (p. 18), Olor) (p. 18), Video operations
18
Video Operations
Switching AUX Output
You can use button operations to directly select the video to send
to the AUX bus.
You can output the video on the AUX bus from SDI OUT connectors
or HDMI OUT connectors. To output the AUX bus, you change the
bus assignments for the respective connectors to “AUX.”
For details, refer to “Changing Video Bus Assignments” (p. 15).
1.
Press the [MODE] button to make it light up in green.
Each press of the [MODE] button makes it toggle between lighting
up in blue and in green.
Lit green
The AUX/MEMORY buttons function as AUX-bus selection buttons.
The AUX/MEMORY button currently selected as the video on the
AUX bus lights up in red.
2.
Press an AUX/MEMORY button to select the AUX-bus video.
The AUX output is switched.
MEMO
5
To adjust the volume level of audio on the AUX bus, select the
[MENU] button
0
“AUDIO OUTPUT”
0
“AUX”
0
adjust “AUX
LEVEL.”
5
You use channels 7 and 8 to output a still image or a
monochrome picture (background color) (p. 18).
5
On the multi-view monitor, the input channel sent to the AUX
bus is displayed with an “AUX” symbol.
The colors of lighted AUX/MEMORY buttons
When the [MODE] button is lighted in green, the AUX/MEMORY
buttons also function as indicators showing the status of video
input.
AUX/MEMORY [1] through [6] Buttons
Button
Input video status
Lighted in green
Valid video is input.
Flashing in green
Video whose format differs from the system
format setting is input.
Dark
No video is input.
AUX/MEMORY [7] and [8] Buttons
Button
Input video status
Lighted in green
A still image has been imported.
Dark
No still image has been imported.
MEMO
The AUX/MEMORY button for the currently selected video
lights up or flashes in red.
Using Imported Still Images
You can take a still image captured from input/output video or
imported from a USB flash drive, assign it to channel 7 or 8, and
output it in the same way as video. You can also use it as a source
for DSK compositing (p. 23).
You can save up to two still images in the unit.
* When still images are saved in the unit, startup takes longer time
according to image size and the number of still images saved.
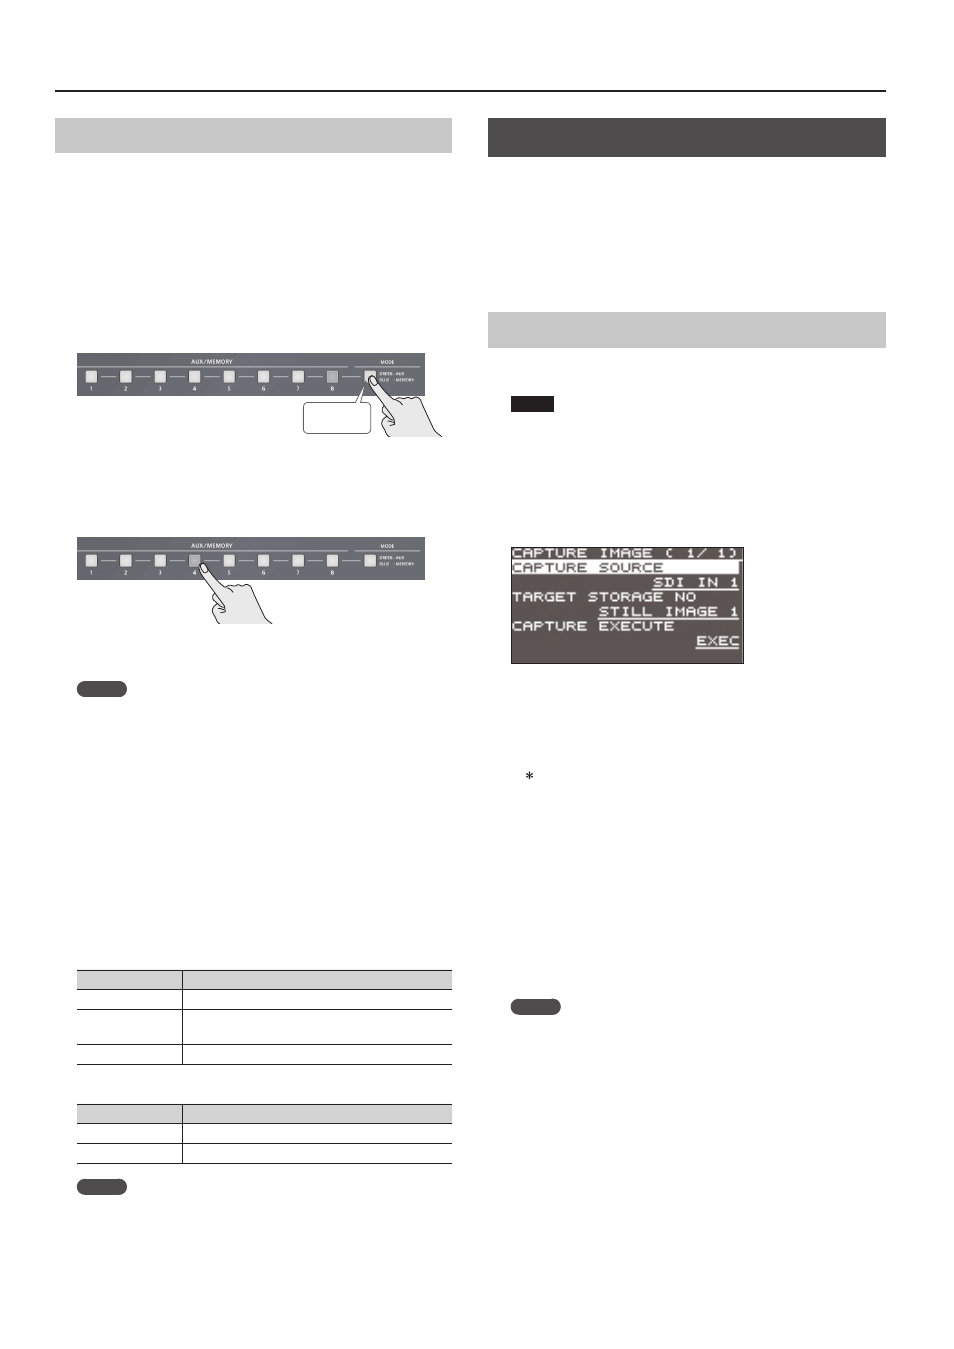
Capturing a Still Image from Input/Output Video
This captures a still image from input/ouput video and saves it in
the unit.
NOTE
5
All video input stops during still-image capture.
5
Depending on the format of the video, completion of still-
image capture might take some time.
1.
Select the [MENU] button
0
“CAPTURE IMAGE”
0
“CAPTURE
SOURCE,” then use the [VALUE] knob to specify the input/
output video to use for still-image capture.
2.
Press the [VALUE] knob to apply the setting.
3.
Select “TARGET STORAGE NO,” then use the [VALUE] knob
to select “STILL IMAGE 1” or “STILL IMAGE 2” as the memory
destination for saving the still image.
A “ ” symbol is displayed for memory where a still image is already
saved.
4.
Press the [VALUE] knob to apply the setting.
5.
Select “CAPTURE EXECUTE.”
A confirmation message appears.
If you want to cancel the operation, press the [EXIT] button.
6.
Use the [VALUE] knob to select “YES,” then press the [VALUE]
knob.
Capturing is carried out.
7.
Press the [MENU] button to quit the menu.
MEMO
HDCP-applied video on HDMI IN 5 and 6
When you have captured from copyright-protected (HDCP)
video, the created still image is treated the same way as HDCP-
applied video.
The still image is switched between displayed and hidden by
turning HDCP on and off (p. 15).
Note, however, that when HDCP is switched from off to on, the
still image is reloaded from where it’s saved in memory, and so
the still image might take some time to display.
Shortcuts for capture
By long-pressing a PGM/PST 1–6 button you can directly
execute capture for inputs 1–6 (this does not work for 7/8).
The image is saved in STILL IMAGE 1 if you long-press a button
of the PGM row, or saved in STILL IMAGE 2 if you long-press a
button of the PST row.