6 – basic recording, Selecting the input source, Phantom power – Teac DP-008EX User Manual
Page 42
42
TASCAM DP-008EX
6 – Basic Recording
Selecting the input source
This unit has two inputs (INPUT A/B) that can be
selected separately as input sources.
The built-in microphones (front panel MIC A/B) and
external input signals (input through the rear panel
INPUT A/B jacks) can be selected as input sources.
In addition to mic/line signals, you can input guitar
and bass through the INPUT A standard jack.
When connecting a guitar, set the MIC/LINE-GUITAR
switch on the back of the unit to GUITAR.
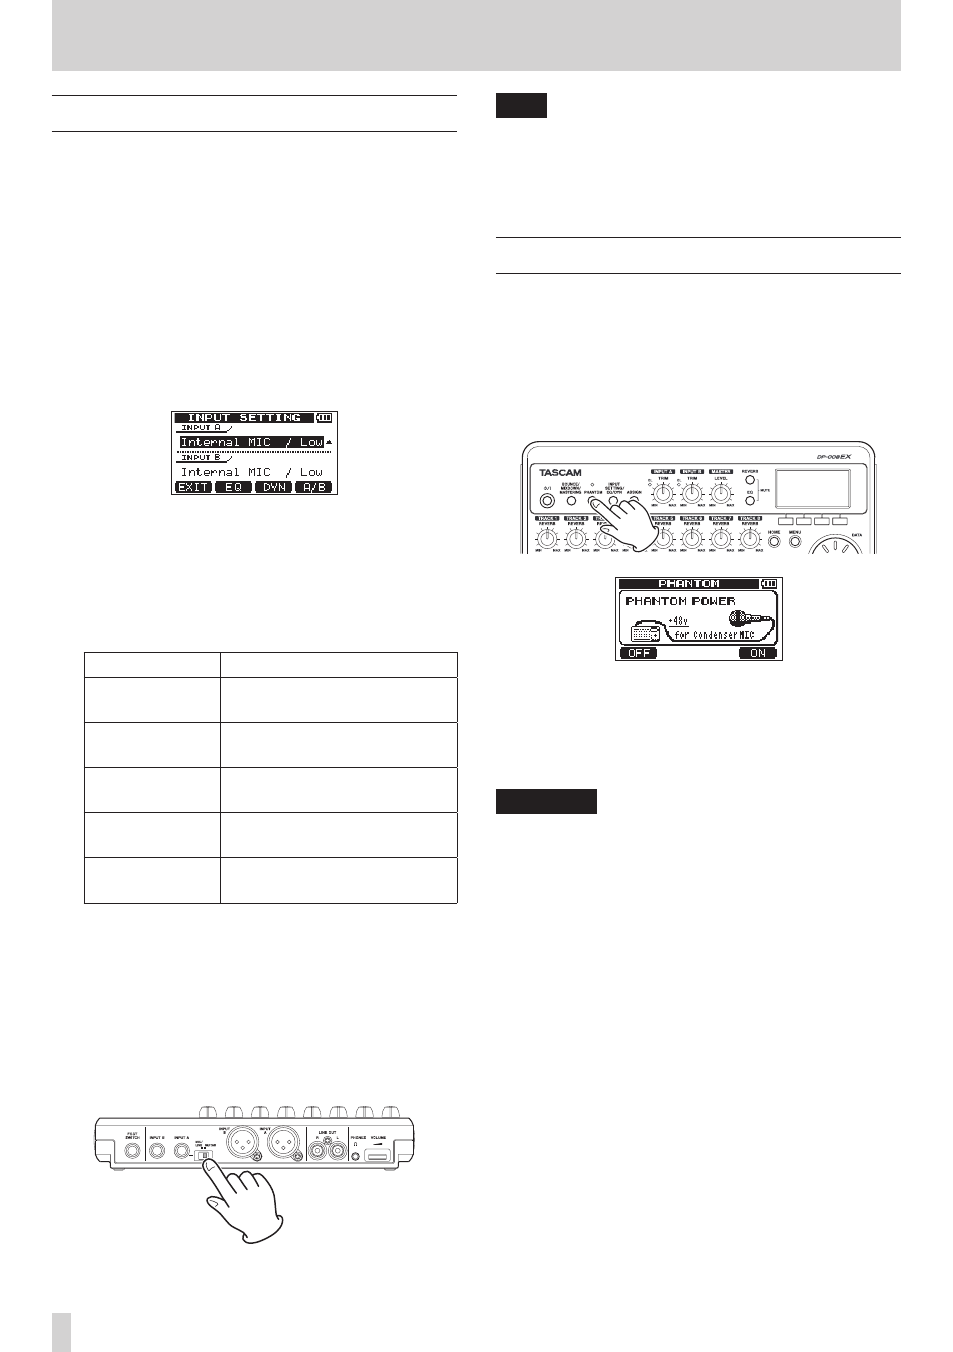
1. When the recorder is stopped, press the INPUT
SETTING/EQ/DYN button to open the
INPUT
SETTING
screen.
Use the
IN A
and
IN B
items to set the input
sources for INPUT A and INPUT B.
2. Use the F4 [A/B] button to select (highlight) the
INPUT A
or
INPUT B
setting, and turn the DATA
wheel to select the input source.
INPUT A/B options
Option
Description
Internal MIC /
Low (default)
Built-in MIC A/B (low input
gain)
Internal MIC /
High
Built-in MIC A/B (high input
gain)
Ext. Input,
LINE / Low
External line input A/B (low
input gain)
Ext. Input / Mid External line input A/B
(medium input gain)
Ext. Input / High External line input A/B (high
input gain)
3. After making the setting, press the HOME button
to return to the Home Screen.
4. If a source that uses the INPUT A connector is
selected as the INPUT A input source in step 2
above, set the MIC/LINE-GUITAR switch on the
left side panel appropriately. Set it to GUITAR
when connecting an electric guitar or electric
bass directly. Set it to MIC/LINE when inputting a
mic or line signal.
TIP
When connecting an electric-acoustic guitar with
a built-in preamp or an active electric guitar, as
well as when connecting an electric guitar with
effect boxes between it and this unit, set the MIC/
LINE-GUITAR switch to MIC/LINE.
Phantom power
When connecting a condenser microphone that
requires phantom power, follow the procedures
below to turn phantom power ON. When ON,
phantom power is provided to both INPUT A and
INPUT B XLR jacks.
1. When the recorder is stopped, press the
PHANTOM button to open the
PHANTOM
screen.
2. Press the F4 [ON] button to turn phantom power
ON. The indicator above the PHANTOM button
lights, and the Home Screen reopens.
To turn phantom power OFF, press the F1 [OFF]
button.
CAUTION
•
Use the MASTER LEVEL knob to turn the unit’s
output volume down before turning phantom
power ON or OFF. Depending on the mic, a loud
noise could occur, damaging equipment and
harming people’s hearing.
•
Do not connect or disconnect a mic when phantom
power is ON.
•
Turn phantom power ON only when using a
condenser microphone that requires phantom
power.
•
Do not supply phantom power to an unbalanced
dynamic microphone.
•
Supplying phantom power to some types of ribbon
microphones could break them. Do not supply
phantom power to a ribbon microphone if you are
in doubt.
•
Battery consumption is faster when phantom
power is ON.