Network, Network setup and operations, Overview of network function – Sony LHP-1 Lens Hood User Manual
Page 100: Compatible devices, Connecting the unit and device via wired lan, Connecting the unit and device via wireless lan, Attaching the cbk-wa02
100
4. Network
Network Setup and Operations
Connecting the unit to a network allows you
to control various settings of the unit from a
computer, smartphone, tablet, or other device
and to display information about the unit.
[Note]
When connecting to the Internet, connect via a router,
a device with a router function, or a firewall to avoid
external attack.
Overview of Network Function
When the unit and a device are connected
via wired LAN or wireless LAN, the unit can
be accessed from a browser on the device,
displaying the web remote control and
enabling the following operations.
• Control recording on the unit (page 103)
• Control playback on the unit (page 103)
• Configure shooting settings on the unit
• Control the lens attached to the unit
• Configure and operate assignable buttons
on the unit (page 104)
Using the web remote control allows you to
start/stop recording or configure settings
remotely, and is useful in applications where
the unit is fixed in a remote location or
mounted on a crane, for example.
Compatible Devices
You can use a computer, smartphone, or tablet
to configure and operate the unit. The verified
devices, OS, and browsers are shown in the
following table.
Device
OS
Browser
Computer
Microsoft Windows
10/11
Chrome
macOS 11.x
Safari
Smartphone Android 10.x/11.x
Chrome
iOS 14.x/15
Safari
Tablet
Android 10.x/11.x
Chrome
iPadOS 14.x
Safari
[Note]
The controls may not be displayed normally, depending
on the version of the browser you are using. Operation
in the following versions of the browsers has been
verified.
Safari: 14/15
Chrome: 93
Connecting the Unit and Device
via Wired LAN
You can connect the unit to a device via a
wired LAN connection or via a router using the
network connector of the unit.
1
Connect the network connector
(page 12) of the unit and computer
using a LAN cable. Or connect the network
connector of the unit and router using a
LAN cable.
2
Set Technical > Network > Setting
(page 87) in the full menu to LAN.
[Note]
Grayed out and cannot be changed if a password is
not configured using Technical > Authentication >
Password (page 87) in the full menu.
3
Configure the unit.
To obtain the IP address of the unit
automatically:
Set Technical > Network > LAN > DHCP
(page 88) in the full menu to On, then
select Set to apply the setting.
To enter the IP address of the unit
manually:
Set Technical > Network > LAN > DHCP in
the full menu to Off, enter the specified IP
address using LAN > IP Address, and
select Set to apply the setting.
[Note]
Select Set on the Technical > Network > LAN setup
screen in the full menu. If Set is not selected, the
configured settings are not applied.
When the wired LAN connection is
enabled, the LAN icon of the network
connection status indicator (page 15) is
displayed on the viewfinder/monitor
screen.
Connecting the Unit and Device
via Wireless LAN
The unit can connect to devices using wireless
LAN connection by attaching the CBK-WA02
Wireless LAN Adaptor (option) to the unit.
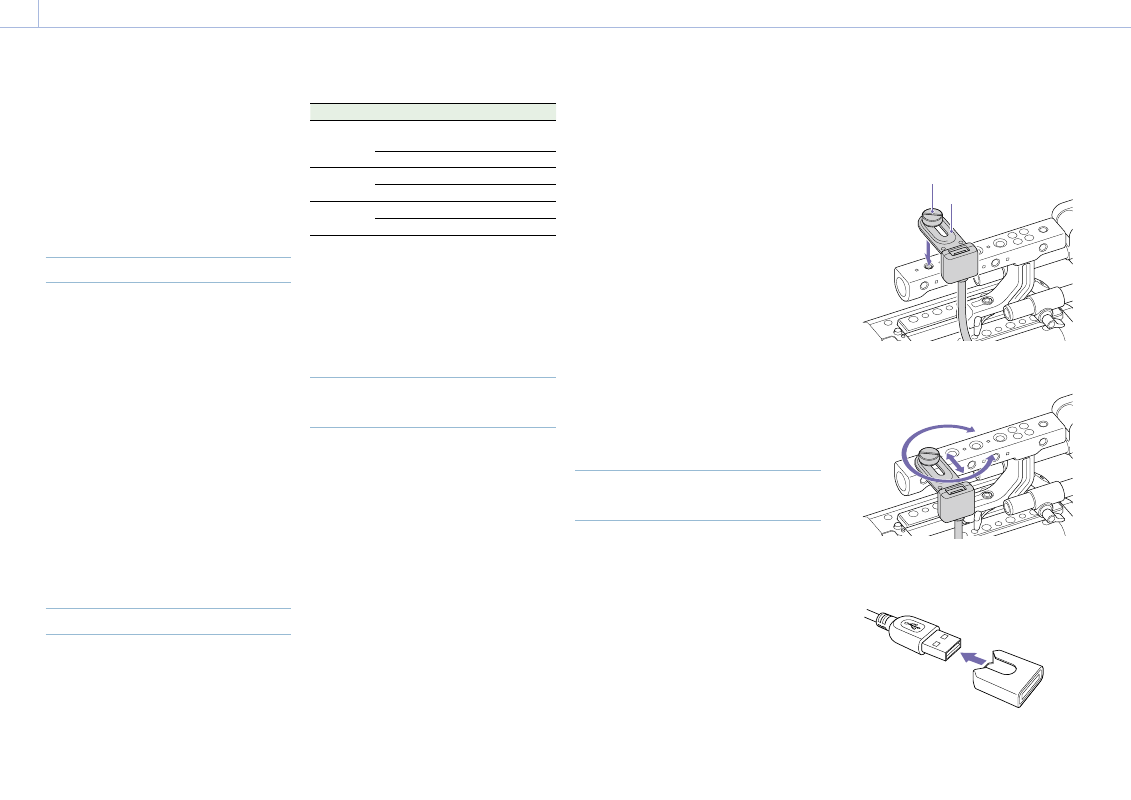
Attaching the CBK-WA02
[Note]
Always turn the unit off before connecting the CBK-
WA02.
1
Attach the USB extension adaptor to the
point shown in the following diagram, and
turn the retaining screw clockwise to
secure it in position.
Retaining screw
USB extension adaptor
You can adjust the position of the USB
extension adaptor over the range shown
in the following diagram.
2
Attach the protective cap (supplied) to the
USB connector of the USB extension
adaptor.