Mounting a lens and adjusting the flange focal, Length, Attaching a pl-mount lens – Sony LHP-1 Lens Hood User Manual
Page 21: Adjusting the flange focal length
2. Preparation
21
Recommended PL-mount lens (Super 35mm
size)
SCL-PK6/F, SCL-PK6/M (set of 6 lenses,
20 mm/25 mm/35 mm/50 mm/85 mm/
135 mm)
SCL-PK3/F, SCL-PK3/M (set of 3 lenses,
20 mm/25 mm/135 mm)
SCL-P11X15
Recommended E-mount lens
SELP28135G, SEL1635GM, SEL2470GM,
SEL70200GM, SEL100400GM, SEL1224G,
SEL35F14Z, SEL50F14Z, SEL85F14GM,
SEL90M28G, SEL100F28GM
[Note]
Control may not be supported with some E-mount
lenses. Use a recommended lens.
For details about available lenses for the unit, contact a
Sony service representative.
[CAUTION]
Do not leave the lens facing the sun. Direct
sunlight can enter through the lens, be
focused in the unit, and cause fire.
[Notes]
• Turn the unit off before attaching or removing the
lens and adapter.
• A lens is a precision part. Do not place the lens down
with the mount side facing down. Attach the cap
supplied with the lens.
• The lens interface of the unit is configured by factory
default for an SCL-P11X15 and lenses with Cooke
type connector. To use an SCL-PK6, SCL-PK3, or other
lenses that do not have a Cooke type connector,
set Technical > Lens Configuration > PL-Mt Interface
Position (page 87) to Off in the full menu.
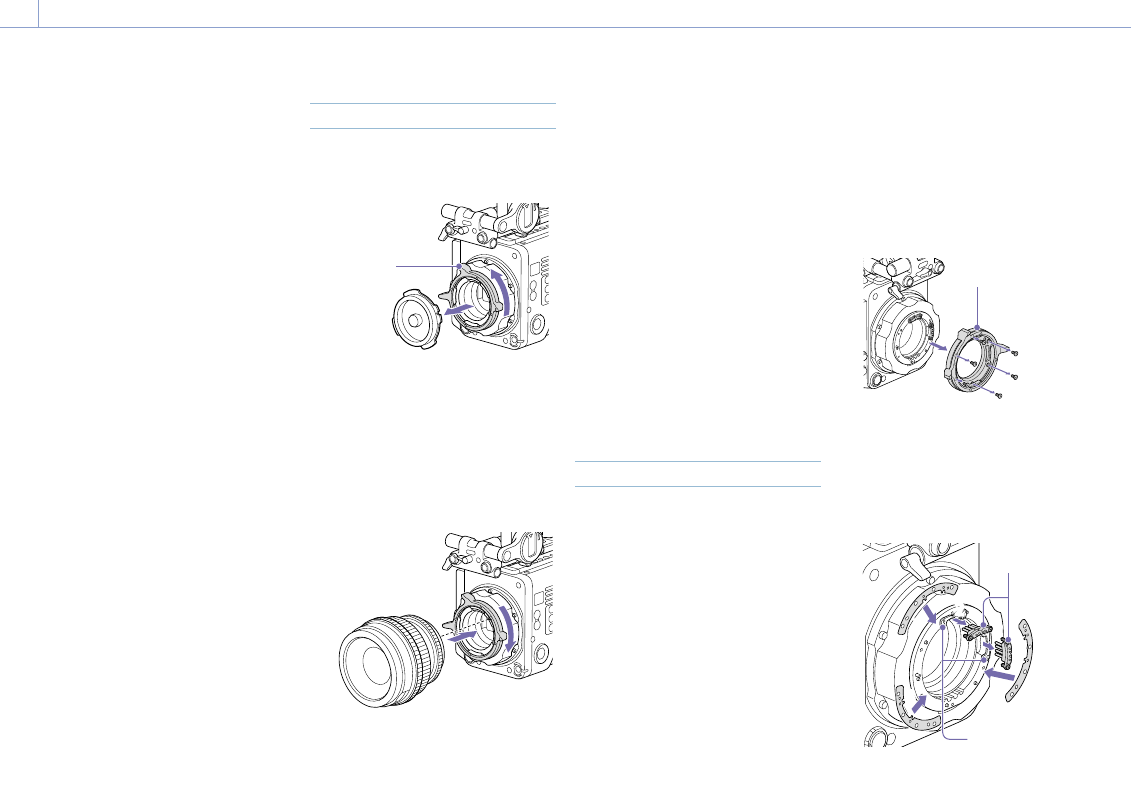
Attaching a PL-Mount Lens
1
Remove the mount cover from the lens
mount by turning the PL-mount lever
counterclockwise.
PL-mount
lever
[Note]
Turn the PL-mount lever counterclockwise to the
stopper position.
2
Insert the lens into the lens mount by
aligning the concave part of the lens with
the positioning pin on the upper right of
the lens mount.
3
Secure the lens by turning the PL-mount
lever clockwise while holding the lens.
[Note]
Do not turn the lens when attaching the PL-mount
lens. It may cause damage to the hot shoe pin.
To attach a Cooke /i lens
Align the contacts on the lens with the hot
shoe of the unit. There are two connectors on
the side of the lens adaptor, and either can be
used.
To remove the lens
1
Turn the PL-mount lever counterclockwise
while holding the lens from underneath.
2
Pull the lens forward.
[Notes]
• If another lens will not be attached soon,
carefully align the concave part of the mount
cover, then secure the mount cover by turning
the PL-mount lever clockwise.
• For correct I/F communication with the lens, set
the Technical > Lens Configuration (page 87)
settings in the full menu to match the lens in
use.
Adjusting the Flange Focal Length
The unit is shipped with the flange focal
length already adjusted. If you need to adjust
the flange focal length, remove the lens
mount, and change the shims with those of
the appropriate thickness. You can adjust the
thickness by ±0.1 mm in 0.01 mm increments.
Shims
The following shims are supplied with the unit.
0.05 mm × 1 (circular)
0.01 mm × 15 (1/3 arc)
1/3 arc shims should always be used as a set
of three shims. Insert shims to increase the
flange focal length. The unit is shipped with
the flange focal length already adjusted using
the following three types of shims.
0.10 mm (circular)
0.05 mm (circular)
0.01 mm (1/3 arc)
A seal is attached showing the shim thickness
when shipped.
Adjusting the flange focal length
1
Remove the six Torx screws and remove
the PL-mount flange.
1
PL-mount flange
2
Loosen the four Phillips screws on both
sides of the PL connectors (two locations),
and remove the PL connectors and PL
connector plates.
3
Attach shims to the PL-mount adaptor
(three locations).
33
33
33
22
22
PL connectors
PL connector
plates
Mounting a Lens and Adjusting the Flange Focal Length