Pa g e / p á gina 5 – Johnson Amplification J-STATION User Manual
Page 10
J-Station User
’s Guide / Manual
Section 1 - Introduction /Secci
ó
n 1 - Introducci
ó
n
ENGLISH
ESP
A
Ñ
OL
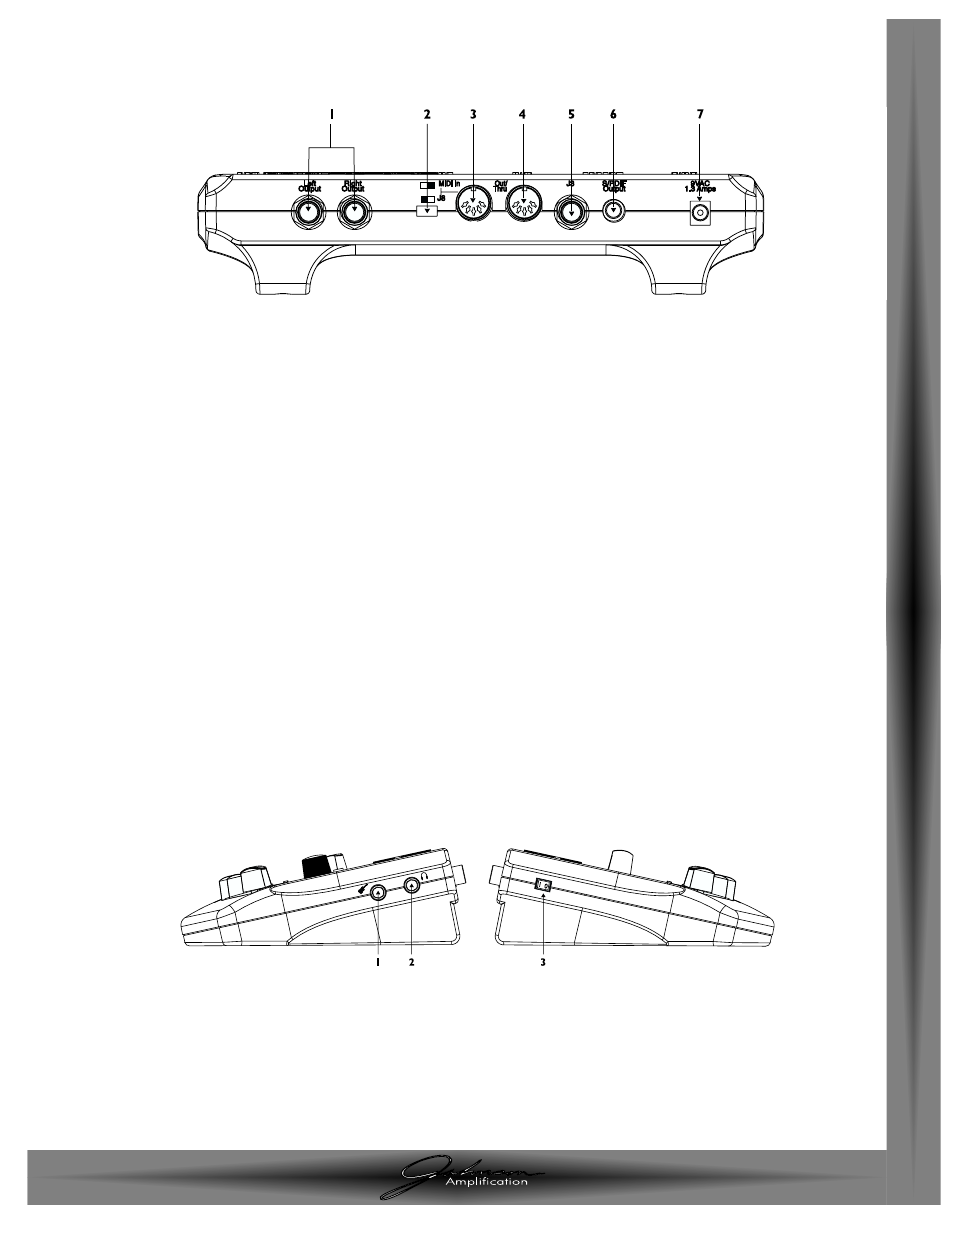
1. Left/Right Outputs -
Connect one of these jacks to a channel input on
your mixer for mono applications, or both of these jacks to two channel inputs
on your mixer for stereo applications. Be sure to select the desired output
mode from the Utility menu. See page 28 for more information on selecting the
output mode.
2. MIDI In/J8 Selector Switch - This switch is used to select whether the 5
pin DIN jack will be used for the Johnson J8 Foot Controller, or as a MIDI input.
Push this switch to the right for MIDI applications, and to the left for J8 use.
3. MIDI In/J8 Jack - Connect either the J8 Foot Controller, or the MIDI Out
of your computer to this jack for remotely controlling, or programming the J-
Station. Be sure to set the MIDI In/J8 selector switch to MIDI before connecting
any MIDI device.
4. MIDI Out/Thru - Connect from this jack to either the MIDI Input on your
computer for sending information from the J-Station to the computer, or to the
MIDI Input on other MIDI devices you wish to control.
5. Footswitch Jack - Connect the J3 Footswitch to this jack for Bank Up, Bank
Down, and Preset select.
6. S/PDIF Digital Output - This is the digital output from the J-Station. The
signal at this output is in a stereo digital format, and is to be connected to a
digital S/PDIF input such as those found on digital recording devices.
ATTENTION: Do not connect the S/PDIF output to analog auxiliary,
CD, phono, or tape inputs on consumer electronic
devices. It is not compatible with these inputs.
7. Power Jack - Connect only the provided PS0913B or PSS3 power supply to
this jack.
1. Salidas izda/dcha - Para aplicaciones mono, conecte una de estas clavijas a
una entrada de canal de su mezclador, y para stereo, conecte ambas clavijas a las
entrdas de dos canales. Asegúrese de elegir el modo de salida que quiera en el
menú de utilidades. Para más información sobre el procedimiento de selección
del modo de salida, vea la página 28.
2. Selector entrada MIDI/J8 - Este interruptor sirve para elegir si el
conector DIN de cinco puntas va a ser usado para la pedalera de control J8
de Johnson, o como entrada MIDI. Coloque este interruptor hacia la derecha
para aplicaciones MIDI, y hacia la izquierda para utilizar el conector como
entrada de la J8.
3. Clavija MIDI In/J8 - Conecte a esta toma la pedalera de control J8, o la
salida MIDI de su ordenador para un control remoto o para programar la J-
Station. Antes de conectar ninguna unidad MIDI, asegúrese de ajustar a MIDI el
selector entrada MIDI/J8.
4. Salida MIDI/Thru - Conecte esta clavija a la entrada MIDI de su ordenador
para enviar información desde la J-Station al ordenador, o a la entrada MIDI de
otras unidades MIDI que quiera controlar.
5.Toma para pedal de disparo - Conecte a esta toma el pedal de disparo
J3 para poder ir pasando por los distintos bancos y para la selección de
presets.
6. Salida digital S/PDIF - Es la salida digital de la J-Station. En ella, la señal
está en un formato digital stereo, y debe ser conectada a una entrada digital
S/PDIF como la de algunas unidades de grabación digital.
ATENCION: No conecte la salida S/PDIF a entradas analógicas
auxiliares, de CDs, de tocadiscos o de cinta de unidades
electrónicas no profesionales. No es compatible con
esas entradas.
7. Entrada de corriente - Conecte solo a esta clavija las fuentes de
alimentación PS0913B y PSS3.
Side Panels
1. Input - Connect your instrument to this jack.
2. Headphone Output - Connect stereo headphones to this jack. Do not
connect a mono plug here as doing so may damage the output driver.
3. Power Switch - This switch is used to turn the J-Station on and off.
Paneles laterales
1. Entrada - Conecte su instrumento a esta toma.
2. Salida de auriculares - Conecte unos auriculares stereo a esta toma.
No conecte aquí ninguna clavija mono ya que podría llegar a dañar la unidad
de salida.
3. Interruptor de encendido - Este interruptor sirve para encender y
apagar la J-Station.
Panel trasero
Rear Panel
Pa
g
e
/
P
á
gina 5