Pa g e / p á gina 26, English esp a ñ ol – Johnson Amplification J-STATION User Manual
Page 31
J-Station User
’s Guide / Manual
Section 4 - Tutorial / Secci
ó
n 4 - Tutorial
Desactivación del retardo
En nuestro preset de ejemplo no queremos que se oiga ningún retardo.Gire totalmente
hacia la izquierda el mando Delay. De este modo habremos anulado el retardo.
Ajuste de la reverberación
Queremos que nuestro preset de ejemplo tenga una pequeña cantidad de
reverberación para darle algo de ambientación. Gire el mando Reverb hasta la
posición de las 9 en punto para darle al preset una ligera ambientación. of
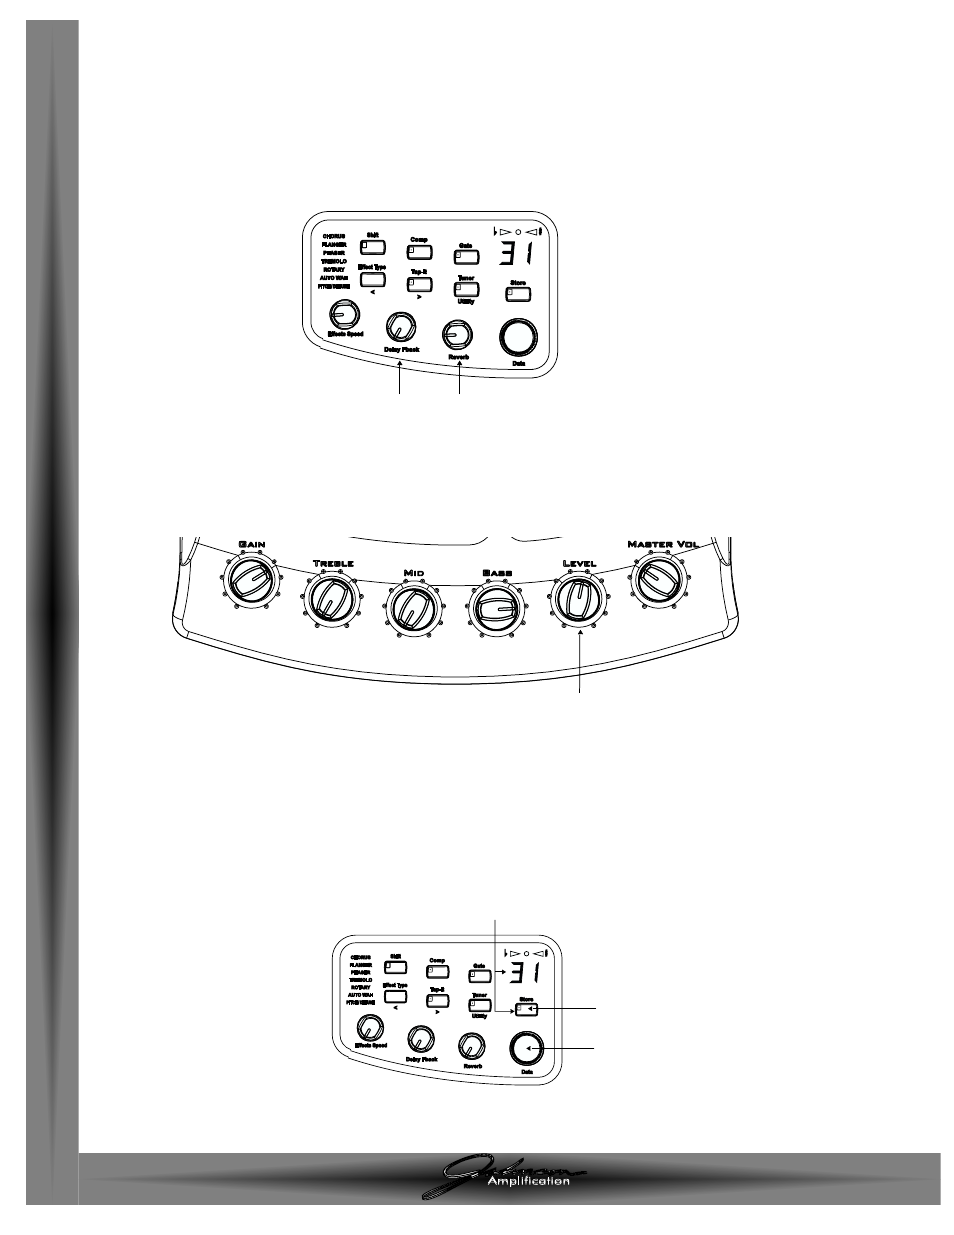
Turn the Delay Off
In our example Preset we wanted no Delay to be heard. Rotate the Delay knob
fully counterclockwise. For all practical purposes, the Delay is now bypassed.
Adjust the Reverb
In our example Preset we also wanted a little bit of Reverb to provide some
ambience. Rotate the Reverb knob to the 9 o’clock position which will provide
just a hint of ambience.
Pa
g
e
/
P
á
gina 26
ENGLISH
ESP
A
Ñ
OL
Rotate the Delay knob
Fully Counterclockwise
Rotate the Reverb knob to
the 9 o'clock Position
Gire el mando Delay
totalmente a la derecha
Gire el mando Reverb a la
posición de las 9 en punto
Set the Preset Level
You may find that the volume of the Preset is too loud due to the heavy
distortion that we have chosen.To equalize the volume of the Preset, rotate the
Level knob until you get a comfortable volume for the Preset.
Ajuste del nivel de preset
Puede que le resulte demasiado alto el volumen del preset debido a la distorsión tan
grande que le hemos aplicado.Para ecualizar el volumen del preset,gire el mando Level
hasta que consiga obtener un volumen para el preset que le resulte agradable.
Rotate the Level knob to set Preset volume
Gire el mando Level para ajustar el volumen del preset
Store the Preset
The last step that we need to do is to store our changes to a User Preset. If we
changed Presets or turned the J-Station off without storing these settings, it
would forget what we had done and revert back to the original Preset. Press the
Store button once. The Preset number in the Display begins to flash which is
asking you where you want to store this new Preset. Rotate the Data knob to
select 19 as the destination. Press the Store button one more time to complete
the Store function.
Store the Preset
El último paso que tenemos que dar es almacenar en un preset de usuario las
modificaciones que hemos hecho. Si cambia de preset o apaga la J-Station sin
grabar esos ajustes, perderá todo lo que haya hecho y volverá a tener el preset
original. Pulse una vez el botón Store. El número de preset en pantalla
empezará a parpadear para preguntarle en qué posición desea grabar el nuevo
preset. Gire el mando Data para elegir el preset 19 como destino. Pulse una vez
más el botón Store para completar la función de grabación.
1. Press Store button once
Display begins to flash
2. Rotate Data knob to select location
3. Press Store again to complete Store function
1. Pulse el botón Store una vez y
la pantalla comienza a parpadear
3. Pulse Store de nuevo para completar la
operación de almacenamiento
2.Gire el mando Data para elegir la posición
Congratulations! You have successfully created a Preset.
¡Enhorabuena!Acaba de crear un preset.