Pa g e / p á gina 3 – Johnson Amplification J-STATION User Manual
Page 8
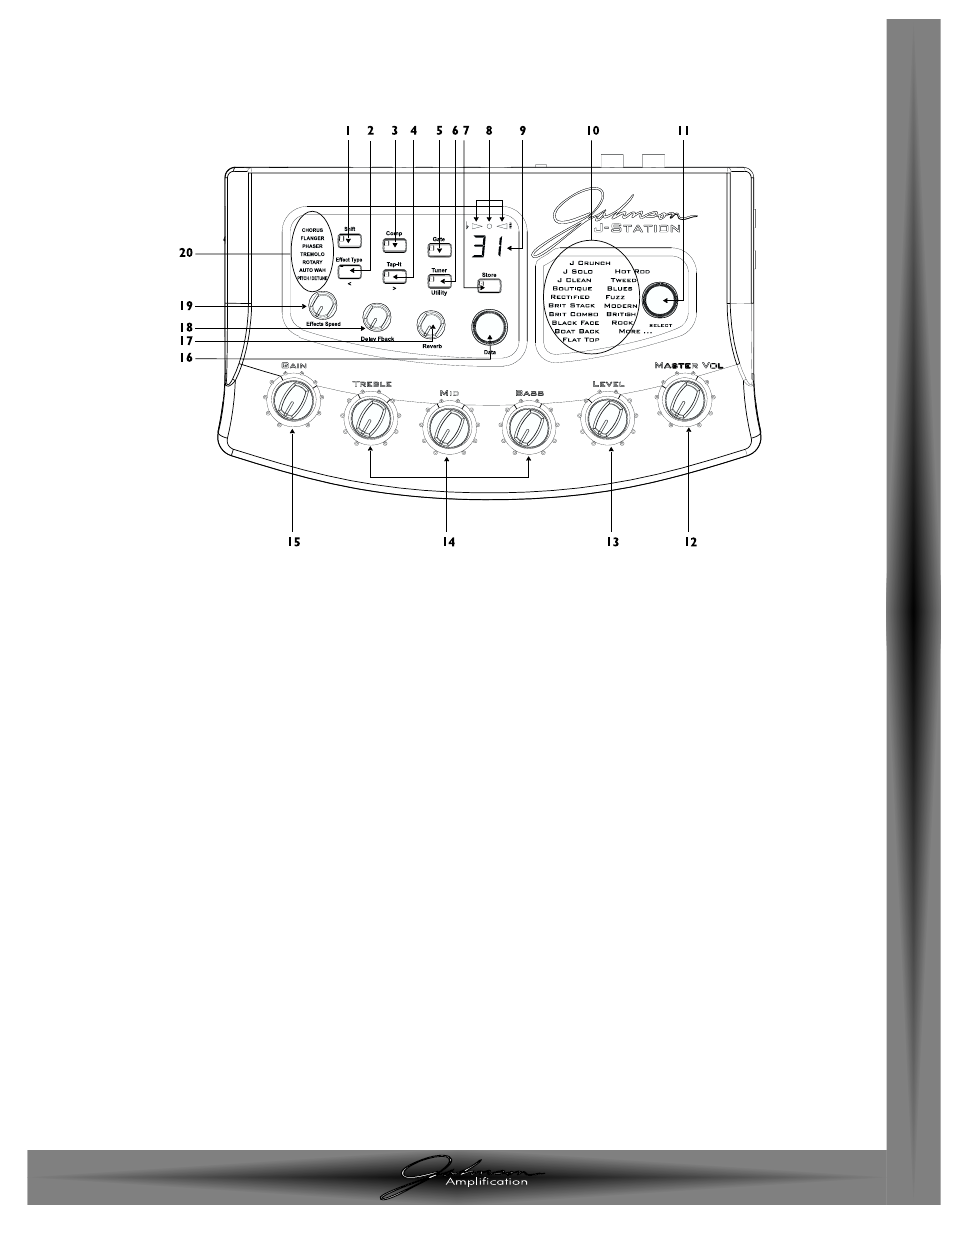
1. Shift - This button is used to access alternate functions for various editing
functions. Pressing and holding this button for 3 seconds will access the Deep
Level editing mode. See page 12 for more information on Deep Level editing.
2. Effect Type - This button is used to select the type of Modulation or Pitch
Shifting effect in the currently active Preset. Successive presses of this button
will advance through all of the available Modulation or Pitch Shifting effects.The
Effects button is also used to select the previous menu (<) in the Deep Level
editing mode and Utility functions.
3. Comp - This button turns the Compressor on and off. Pressing and holding
this button accesses the Ratio. It is also used in conjunction with the Shift
button to access the Compressor’s gain parameter.
4.Tap-It - This button is used to synchronize the Delay repeats with the tempo
of the music.Tapping this button will set the Delay Time at the rate in which it
is tapped. It is also used to select the next menu (>) in the Deep Level editing
mode and Utility functions.
5. Gate - This button turns the Noise Gate on and off. Pressing and holding this
button provides access to the Noise Gate’s Threshold. It is also used in
conjunction with the Shift button to access the Noise Gate’s Attack Time
Parameter.
6.Tuner/Utility - This button is used to activate and deactivate the Tuner. It is
also used in conjunction with the Shift button to access the Utility functions.
7. Store - This button is used to save custom settings to the User Presets.
Pressing this button once allows you to choose the User Preset where the
custom settings will be stored, and the second press of the Store button saves
the settings to the selected User Preset.
8.Tuner Indicators - These LEDs provide a visual reference while the Tuner is
active. The arrow on the left indicates the note is flat. The arrow on the right
indicates the note is sharp, and the green LED in the middle lights when the note
is in tune.
1. Shift - Este botón sirve para acceder a funciones alternativas en distintas
funciones de edición. Mantenga pulsado este botón durante tres segundos para
acceder al modo de edición de nivel profundo. Vea la página 12 para más
información sobre la edición de nivel profundo.
2. Effect Type - Este botón se utiliza para elegir el tipo de modulación o el
efecto de cambio de tono para el preset activo en esos momentos. Si pulsa este
botón irá avanzando sucesivamente a través de todos los efectos de modulación
o de cambio de tono. El botón de efectos sirve también para elegir el menú
anterior (<) en el modo de edición de nivel profundo y las funciones de las
utilidades.
3. Comp - Activa y desactiva el compresor. El mantener pulsado este botón da
acceso al Ratio. También se utiliza junto con el botón Shift para modificar el
parámetro de ganancia del compresor.
4.Tap-It - Este botón sirve para sincronizar las repeticiones del retardo con el
tempo de la música. Si golpea este botón ajustará el tiempo de retardo a la
velocidad a la que esté dando los golpes. También se utiliza para elegir el menú
siguiente (>) en el modo de edición de nivel profundo y las funciones de las
utilidades.
5. Gate - Activa y desactiva la puerta de ruidos. El mantener pulsado este botón
da acceso al umbral de la puerta de ruidos.También se utiliza junto con el botón
Shift para acceder al parámetro de tiempo de ataque de la puerta de ruidos.
6. Tuner/Utility - Este botón activa y desactiva el afinador. Se utiliza también
junto con el botón Shift para acceder a las funciones de las utilidades.
7. Store - Este botón sirve para grabar los ajustes personales en los presets de
usuario. Pulse este botón una vez para elegir el preset de usuario en el que
quiera almacenar esos ajustes personalizados, y púlselo una segunda vez para
grabar los ajustes en el preset de usuario seleccionado.
8.Tuner Indicators - Estos LEDs le ofrecen una referencia visual mientras está
activo el afinador. La flecha de la izquierda indica que la nota está bemolada, y la
de deracha indica que está sostenida; el piloto verde central se enciende cuando
la nota está afinada.
J-Station User
’s Guide / Manual
Secci
ó
n 1 - Introducci
ó
n / Section 1 hIntroduction
Pa
g
e
/
P
á
gina 3
ENGLISH
ESP
A
Ñ
OL
Recorrido guiado
Panel frontal
Guided Tour
Front Panel