ATL Telecom OM100 User Manual
Page 34
ATL USER GUIDE
OM100 Optical Multiplexer
65
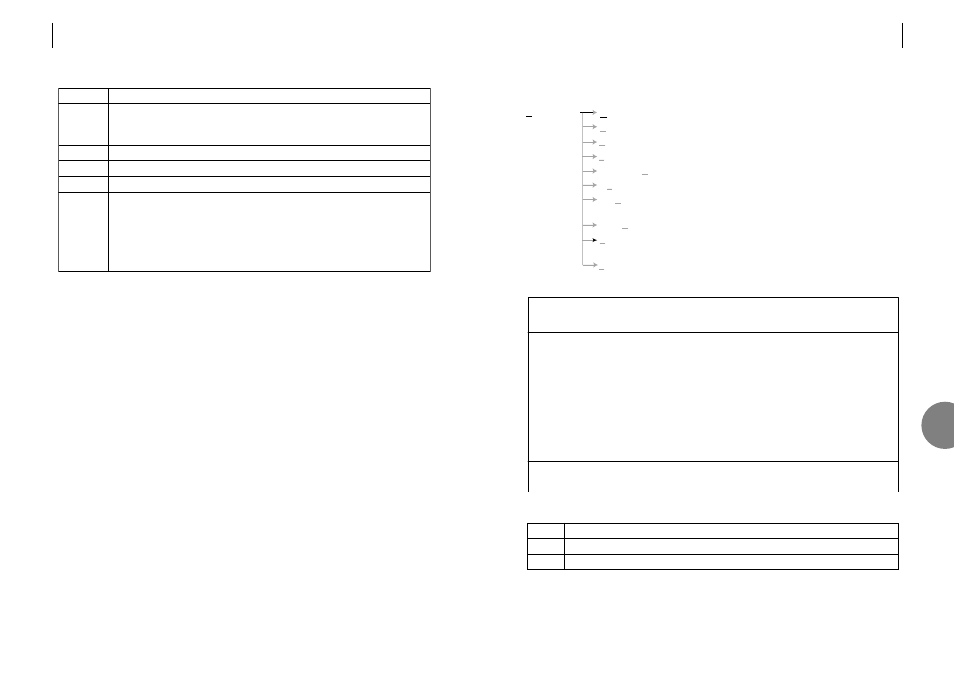
7.2.9 Reboot
Field Description
Local
Causes the unit that you are using to reboot. You will be returned to the login screen.
Remote Causes the remote partner to the unit that you are using to reboot.
OM100 Thu 01 Nov 2002 20:20:54
Config > Reboot
Urgent Alarm:On Non-Urgent Alarm:Off
Local: [ ]
Remote: [ ]
Press Return to Accept or Escape to Cancel
F1 Help F3 Previous Menu F4 Main Menu Use TAB to select fields
Configuration
Master / Slave
Master / slave configuration.
User Port
Configure each E1 port – enable.
Protection Switching
Configures the protection 1+1 switching.
System
Set date, time and menu timeout.
Subsystem Names
Enter name, description and location of this unit.
Monitoring Mode
Configures monitoring mode.
Software
Allows the downloading of software to the unit
and allows reset to factory default.
Serial Communications
Local terminal set-up – baud rate, parity, handshake.
Reboot
This option allows you to reboot the unit that you
are using, as well as its remote partner.
Front Panel
Allows configuration of Front Panel controls.
64
ATL USER GUIDE
OM100 Optical Multiplexer
7.2.8.1
Procedure to follow when changing settings
1. Make all the desired changes to this menu by using the cursor to move to the appropriate
check box, then press the space bar to change the selected field.
2. Once all the desired changes have been made, press the <return> key to accept the
changes. The unit will now implement these changes.
3. A message will appear: “Change your terminal to new settings.... Press Escape
to continue”.
4. Referring to the user manual for your terminal – change its communications set-up in the
same way you changed this menu.
5. Press the <Escape> key.
Notes: a) The OM100 tries to change baud rates smoothly. However if the new screen is not
displayed correctly you may have to reset your local terminal.
b) If the characters still appear corrupt then choose a lower baud rate.
Description
Speed at which characters are sent and received from the local terminal.
Higher numbers mean faster speed. If characters are being corrupted try a lower
speed.
Some terminals require 7 bit data if parity is turned on. Most prefer 8 bit data.
Provides a means of checking characters for errors (but does not correct them).
1 stop bit is standard.
Turning this on allows your local terminal to control the rate at which characters are
being sent.
This is useful if your terminal cannot keep up with the rate at which characters are
produced.
Note: if characters are being corrupted, turning on handshaking will not help –
choose a slower baud rate instead.
Field
Baud rate
Data bits
Parity
Stop bits
Handshake
7