Schedules window, Lead/lag controller technical guide, Setting schedules – Orion System Lead Controller User Manual
Page 33
Lead/Lag Controller Technical Guide
Section 9: Setting Schedules
33
Schedules Window
Setting Schedules
Left click the
<Schedules>
button (ON/OFF button) in the Schedules
Status Window (Figure 59, page 32) to open the Schedule Confi gu-
ration Window (Figure 60). You can confi gure up to (4) separate
schedules for various uses on the Lead/Lag Controller, but can
only confi gure (1) schedule on the 2 Lead/1 Lag Controller. These
Schedules are (7) day, (2) event per day Schedules.
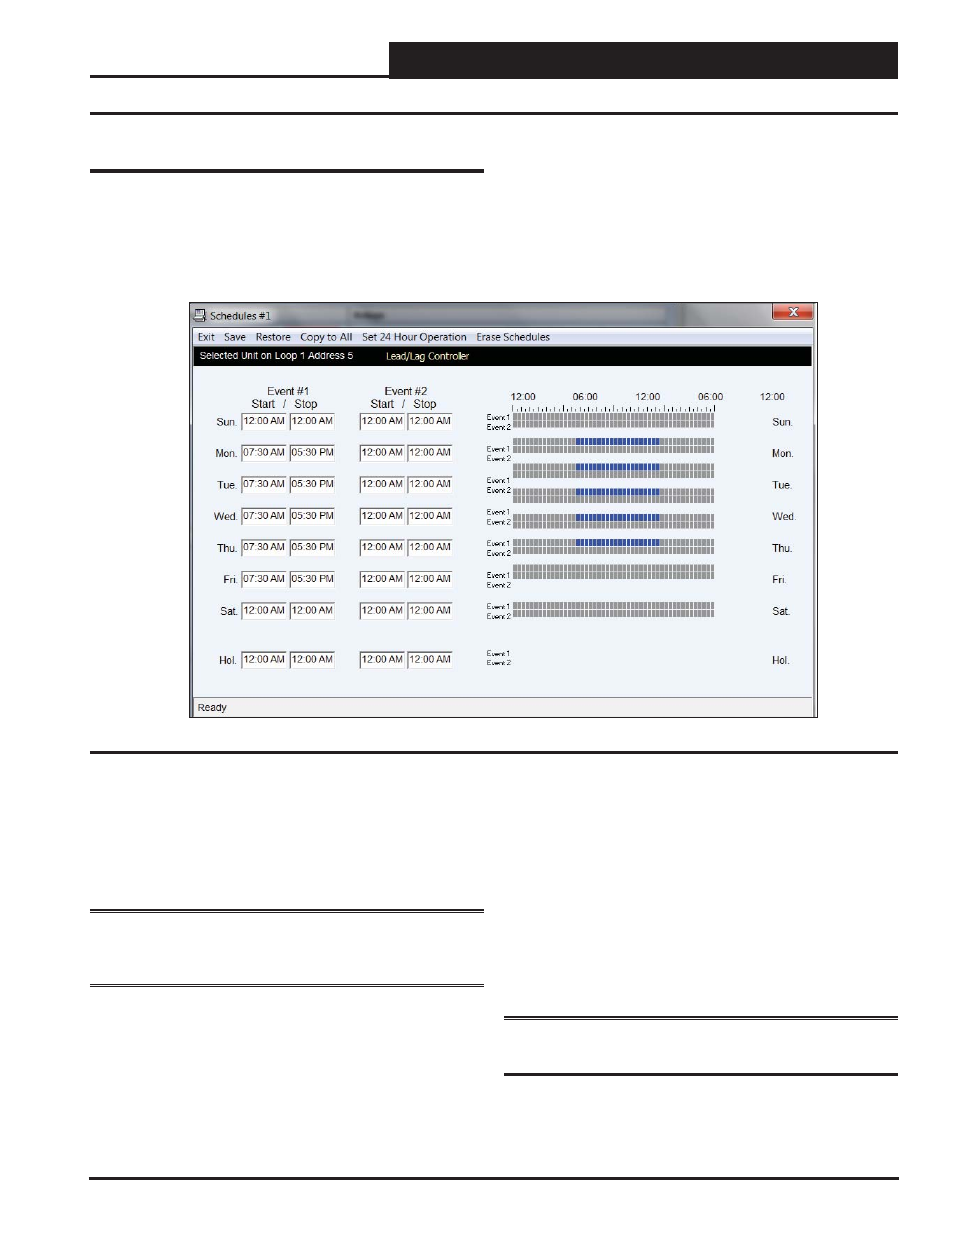
Figure 60: Schedule #1 Confi guration #1 Window
The
Schedule Confi guration Window
in the example shows a 7:30
AM to 5:30 PM operating schedule for Monday through Friday. You
can also use 24 hour military format if you wish. The bars on the right
side of the screen give a visual indication of the selected time periods.
When you enter a time in any fi eld, you must designate AM or PM
and
press
<ENTER>
to save.
NOTE:
You MUST press
<ENTER>
to have the system accept
your entry. If you do not press
<ENTER>
, the bar graph to the right
will either not display or will not change.
The holiday start and stop times will override the standard operat-
ing hours. The holidays themselves are scheduled in the
Holiday
Schedule Window
described on page 35
.
To eliminate a schedule from any event, simply
type
a zero and
press
<ENTER>
for the Start and Stop time for that day. The screen will
display 12:00 AM for both the Start and Stop times, indicating that
the equipment will not activate for that day.
If you want the controller to run the full 24 hours,
type
11:59 AM
for the Start time and type 11:59 PM and
press
<ENTER>
for the
Stop time. This ensures the full 24-hour period will remain in the
occupied mode without interruption.
Select
<Save>
to save your schedule.
Select
<Restore>
to restore
a previously saved schedule.
Select
<Copy to All>
to copy the
schedule to all like controllers,
select
< Set 24 Hour Operation>
to all schedules in this window for continuous operation, and
select
<Erase Schedules>
to completely erase the schedule appearing
in the window. See page 34 for an explanation of each of these
functions.
WARNING: < Erase Schedules>
will clear ALL entered
stop/start times, so use with caution.