Running ruinet – Orion System PT-Link II LON User Manual
Page 9
PT-Link II Interface
PT-Link II LON
®
Technical Guide
9
Connecting To The PT-Link II
1.) In order to communicate and program the PT-Link II you will
need to install RUINET software on your computer. If you do not
have the software, it is available for downloading at www.orioncon-
trols.com/software-new.html under PT-Link II Software
WARNING:
Make sure to load RUINET onto your hard drive
and run the program from your hard drive. DO NOT under any
circumstances run RUINET from your cd drive.
2.) If RUINET is in the desktop directory (if it isn’t, locate its direc-
tory), double-click on RUINET, and the RUINET program should
run. Initially, you might see the screen below (Figure 9). Type
<I>
for
Specify IP Address and the message “Enter IP Address of the Field
Server to Connect to” will appear on the screen.
3.) Type the IP Address of
<192.168.1.24>
and press
<Enter>
.
4.) If you have only one PT-Link II connected to the network, then RUI-
NET will automatically connect to that particular PT-Link II ; otherwise,
a menu will appear to allow the selection of the desired PT-Link II .
NOTE: If RUINET is unable to establish a connection, there
are a few simple procedures you can perform to try to
determine the problem. To verify your network cables,
observe the green LED displayed directly above and to
the right of the Ethernet port. This LED should be on
if the 10 BaseT cable is good. Secondly, observe the
red LED displayed directly above and to the left of the
Ethernet port. This LED should be solid while RUINET
is running. If the LEDs are lit as expected, and RUINET
still does not receive replies, then the netmask is prob-
ably incorrect. If this does not help, then your Ethernet
setup on your PC is possibly not compatible. Ensure that
you have an Ethernet adapter installed in your software
confi guration and that it is confi gured to run the TCP/IP
protocol. If you are still unable to connect, please contact
WattMaster Controls.
Running RUINET
Figure 9: RUINET PT-Link II Specify IP Address
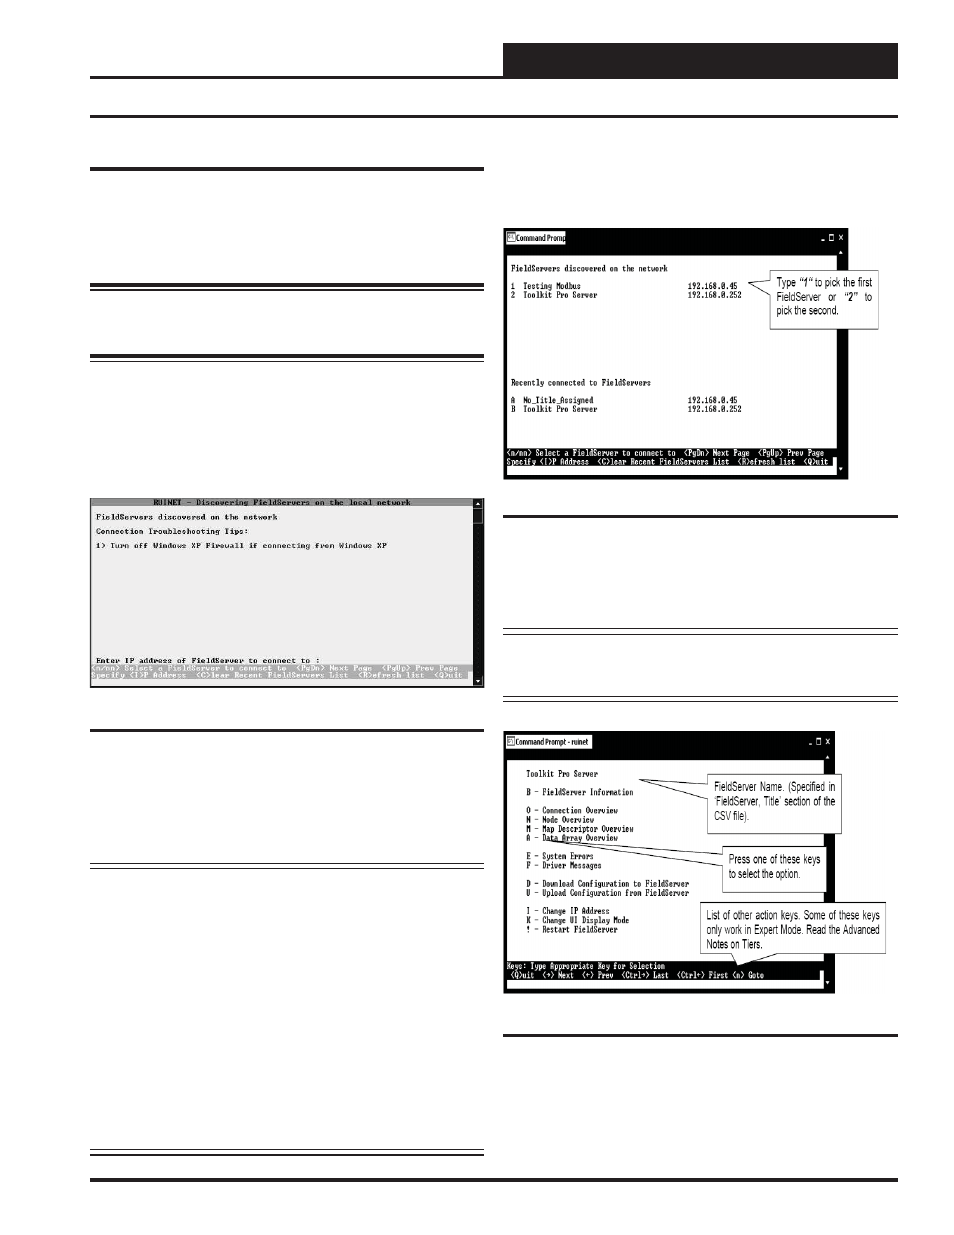
5.) On subsequent connections, a list of PT-Link II’s that have been
recently connected may appear under the message “Recently connected
to FieldServers.” Select the required PT-Link II by typing the Number
or Letter in the left hand column. (Figure 10).
6.) Once connected, you will see the RUINET Main Menu (Figure
11). Unless you need to make changes to the confi g.csv fi le (see Steps
9-13 on page 10 & 11), you are now ready to send and receive fi les to
and from the PT-Link II .
NOTE:
If you are installing a LON PT Link and the LON BAS
is using implicit addressing, no changes need to be made
to the confi g.csv fi le and you can skip to step 14.
Figure 10: RUINET PT-Link II Selection Menu
Figure 11: RUINET PT-Link II Main Menu