Virtual tracks, 4 – recorder, Press the shifted – Teac 2488 User Manual
Page 56: Use the channel, Keys, Through, Press, Tascam 2488 user’s guide, Virt trk, Select
4 – Recorder
56
TASCAM 2488
User’s Guide
You could undo all items up to item 7:
…and then re-record the guitar bridge.
After this, though, if you wanted to restore the vocal
tracks which we’d recorded, you wouldn’t be able to.
The new recording would replace everything above
the line”.
NOTE
Performing an action after the redo clears the list of
redoable actions (i.e. those actions which have been
undone).
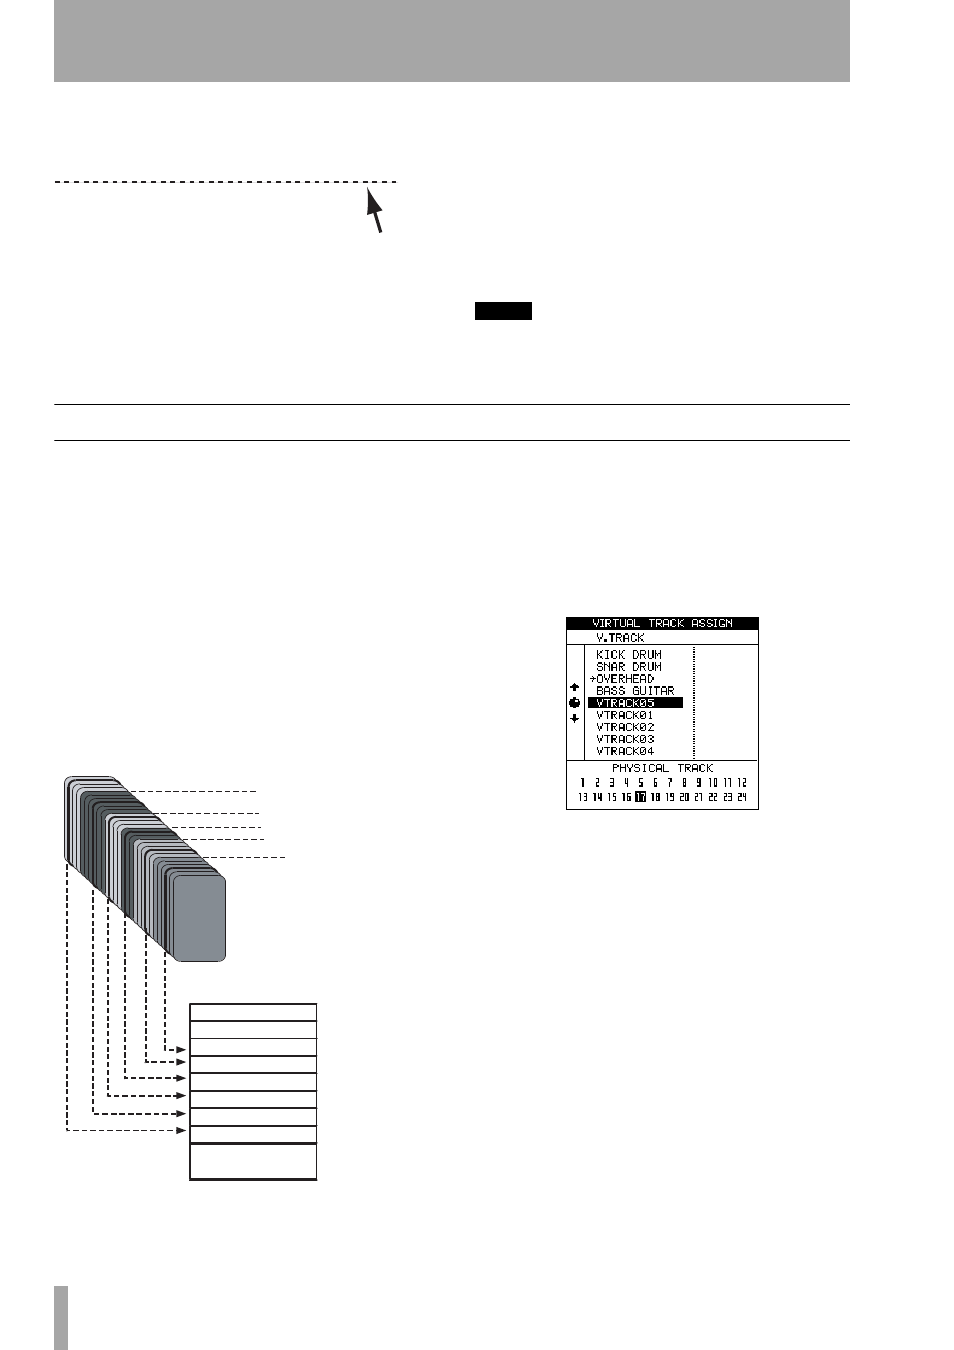
Virtual tracks
When you use the 2488, you can record “spare”
tracks; for instance, different versions of the lead
vocals, and pick and choose between the different
versions to find the one which works best.
These “spare tracks” are known as virtual tracks.
With the 2488, you can record up to 250 tracks per
song. From those 250 tracks, you pick the ones that
you want and fit them together to make your finished
mixed song. This can be re-takes of the same mate-
rial (for instance, many attempts by a singer to cap-
ture the perfect vocal line), or alternative tracks
(different guitar lines or effect settings, etc.). This
allows you much more freedom to experiment than a
tape recorder can provide.
When a virtual track is assigned to be an “active”
disk track, it cannot be assigned to any other track.
Virtual tracks are mono tracks. You need to assign
one virtual track to each track of a stereo pair.
To assign a virtual track to a disk track:
1
Press the shifted
VIRT TRK
key.
2
Use the channel
SELECT
keys or the (Ó and
Á keys) to select the disk track to which the
virtual track will be assigned, as shown by the
inverted numbers at the bottom of the screen.
Repeated pressing of the stereo channel
SELECT
keys (
13/14
through
23/24
) changes
between the odd and even numbered channels
of that pair.
3
Use the wheel to choose which virtual track
will be assigned to the disk track and become
active.
4
Press
ENTER
(or
PLAY
) to make the assign-
ment, or
EXIT
to exit the track assignment
screen without actually making the
assignment.
RECORDING
12
This is yet another retake of the lead vocal
RECORDING
11
Another attempt at the whole of the lead vocal
AUTO PUNCH
10
A try to correct a bad note in the lead vocal
RECORDING
9
First try at the lead vocal
AUTO PUNCH
8
Repairing the bad guitar bridge
>RECORDING
7
Recording the guitar solo
RECORDING
6
Piano (alternative part)
RECORDING
5
Piano
RECORDING
4
Guide vocals
RECORDING
3
Bass line
COPY->PASTE
2
Looping the drum part
RECORDING
1
Basic drum loop
START UP
0
Beginning of song
AUTO PUNCH
8
This was the second go at repairing the bridge
>RECORDING
7
Recording the guitar solo
RECORDING
6
Piano (alternative part)
RECORDING
5
Piano
RECORDING
4
Guide vocals
RECORDING
3
Bass line
COPY->PASTE
2
Looping the drum part
RECORDING
1
Basic drum loop
START UP
0
Beginning of song
All the pre
vious items ha
ve now
gone
Track 1:
Drums Left
Track 2:
Drums Right
Track 3:
Lead Guitar
Track 4:
Rhythm Guitar
Track 5:
Saxophone
Track 7:
Lead vocals
Track 6:
Bass line
Track 8:
Backing vocals
Assigned
playback
tracks
Different harmony arrangements for
backing vocals
Lead vocal attempts
Bass line played on different instruments
Saxophone takes
Rhythm guitar experiments with
different effect settings
Different takes of lead guitar line
Virtual
tracks
Tracks 9 through 24 use
other virtual tracks (not
shown here for clarity)
Here, we pick the best
takes from the virtual
tracks and assign them to
our playback tracks.