Preassembly – Harken 1080 MKIII Jib Reefing & Furling User Manual
Page 23
Preassembly
Foil Length Instructions
April 2000
Unit 3.25 MKIII
12
■
Adjusting Foil Length
The length of the furling system is matched to the headstay length by adjusting the number of
7' (2.13 m) foil extrusions used and by cutting the top foil to length from one of the 7' (2.13
m)
foils provided. In some cases the bottom foil is also shortened.
Consult the chart on page 11 to determine how many full length 7' (2.13 m) foils you
need and save these. You should have an additional 7' (2.13 m) foil to be used for the
top foil which will be 7' (2.13 m) or less.
■
Foil Length - Special Considerations
The top foil is designed to ride over the shank of the upper swage fitting and to within
2
1
/
2
" (63.5 mm) of the center of the pin holding the headstay to the masthead toggle.
On some boats this is not possible - for example, a Norseman, Sta-Lok or rod upper termi-
nal.
If for any reason your foil cannot ride within 2
1
/
2
" (63.5 mm) of the pin center, shorten the foil length to compensate.
■
Find Your Pin-to-Pin Headstay Length on Page 13 or 14 and follow procedures below as necessary.
Pin-to-pin length is described on page 8.
All Installations
■
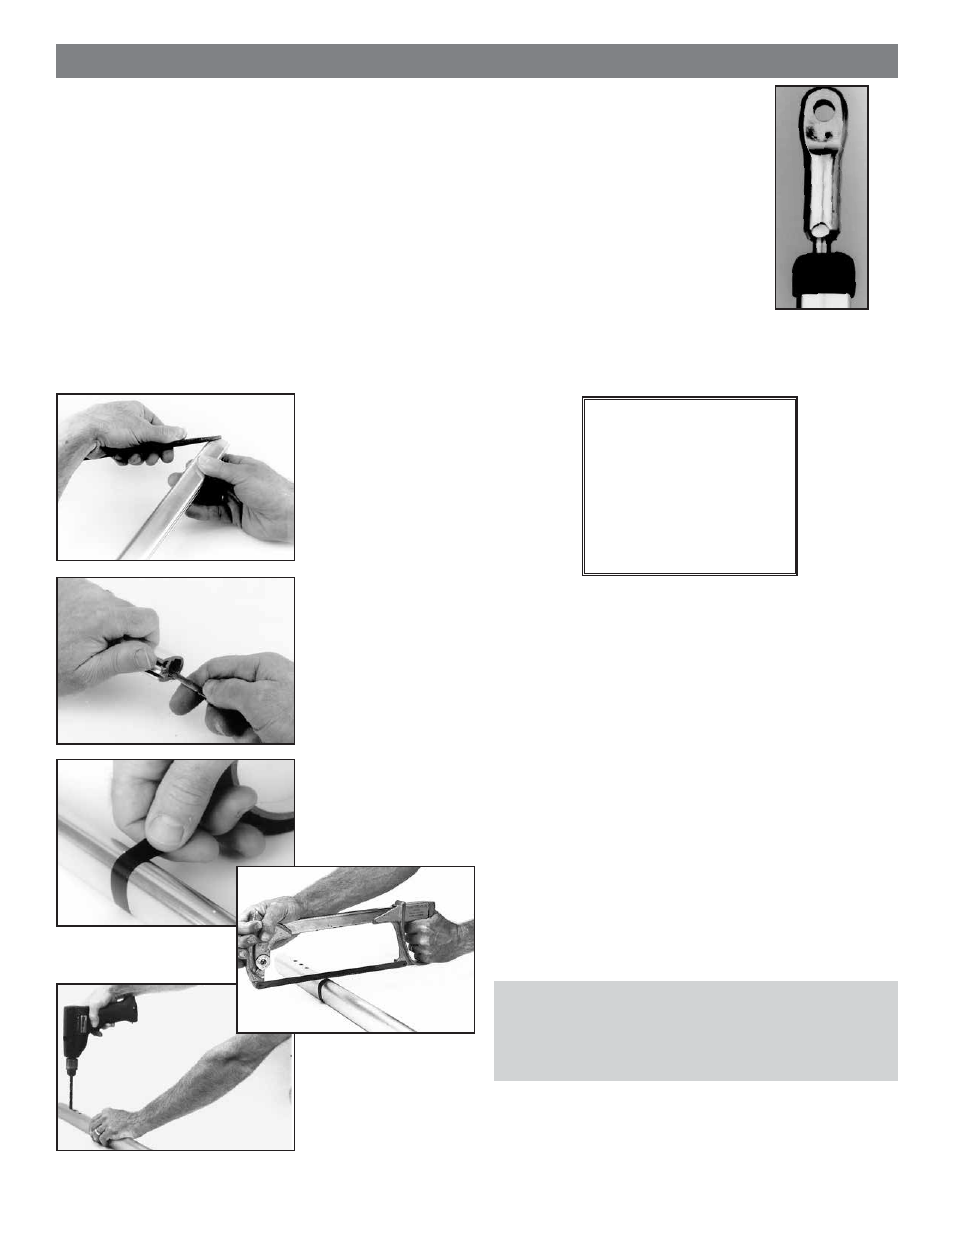
Roughing up Top Foil for Trim Cap
Rough up the top 1" (25 mm) of the top foil with
a file or sandpaper.
Most Installations
■
Deburr the Foil
After cutting foil, clean all shavings from inside the
foil. Failure to deburr or clean the inside of the foil
may cause it to seize to a connector when it is being
installed.
Some Installations
■
Cutting and Drilling Bottom Foil
Consult the chart on page 13 to see if you need to
shorten the special bottom foil. If you do use a hacksaw
to shorten the special bottom foil by 7
1
/
2
" (190.5 mm).
Make sure you cut the end nearest the existing holes.
Deburr the foil after cutting.
Tip: there are three dimples in the bottom foil. The upper dimple is a
guide for cutting the foil. Wrap tape evenly around the foil so the top
edge of the tape runs through the center of the upper dimple. Line the
hacksaw blade up with this edge of the tape. The side of the blade
facing the lower part of the foil should run through the center of the
dimple.
Drill two holes using a
21
/
64
" (8 mm) drill bit. Use the dim-
ples in the foil as a guide. The center of the dimples will
be at 2
1
/
2
", 3
1
/
2
" and 4
1
/
2
" (63.5 mm, 88.9 mm and 114.3
mm) from the cut end of the foil.
WARNING
If you make any cuts in the foils
be sure to carefully
clean all shavings from inside
the foils. Failure to deburr or
clean the inside of the foils
may cause them to seize to the
connector during installation.
- 1081 MKIII Jib Reefing & Furling 1082 MKIII Jib Reefing & Furling 1083 MKIII Jib Reefing & Furling 1084 MKIII Jib Reefing & Furling 1085 MKIII Jib Reefing & Furling 892 MKIII Jib Reefing & Furling 896 MKIII Jib Reefing & Furling 882 MKIII Jib Reefing & Furling 815 MKIII Jib Reefing & Furling 1110 MKIII Jib Reefing & Furling