11 – internal settings, Options page – Teac HS-4000 User Manual
Page 102
102
TASCAM HS-4000
11 – Internal settings
Mono File Place
When the File Mode is set to MONO, set the folder where
audio files are saved with the following buttons.
Sub Folder
POLY button (default)
Audio files are saved in
subfolders created for each take
within the session folder.
Session Root
Session Root button
Audio files are saved directly in
the session folder.
CAUTION
• In both modes, a subfolder is created for each take inside
the folder, and management files are generated in these
subfolders.
• When Session Root mode is selected, the maximum number
of takes that can be recorded in a single session is greatly
reduced from normal. For this reason, when switching to
Session Root mode the following pop-up window appears
with a warning about the reduced maximum limit to the
number of takes.
When switching to Sub Folder mode, the following pop-up
window appears explaining the restored maximum limit to
the number of takes.
• When Session Root mode is selected, the number of files
created is large. For this reason, the maximum number
of takes that can be recorded is greatly reduced.(See
“Recording operation limitations” on page 35.)
• During recording, you can press the REC key to start
recording a new take. This function can be used 4 seconds
after beginning recording in polyphonic and subfolder
modes, but inSession Root mode, you might have to wait
more than 4 seconds.
Bit Length
Set the quantization bit rate for recording files using the
following buttons.
Setting buttons: 16bit (default), 24bit
Max File Size
Set the maximum size for recording files using the following
buttons.
Setting buttons: 640MB, 1GB, 2GB (default)
Pause Mode
Set whether or not to divide files when a recording is paused
using the following buttons.
Setting buttons: SPLIT (default), NO SPLIT
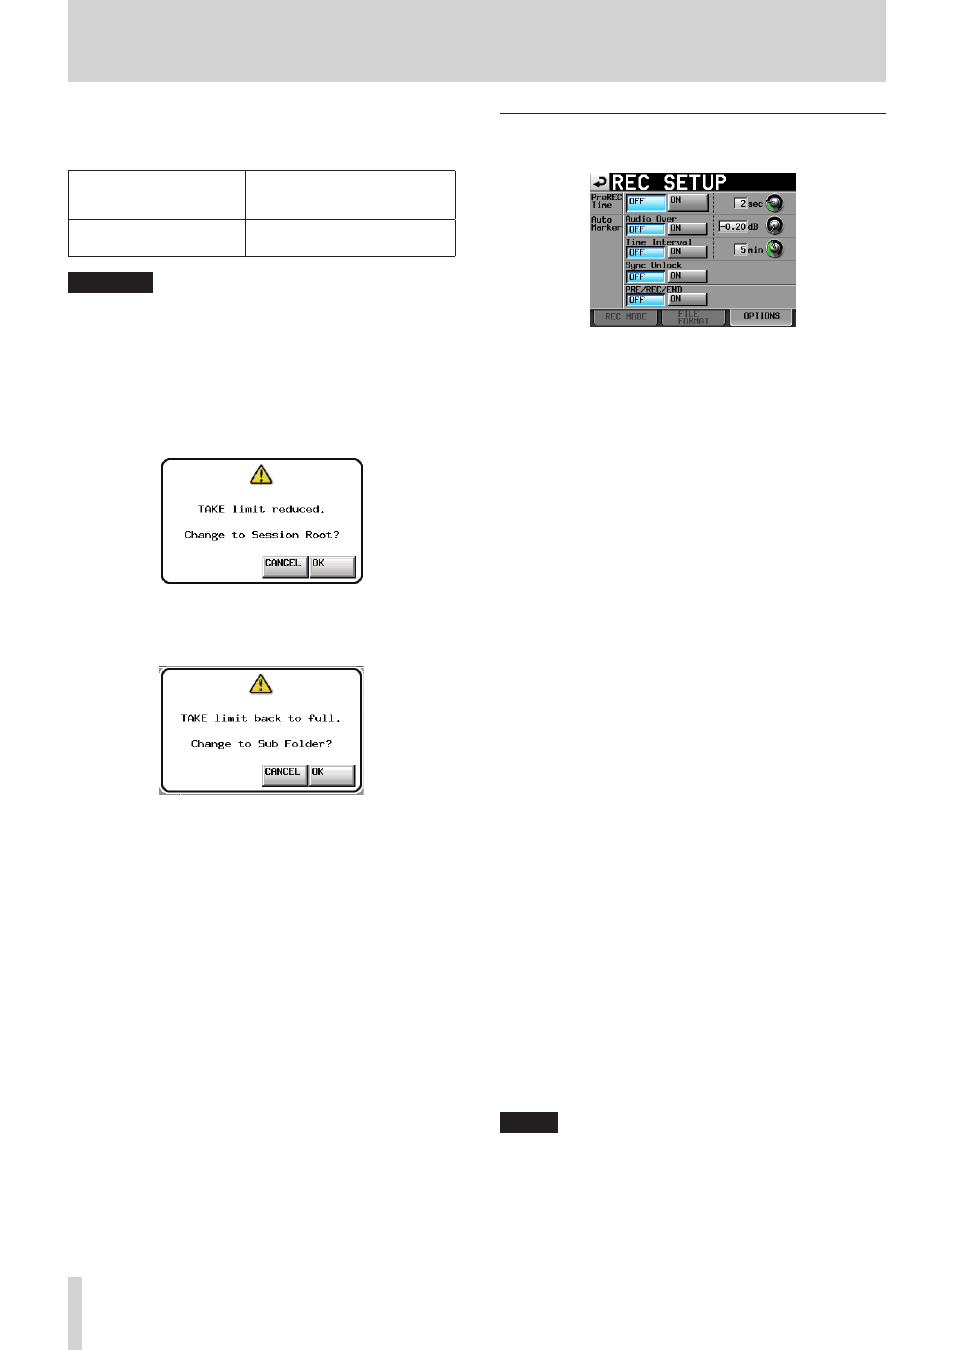
OPTIONS page
Make settings related to the pre-recording and auto markers.
PreREC Time
Turn pre-recording on or off and set the amount of
pre-recording time (default: OFF).
When PreREC Time is ON, the signal input during recording
standby is captured by the built-in memory for the set
amount of time. This allows a maximum of 5 seconds to be
recorded before recording is started normally.
To set the pre–recording time, touch the knob, and use the
DATA dial to adjust the value.
Setting range: 0–5 seconds (default: 2 seconds)
Auto Marker
Make settings related to auto markers.
• Audio Over:
Use this to add marks when the set audio level is
detected.
A mark is added when the set audio level is exceeded.
Turn this function ON or OFF and set the detection level
(default: OFF).
To set the detection level, touch the knob, and adjust the
value using the DATA dial.
Setting options: −0.20dB (default), −0.17dB, −0.13dB,
−0.10dB, −0.06dB, −0.03dB
Settings made here are reflected in the Over Level
setting on the METER SETUP screen.
• Time Interval
Use to add marks at fixed time intervals.
Turn this function ON or OFF and set the time interval
(default: OFF).
To set the time, touch the knob, and adjust the value
using the DATA dial.
Setting range: 1–10 minutes (default: 5 minutes)
• Sync Unlock
Use to add a mark when synchronization with the master
clock is lost.
Turn this function ON or OFF (default: OFF).
• PRE/REC/END
Use to automatically add marks at the pre-recording
starting position, the recording starting position and
recording ending position.
Turn this function ON or OFF (default: OFF).
NOTE
• An “audio over” occurs when the level exceeds the
maximum level (full scale) minus the value set by the user.
(In the example above, this would be when the level exceeds
the maximum level minus 0.20 dB.)
• PRE/REC/END automatic marks are only added to takes.
They do not appear in the timeline mode timeline.