Operation panel, Operation panel -3 – TA Triumph-Adler DC 2016 User Manual
Page 19
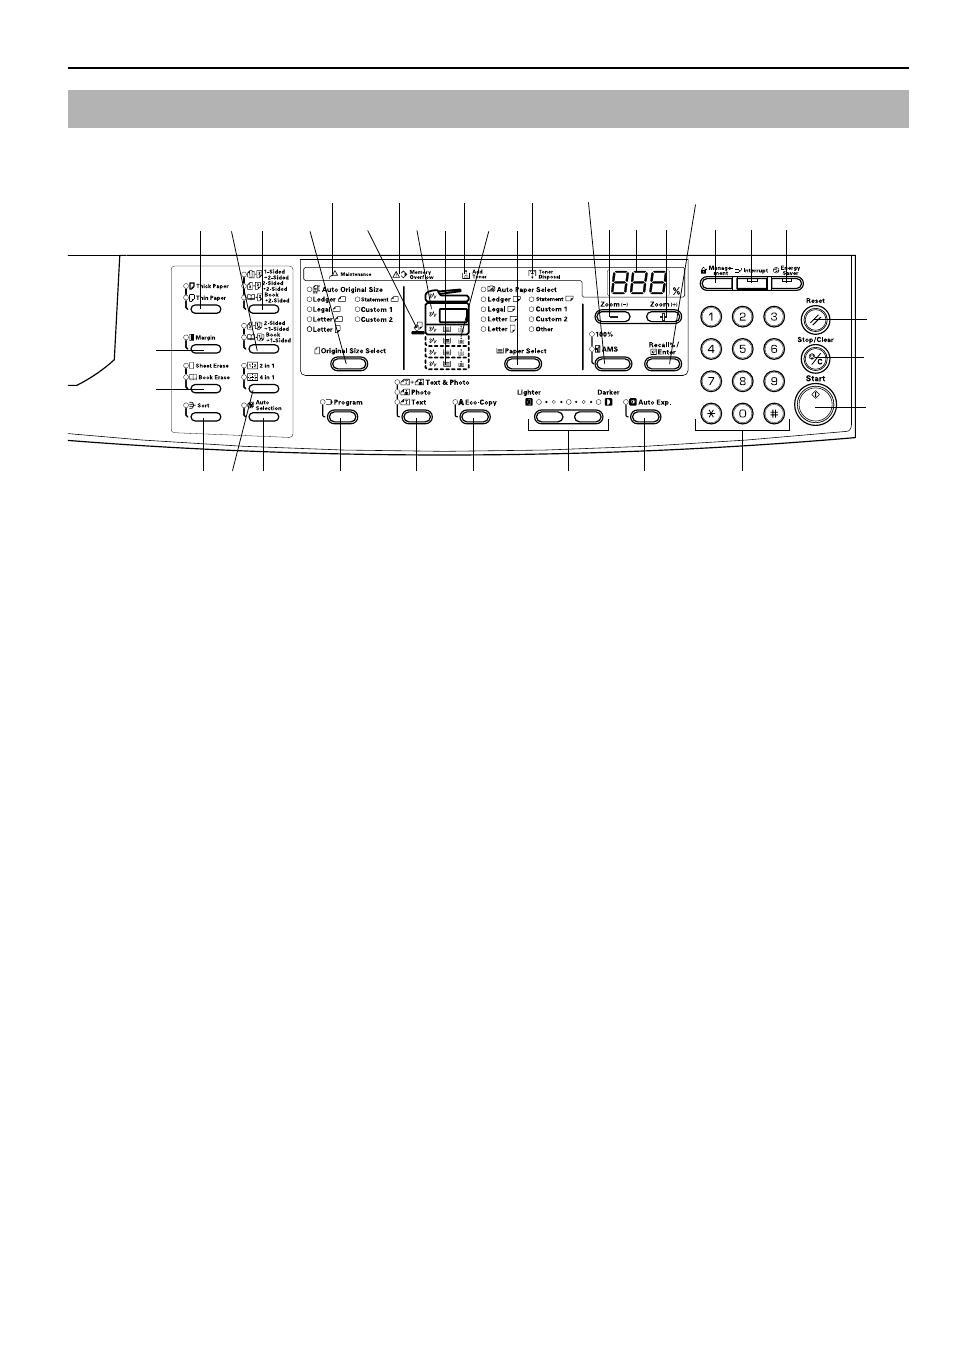
Section 2 NAMES OF PARTS
2-3
Inch specifications
(1) [Start] Key (Indicator)
Press this to begin copying. When this indicator is pressed
after it has changed to a green color, copying will begin
immediately.
(2) [Stop/Clear] Key
Interrupts/Stops copying. Pressing on this key for 3 seconds
will display the Total Count. Refer to P.6-34.
(3) [Reset] Key
Press this key to reset all functions and return to the Default
Setting Mode. (Refer to P.2-4 "Regarding the Default
Setting Mode (the mode after warm-up processing has
been completed or the [Reset] key pressed)".)
(4) Keypad
Press this key to set the number of copies to be produced or to
enter numbers.
(5) [Energy Saver] Key (Indicator)
Press this key to enter the Low Power Mode. The “Conserve
Power” indicator will be lit while in either the Low Power or
OFF Mode. Press the key once to exit the OFF Mode. (Refer to
P.4-7.)
(6) [Interrupt] Key (Indicator)
Press this when an interrupt copy operation is to be carried
out. The Interrupt indicator will light up. (Refer to P.4-6.)
(7) [Management] Key
When in Department Management Mode, press this key after
the copy operation has finished. This will display the
Department Code Input screen. (Refer to P.6-6.)
(8) [Auto Exposure] Key
Press this key to enter the Auto Exposure Mode. This will
detect the correct exposure for the original and set the optimal
exposure for copying it. (Refer to P.4-2.)
(9) Exposure Adjustment Key/Exposure Display
Press this to adjust the exposure. The Exposure Display
shows the current exposure for copying. (Refer to P.4-2.) Press
the key for 3 seconds to enter the Default Settings Mode.
(10) [Eco-copy] Key
Press this to make copies using a reduced amount of toner.
(Refer to P.5-17.)
(11) Image Quality Selection Key
Press this in order to select the image quality to match the
type of original to be copied. (Refer to P.4-2.)
(12) [Program] Key
Press this to use a stored program for the copying operation.
The indicator will light up when in Program Mode. (Refer to
P.5-18.)
(13) No. of Copies/Zoom Display
This displays the number of copies. When the Zoom
magnification is displayed the % symbol will be lit.
(14) Zoom (+) Key
Press this in order to increase the magnification for the copy.
When in Default Settings Mode, this is used to select setting
items.
(15) Zoom (–) Key
Press this in order to reduce the Zoom magnification for the
copy. When in Default Settings Mode, this is used to select
setting items.
(16) [Recall%/Enter] Key
When this is pressed while the No. of Copies is displayed, the
Zoom percentage will be displayed. When in the Default
Settings Mode, press this to confirm the items that have been
set.
(17) Zoom Selection Key
Press this to switch between 1:1 (100%) and Automatic Sizing
selection. (Refer to P.4-4.)
(18) [Paper Select] Key
Press this to select the paper size. The paper size can be
selected by changing the drawer (paper supply level). The
currently selected paper size will be lit. (Refer to P.4-1.)
Pressing on this key for 3 seconds will display the drawer
paper size selected in the Default Settings Mode. (Refer to
P.3-3.)
(19) Paper Supply Indicator
This will turn to red when there is no paper in the drawer
(paper supply level).
(20) Paper Supply Level Indicator
The indicator for the paper supply drawer (supply level)
selected will be lit green.
(21) Paper Misfeed Indicator
The location of the paper misfeed will be lit red when a paper
misfeed occurs. (Refer to P.8-3.)
(22) Multi-bypass Indicator
This will be lit green while Multi-bypass is selected.
(23) [Original Size Select] Key
Press this to select the size of the original.
Operation Panel