TA Triumph-Adler DC 2016 User Manual
Page 20
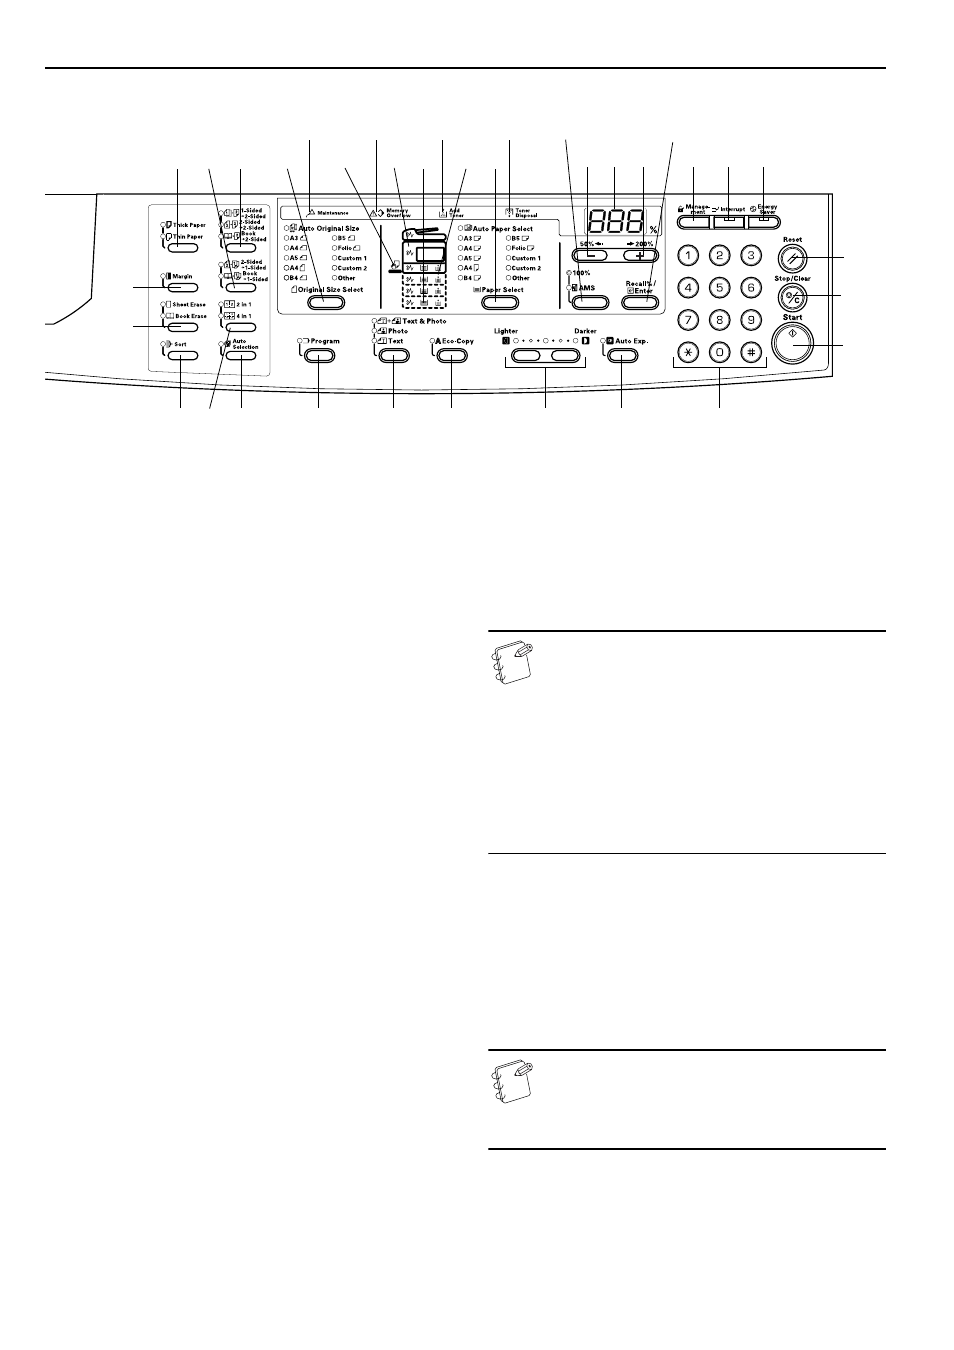
Section 2 NAMES OF PARTS
2-4
Metric specifications
(24) Toner Disposal Indicator
This will be lit red when the Waste Toner Box is full.
(25) Add Toner Indicator
This will blink red when only a little toner is left. It will stay
lit when no further copies can be produced.
(26) Memory Overflow Indicator
This will be lit red when the amount of available memory is
exceeded during memory copy mode.
(27) Maintenance Indicator
This will flash red when the time for a maintenance inspection
draws near. In addition, it will be lit red when it is time for a
maintenance inspection.
(28) [Auto Selection] Key
Press this when making copies of originals of different sizes.
The Mixed Original Sizes Indicator will light up. This can be
used when the optional Document Processor is installed.
(Refer to P.7-3.)
(29) Combine/Merge Copy Key
Press this when Combine/Merge copies (2 in 1 or 4 in 1) are to
be made. (Refer to P.5-10.) Pressing this for 3 seconds will
display the Default Setting Mode’s Combine/Merge Copy item.
(Refer to P.5-13.)
(30) 2-Sided Copy Key
Press this to match the original type when making copies of
both sides. (Refer to P.5-1.) Pressing this for 3 seconds will
display the Default Setting Mode’s 2-Sided Copy item. (Refer
to P.5-3.)
(31) Split Copy Key
Press this to match the original type when making split
copies. (Refer to P.5-4.)
(32) [Sort] Key
Press this when copies are to be sorted. (Refer to P.5-15.)
(33) Border Erase Key
Press this to match the original type when making copies in
which the borders are to be lightened. (Refer to P.5-8.)
Pressing this for 3 seconds will display the Default Setting
Mode’s Border Width item. (Refer to P.5-8.)
(34) [Margin] Key
Press this to shift the image to create a margin. (Refer to
P.5-6.) Pressing this for 3 seconds will display the Default
Setting Mode’s Margin Width item. (Refer to P.5-6.)
(35) Paper Type Selection Key
Select the paper type when thick or thin paper, etc. are to be
copied.
Regarding the Default Setting Mode (the mode after
warm-up processing has been completed or the
[Reset] key pressed)
The copier has been set at the factory to automatically select a
magnification ratio of 1:1 for the same size of paper as the original
in the [Auto Paper Select] Mode with the No. of Copies at “1” and
[Text & Photos Mode] for the Image Quality.
Notes
• The Default Setting Mode can be changed in the
Default Settings.
• In the case where an optional drawer is present, the
drawer selected in the Default Setting Mode can be
changed. (Refer to P.6-20 "Selected Drawer ".)
• The Image Quality Mode selected in the Default
Setting Mode can be changed. (Refer to P.6-12
"Original Image Quality ".)
• The Default Setting for the copy Exposure Adjustment
can be changed to the [Auto Exposure Mode]. (Refer to
P.6-13 "Exposure Mode ".)
Regarding the Auto-clear function
After the copy has been produced and a fixed interval (10 - 270
seconds) has elapsed, the copier will automatically revert to the
state it was in when warm-up processing was completed.(However,
the copy Exposure Mode and the Image Quality will not revert back
to their original state. Copies can still be repeatedly produced with
the same Copy Mode, No. of Copies, copy Exposure and other
settings if the Auto-clear function has not been activated.
Note
Please refer to P.6-30 "Auto Clear Time " Turning OFF
the Auto-clear Function P.6-29 "Auto Clear Setting "
for information on changing the time interval before the
Auto-clear function activates.
Custom Sizes
Paper and original sizes that are not displayed on the Operation
Panel can be registered as Custom Sizes. (Refer to P.3-6.)