Marantz AV8003 User Manual
Page 34
CONNECTIONS
BASIC
OPERA
TION
ADV
ANCED
OPERA
TION
REMOTE
CONTROLLER
TROUBLESHOOTING
OTHERS
NAMES AND
FUNCTION
SETUP
31
ENGLISH
SUB W:
Set the distance from the subwoofer to your
normal listening position.
SURR. B L:
Set the distance from the surround back left
speaker to your normal listening position.
SURR. B R:
Set the distance from the surround back right
speaker to your normal listening position.
Notes:
• Set the distance to each speaker in meters (m) or feet
(ft) as follows.
m: 0.03 - 9.15 m in 0.03 m steps
ft: 0.1 - 30.0 ft in 0.1 ft steps
(The values appearing on the FL display are
approximate.)
• For the speakers that you have selected “NONE” the
speaker size menu will not appear.
• The setting for surr.back L and surr.back R appears
if it is set, two surround back speakers in the
SPEAKER SIZE menu.
• The setting of SURR. BACK appears if it is set for
one surround back speaker in the SPEAKER SIZE
menu.
11.
After you complete this portion of the setup,
move the cursor to “NEXT” with the
3
,
4
,
1
and
2
cursor buttons and press the ENTER button
to go to the next page.
<SPEAKER LEVEL>
S P E A K E R L E V E L
T E S T M O D E :
M A N U A L
F R O N T L : 0 . 0 d B
C E N T E R : 0 . 0 d B
F R O N T R : 0 . 0 d B
S U R R . R : 0 . 0 d B
S U R R . B R : 0 . 0 d B
S U R R . B L : 0 . 0 d B
S U R R . L : 0 . 0 d B
S U B W : 0 . 0 d B
R E T U R N B A C K
E X I T
Here you can set the volume for each speaker so that
they are all heard by the listener at the same level.
We recommend holding a dB SPL (Sound Pressure
Level) meter at the listening position, at arms length,
and pointing straight up at the ceiling, adjust the level
of each speaker in turn unit it reads 75dB SPL when
the meter is set to “C” weighting and Slow responce.
Note:
• The speaker level settings are not available in 7.1
Channel Input mode, Pure Direct mode and Source
Direct mode.
TEST MODE:
Select “MANUAL” or “AUTO” generation of the test
tone with the
1
or
2
cursor buttons.
If you select “AUTO”, the test tone will be cycled
through in a circular pattern beginning at Left
→
Center
→
Right
→
Surround Right
→
Surround
Back Right
→
Surround Back Left
→
Surround
Left
→
Subwoofer
→
Left, in 2 seconds increments
for each channel.
Using the
1
or
2
cursor buttons, adjust the volume
level of the noise from the speaker so that it is the
same level for all the speakers.
If you select “MANUAL”, adjust the output level of
each speaker as listed below.
12.
Move the cursor to FRONT L by pressing the
4
cursor button. This unit will emit a pink noise
from the front left speaker.
Remember the level of this noise and then
press the
4
cursor button.
(Note that this can be adjusted to any level
between -12 and +12 dB in 0.5 dB increments.)
This unit will now emit the pink noise from the
center speaker.
13.
Using the
1
and
2
cursor buttons, adjust the
volume level of the noise from the center
speaker so that it is the same level as the front
left speaker.
14.
Press the
4
cursor button again. This unit will
now emit the pink noise from the front right
speaker.
15.
Repeat steps 13 and 14 for the front right and
other speakers until all speakers are adjusted
to the same volume level.
After you complete this portion of the setup, press the
ENTER button to move the cursor to “RETURN”. Press
the ENTER button to go to “2. SPKR SETUP”.
Notes:
• Speakers for which you selected “NONE” in the
SPEAKER SIZE menu will not appear.
• Surr. Back L and Surr. Back R appear if it is set for
two surround back speakers in the SPEAKER SIZE
menu.
• Surr. Back appears if it is set for one surround back
speaker in the SPEAKER SIZE menu.
• To adjust the speaker levels for 7.1 channel input
sources, you will need to use the 7.1 Ch Input sub
menu. (See page 24)
• SUB W can be set from –18dB to +12dB.
2-3 THX AUDIO SETUP
You can set the advanced Speaker Array.
1.
Select
“2. SPEAKER SETUP” from the MAIN
MENU.
2.
Select
“THX AUDIO SETUP” with the
3
or
4
cursor buttons.
3.
Press the ENTER button to enter the
selection.
T H X A U D I O S E T U P
B O U N D A R Y G A I N C O M P .
T H X U L T R A 2 S U B - W :
Y E S
B . G . C . : O N
A D V A N C E D S P K R A R R A Y
S U R R . B S P K R
: T O G E T H E R
R E T U R N
E X I T
Boundary Gain Compensation
THX ULTRA2 SUB-W : YES or NO
If you have a THX Ultra2 certifi ed subwoofer (or other
subwoofer with fl at anechoic response to 20Hz),
select “YES”.
If set to “YES”, you can chose to activate B.G.C.
(Boundary Gain Compensation).
If set to “NO”, Boundary Gain Compensation may not
be activated and the feature is locked out.
B.G.C.: ON or OFF
Set to ON when you feel too much bass is being
output.
OFF: Boundary Gain Compensation is not applied.
ON: Boundary Gain Compensation is applied.
Notes:
• If you set SUB W = NO in SPEAKER SIZE menu,
Boundary Gain Compensation will not be activated.
THX ULTRA2 SUB-W also cannot be set.
• If you set THX ULTRA2 SUB-W = YES, the Bass
Peak Level setting is not applied.
Advanced Speaker Array (ASA)
SURR.B SPKR: TOGETHER, CLOSE or APART
The best ASA effect is when the surround back
speakers are together and facing forward.
If the distance between the surround back speakers
is,
• Less than 30 cm (12 in.): TOGETHER
• Greater than 30 cm (12 in.), and less than 48 in.
(122 cm): CLOSE
• Greater than 122 cm (48 in.): APART
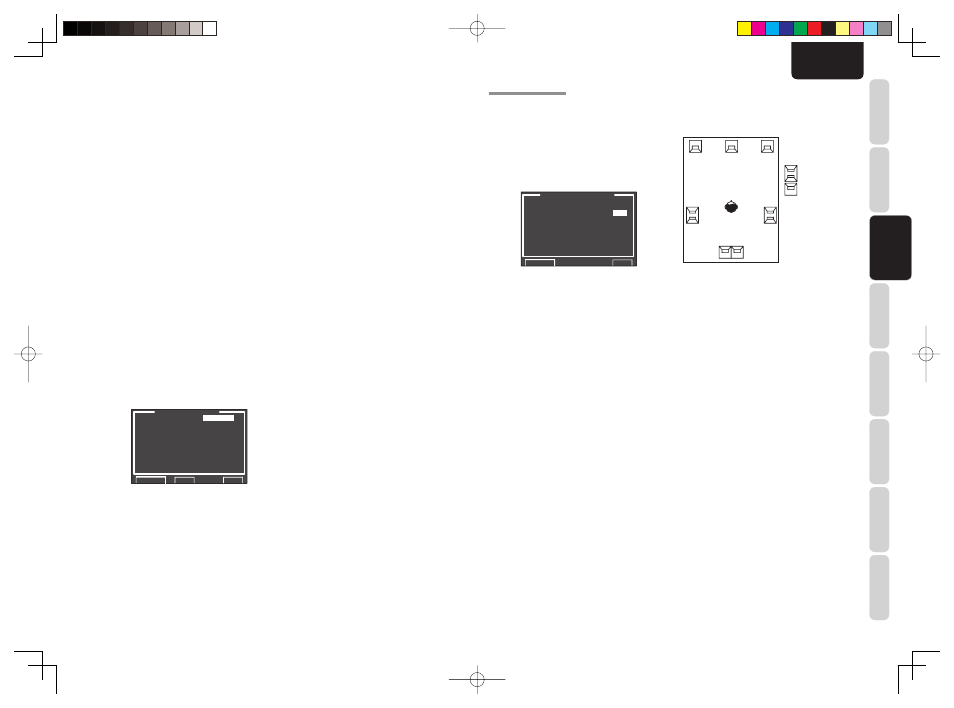
Speaker type and positioning
This diagram shows the desired positioning for 7.1
channel speaker systems used in ASA mode. During
system setup, select the distance between surround
back speakers.
FL
SBL
SBR
C
FR
SL
SR
Surround B
Surround A
Surround-L
Surround-R
Surround A
Di-polar Radiating Speaker
Direct Radiating Speaker
Front-L
Center
Front-R
Surround Back
L
R
Notes:
• The Advanced Speaker Array setting cannot be
made when using the Zone Speaker function or
when ON is set for SPEAKER C on the rear panel
of this unit.
• If you set SURR.B = NONE, 1CH, ZSP A or ZSP
B in the SPEAKER SIZE menu, Advanced Speaker
Array will not be activated.
After you complete this portion of the setup, move
the cursor to “RETURN” with
3
,
4
,
1
and
2
cursor
buttons and press ENTER button to go to the 2.
SPKR SETUP menu.
AV8003_U_Eng.indb 31
AV8003_U_Eng.indb 31
08.4.28 10:40:13 AM
08.4.28 10:40:13 AM