Marantz AV8003 User Manual
Page 38
CONNECTIONS
BASIC
OPERA
TION
ADV
ANCED
OPERA
TION
REMOTE
CONTROLLER
TROUBLESHOOTING
OTHERS
NAMES AND
FUNCTION
SETUP
35
ENGLISH
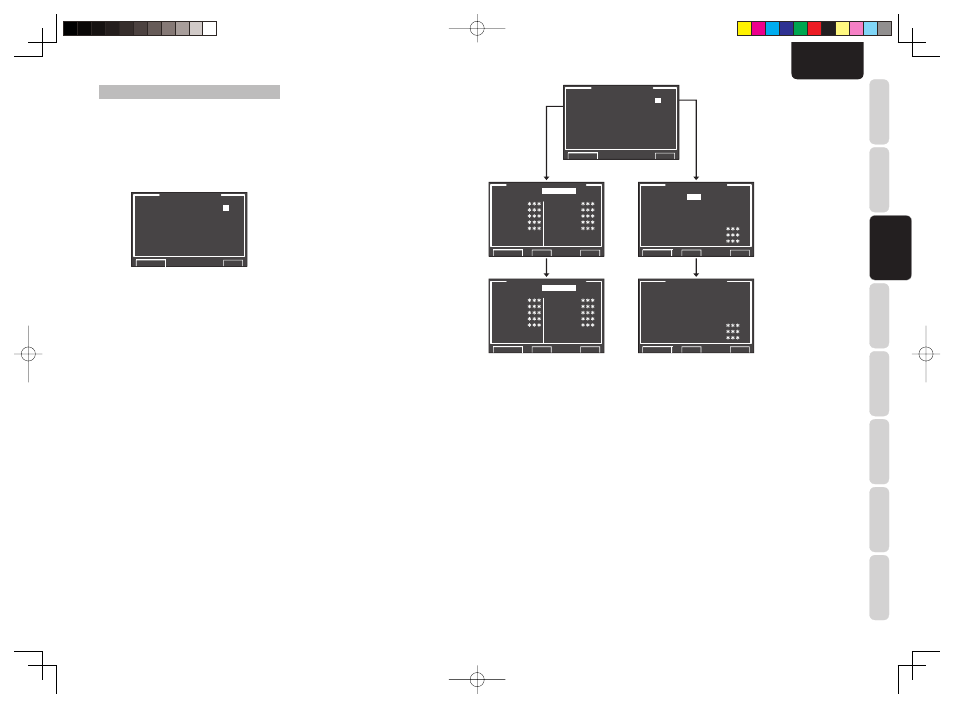
5 PREFERENCE
• ZONE SETUP :
“5-1 ZONE SETUP” (see page 36)
• DC TRIGGER SETUP :
“5-2 DC TRIGGER SETUP” (see page 36)
1.
Select
“5. PREFERENCE” from MAIN MENU
with the
3
or
4
cursor buttons and press the
ENTER button.
5 . P R E F E R E N C E
Z O N E S E T U P
A
B
D C T R I G G E R S E T U P 1 2
S T A N D B Y : N O R M A L
A U D I O : M A I N
H D M I A U D I O : E N A B L E
H D M I L I P : D I S A B L E
P . A M P L I N K : E N A B L E
R E T U R N
N E X T
E X I T
2.
Select the desired menu with the
3
or
4
cursor
buttons and press the ENTER button.
STAND BY:
When this is set to “ECONOMY”, you can reduce
the power consumption when the unit is in the
Standby mode. When “ECONOMY” is selected,
“TV AUTO” and “RS-232C” are disabled when the
unit is in the Standby mode.
AUDIO:
In the Audio mode, Dolby Digital and DTS output
is set to either “MAIN” or “SUB”. Select “AUDIO”
with the
1
or
2
cursor buttons, then select MAIN
↔
SUB
↔
MAIN+SUB with the
1
or
2
cursor
buttons.
HDMI AUDIO:
This setting determines whether to play back audio
input to the HDMI jacks through the unit or output it
through the unit to a TV or projector.
ENABLE: The audio input to the HDMI jacks
can be played back by this unit.
In such case, audio signals are not
output to the TV or projector.
THROUGH: The audio input to the HDMI jacks is
not output from the speaker terminals
of the unit. Audio data is output
directly to the TV or projector. This
setting is used to listen to audio on a
multi channel TV, etc.
D C T R I G G E R S E T U P
D C T R I G - 1 :
D I S A B L E
T V : T A P E :
D V D : C D / R :
V C R 1 : A U X :
D S S : T U N E R :
N E T : 7 . 1 C H :
R E T U R N B A C K E X I T
D C T R I G G E R S E T U P
D C T R I G - 2 :
D I S A B L E
T V : T A P E :
D V D : C D / R :
V C R 1 : A U X :
D S S : T U N E R :
N E T : 7 . 1 C H :
R E T U R N B A C K E X I T
Z O N E S E T U P B
A U D I O : D V D
S L E E P : O F F
M O N O / S T : S T E R E O
Z O N E : O F F S P K R :
V O L : V A R I V O L :
L E V : - 9 0 d B L E V :
R E T U R N B A C K E X I T
Z O N E S E T U P A
V I D E O :
D V D
A U D I O : D V D
S L E E P : O F F
M O N O / S T : S T E R E O
O S D I N F O : E N A B L E
Z O N E : O F F S P K R :
V O L : V A R I V O L :
L E V : - 9 0 d B L E V :
R E T U R N B A C K E X I T
5 . P R E F E R E N C E
Z O N E S E T U P
A
B
D C T R I G G E R S E T U P 1 2
S T A N D B Y : N O R M A L
A U D I O : M A I N
H D M I A U D I O : E N A B L E
H D M I L I P : D I S A B L E
P . A M P L I N K : E N A B L E
R E T U R N
N E X T
E X I T
HDMI LIP (Auto Lipsync Correction):
Video signals may take longer to process than
audio signals depending on the connected video
equipment.
When the unit is connected to TV or Projector
supporting Auto Lipsync Correction in HDMI
1.3a, audio and video can be automatically
synchronized using this function.
Use the
1
or
2
cursor buttons to switch between
ENABLE and DISABLE.
ENABLE: Auto Lipsync Correction is used to
synchronize audio and video.
DIESABLE: Deactivates this function.
Note:
• This function is not available when the unit is
connected to equipment that does not support HDMI
1.3a or Auto Lipsync Correction. For details, check
the user’s manual of the connected equipment.
• If this function is unavailable, you can use the
regular Lipsync function to synchronize audio and
video. (See page 47)
P.AMP LINK:
ENABLE: Set when perfor ming REMOTE
CONTROL connection with MM8003.
DISABLE: Set when perfor ming REMOTE
C O N T RO L c o n n e c t i o n w i t h a
MARANTZ power amp other than
MM8003.
After you complete this portion of the setup, move the
cursor to “RETURN” with the
3
,
4
cursor buttons and
press the ENTER button.
AV8003_U_Eng.indb 35
AV8003_U_Eng.indb 35
08.4.28 10:40:15 AM
08.4.28 10:40:15 AM