Marantz AV8003 User Manual
Page 52
CONNECTIONS
SETUP
BASIC
OPERA
TION
REMOTE
CONTROLLER
TROUBLESHOOTING
OTHERS
NAMES AND
FUNCTION
ADV
ANCED
OPERA
TION
49
ENGLISH
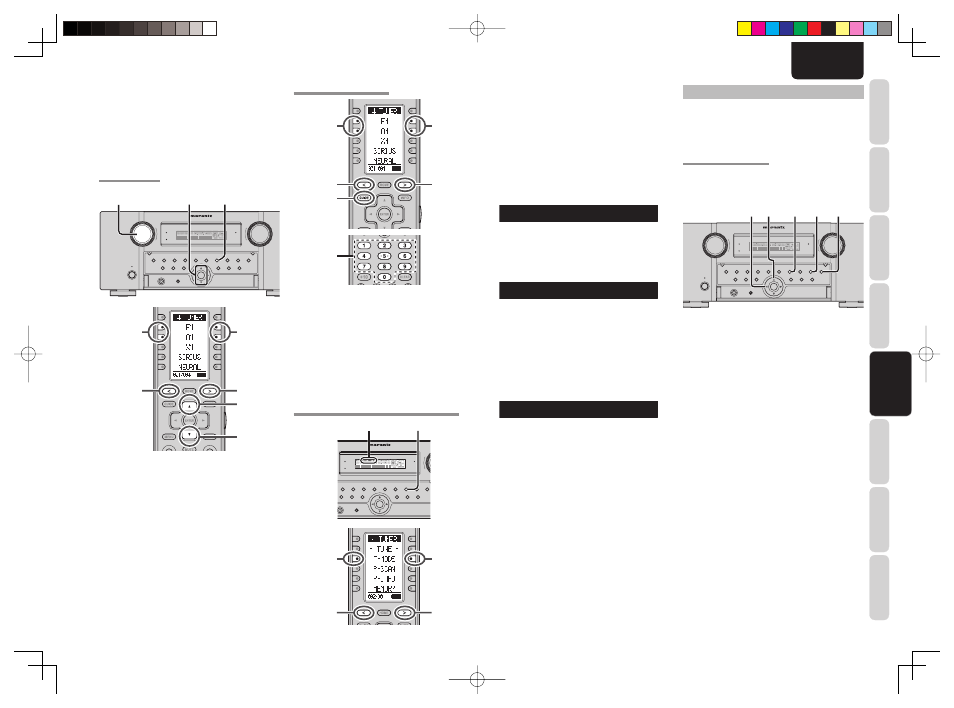
PRESET MEMORY
With this unit you can preset up to 60 FM/AM stations
in any order.
For each station, you can memorize the frequency
and reception mode if desired.
AUTO PRESET MEMORY
This function automatically scans the FM and AM
band and enters all stations with proper signal
strength into the memory.
TOP
TOP
ZONE
ZONE
SPEAKER
SPEAKER
DISPLAY
DISPLAY
INPUT
INPUT
7.1CH
7.1CH
DIRECT
DIRECT
PURE
PURE
PHONES
PHONES
THX
THX
M-DAX
M-DAX
MODE
MODE
SURROUND
SURROUND
CLEAR
CLEAR
MEMORY
MEMORY
T-MODE
T-MODE
BAND
BAND
EXIT
EXIT
MENU
MENU
ZONE
ZONE
DOWN
DOWN
VOLUME
VOLUME
UP
UP
INPUT
INPUT
SELECTOR
SELECTOR
AUTO
AUTO
SETUP MIC
SETUP MIC
HDMI
HDMI
M-DAX
M-DAX
PURE DIRECT
PURE DIRECT
POWER ON/OFF
POWER ON/OFF
STANDBY
STANDBY
AV PRE TUNER AV8003
AV PRE TUNER AV8003
ENTER
ENTER
2. 4. 1. 3.
5.
2.
1.
To select FM , press the BAND button on the
front panel.
2.
While pressing the MEMORY button, press the
1
cursor button.
“AUTO PRESET” will appear on the display,
and scanning starts from the lowest frequency.
3.
Each time the tuner fi nds a station, scanning
will pause and the station will be played for fi ve
seconds.
During this time, the following operations are
possible.
The band can be changed by the BAND button.
4.
If no button is pressed during this period, the
current station is memorized in location Preset
02.
If you wish to skip the current station, press the
3
cursor button during this period, this station
is skipped and auto presetting continues.
5.
Operation stops automatically when all 60
preset memory positions are fi lled or when
auto scanning attains the highest end of all
bands. If you desire to stop the auto preset
memory at anytime, press the CLEAR button.
In TUNER mode, press the T-MODE button on the
remote controller to switch between AUTO STEREO
and monaural sound.
1.
Switch the remote controller to TUNER mode.
2.
Press
the
< / > button on the remote controller
to display 002.
3.
Each time the T-MODE button is pressed,
the TUNER mode changes and the mode is
displayed on the FL display.
Analog / Digital Auto Mode
T - M O D E : D I G - A T
For listening to HD Radio stations.
See p.52 for more information on HD Radio
technology.
Analog Auto Mode
(when receiving FM broadcasts)
T - M O D E : A N A - A T
AUTO STEREO mode is selected and the AUTO
indicator is illuminated on the FL display.
When stereo broadcasts are received, the ST
indicator is illuminated on the FL display.
Note:
• This mode is not available when BAND is set to
AM.
Analog Mono Mode
T - M O D E : M O N O
MONO mode is selected and the AUTO indicator
disappears from the FL display. Monaural broadcasts
are received in TUNER mode.
Note:
• If the unit receives a weak signal or it is diffi cult to
receive a stereo signal, press the T-MODE button
on the remote controller or the unit to switch to
MONO mode. This reduces the amount of noise
and makes broadcasts easier to hear. The AUTO
indicator on the FL display disappears.
DIRECT FREQUENCY CALL
4.
2.
2.
3.
3.
5.
1.
Switch the remote controller to TUNER mode.
2.
Press the < / > button until 001 is displayed.
3.
Press
the
FM or AM button.
4.
Press
the
GUIDE button on the remote
controller, display will show “FREQ----”.
5.
lnput your desired station’s, frequency with the
ten numbered keypad on the remote controller.
6.
The desired station will automatically be tuned.
(FM) TUNING MODE (AUTO STEREO OR MONO)
TOP
TOP
ZONE
ZONE
SPEAKER
SPEAKER
DISPLAY
DISPLAY
INPUT
INPUT
7.1CH
7.1CH
DIRECT
DIRECT
PURE
PURE
PHONES
PHONES
THX
THX
M-DAX
M-DAX
MODE
SURROUND
CLEAR
CLEAR
MEMORY
MEMORY
T-MODE
T-MODE
BAND
BAND
EXIT
EXIT
MENU
MENU
ZONE
ZONE
DOWN
DOWN
VOLUME
VOLUME
UP
UP
INPUT
SELECTOR
AUTO
AUTO
SETUP MIC
SETUP MIC
HDMI
HDMI
M-DAX
M-DAX
PURE DIRECT
PURE DIRECT
POWER ON/OFF
STANDBY
AV PRE TUNER AV8003
AV PRE TUNER AV8003
ENTER
ENTER
AUTO, TUNED, ST T-MODE
3.
3.
2.
2.
Note:
The same operations performed using the
3/ 4
buttons can be performed using the – TUNE + button
of item 002 when the remote controller is in TUNER
mode.
If tuning does not stop at the desired station, use to
the “Manual Tuning” operation.
MANUAL TUNING
TOP
TOP
ZONE
ZONE
SPEAKER
SPEAKER
DISPLAY
DISPLAY
INPUT
INPUT
7.1CH
7.1CH
DIRECT
DIRECT
PURE
PURE
PHONES
PHONES
THX
THX
M-DAX
M-DAX
MODE
MODE
SURROUND
SURROUND
CLEAR
CLEAR
MEMORY
MEMORY
T-MODE
T-MODE
BAND
BAND
EXIT
EXIT
MENU
MENU
ZONE
ZONE
DOWN
DOWN
VOLUME
VOLUME
UP
UP
INPUT
INPUT
SELECTOR
SELECTOR
AUTO
AUTO
SETUP MIC
SETUP MIC
HDMI
HDMI
M-DAX
M-DAX
PURE DIRECT
PURE DIRECT
POWER ON/OFF
POWER ON/OFF
STANDBY
STANDBY
AV PRE TUNER AV8003
AV PRE TUNER AV8003
ENTER
ENTER
1.
3.
2.
4.
4.
2.
2.
3.
3.
(Using the unit)
1.
Turn the INPUT SELECTOR knob to select
“TUNER”.
2.
Press
the
BAND button to select either FM or
AM.
3.
Press
the
3
or
4
cursor buttons on the front
Panel to select the desired station.
(Using the remote controller)
1.
Switch the remote controller to TUNER mode.
2.
Press
the
< / > button until 001 is displayed.
3.
Press
the
FM or AM button.
4.
Press
the
3
or
4
cursor buttons to tune in the
deseired station.
AV8003_U_Eng.indb 49
AV8003_U_Eng.indb 49
08.4.28 10:40:25 AM
08.4.28 10:40:25 AM