Setting the recording file format, Using the sampling rate converter, 5 – recording – Teac SS-CDR200 User Manual
Page 41
TASCAM SS-CDR200/SS-R200/SS-R100
41
NOTE
When the input source setting is
D.COAX
. you cannot
start recording from recording standby in the following
situations.
• When the unit is not digitally locked to the input source
(
DIN UNLOCK
will appear on the display).
• When the input source is not audio (
DIN NotAudio
will appear on the display).
• When the sampling frequency specified by the
REC
menu
REC FORMAT
item differs from the input source.
(
FS UNMATCH
will appear on the display). However
if you have enabled the sampling rate converter,
recording can take place even if the sampling
frequency is different (see “Using the sampling rate
converter” on page 41).
Setting the recording file format
If the current device is set to
USB
,
SD
or
CF
, the unit can
record in MP3 and WAV formats. If the current device is set
to
CD
, the unit can record in MP3 and audio CD formats
(SS-CDR200 only).
Moreover, both MP3 and WAV files can be on the same
USB memory or SD/CF card, but both MP3 and audio
CD format files cannot be included on the same CD-R or
CD-RW disc. The first file recorded on the CD-R or CD-RW
disc will determine the file format that can be recorded on
that disc (MP3 or audio CD).
NOTE
• WAV files cannot be recorded to a CD-R/CD-RW disc,
but using the file copy function described below, you
can copy WAV files from USB/SD/CF media to CD-R/
CD-RW discs (SS-CDR200 only). (See “Copying files
between CDs and other media” on page 63.)
• Recording of MP3 files to CD-R/CD-RW discs is possible
only if a blank disc is inserted. If you eject the disc or
turn off the power, adding recordings later will not be
possible. (See “Finalizing CD-R/CD-RW discs (SS-CDR200
only)” on page 43.)
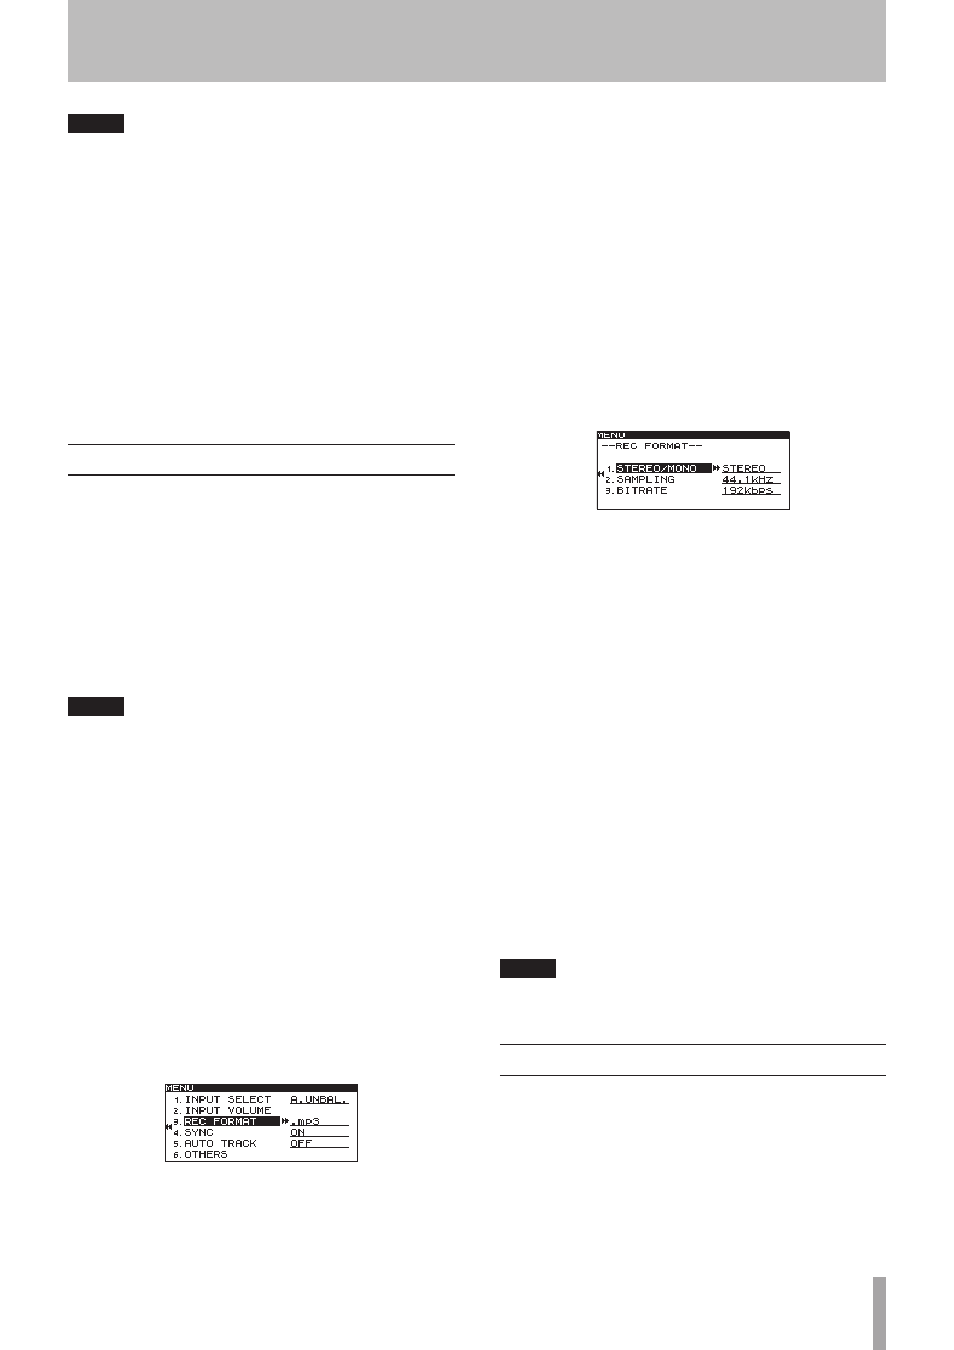
When stopped or in recording standby, use the menu to
set the file format.
1 Press the MENU [JOG] button (or remote control
MENU button) to open the
MENU
screen.
2 Open the
REC
menu.
3 Select
REC FORMAT
.
4 Press the MULTI JOG dial or , [LOCK] button (or
remote control ENTER or t button) to move the
cursor right to select the value.
5 Turn the MULTI JOG dial (or press the remote
control 5 and b buttons) to select the recording
file format.
USB/SD/CF media:
.mp3
(default value),
.wav
CD-R/CD-RW disc (SS-CDR200 only):
.mp3
(default
value),
CDDA
(audio CD format)
If the current device is set to
CD
and the recording
file format is set to
CDDA
, steps 6 and 7 below are
not necessary (no screen appears). Skip to step 8.
If the current device is set to
USB
,
SD
or
CF
and the
recording file format is set to
CD
or
.mp3
, continue
with the following procedures.
6 Press the MULTI JOG dial or , [LOCK] button (or
remote control ENTER or t button) to open the
REC FORMAT
screen.
7 Set the following items on the
REC FORMAT
screen.
STEREO/MONO
Set whether the recording file should be a stereo file
or a mono file.
Options:
STEREO
(default value),
MONO
SAMPLING
Set the sampling frequency.
Options:
44.1kHz
(default value),
48kHz
BITRATE (can only be set when the recording file
format is set to .mp3)
Set the bit rate.
Options:
64kbps
,
128kbps
,
192kbps
(default value),
256kbps
,
320kbps
”
The bit rate option is the value when recording in
stereo. When set to mono recording, the bit rate will
be halved, resulting in the same sound quality.
8 When you have finished making the setting, press
the HOME/DISPLAY button (or remote control
HOME/DISP button) to return to the Home Screen.
NOTE
The recording file format setting is retained even after the
power is turned OFF.
Using the sampling rate converter
Since this unit has a built-in sampling rate converter, you
can record at a sampling frequency that is different from
the sampling frequency of the digital input source.
Use the menu to turn the sampling rate converter (SRC)
ON/OFF.
1 Press the MENU [JOG] button (or remote control
MENU button) to open the
MENU
screen.
2 Open the
REC
menu.
5 – Recording