Video composition operations, Compositing video with picture-in-picture (pinp) – Roland VR-6HD Direct Streaming AV Mixer User Manual
Page 33
33
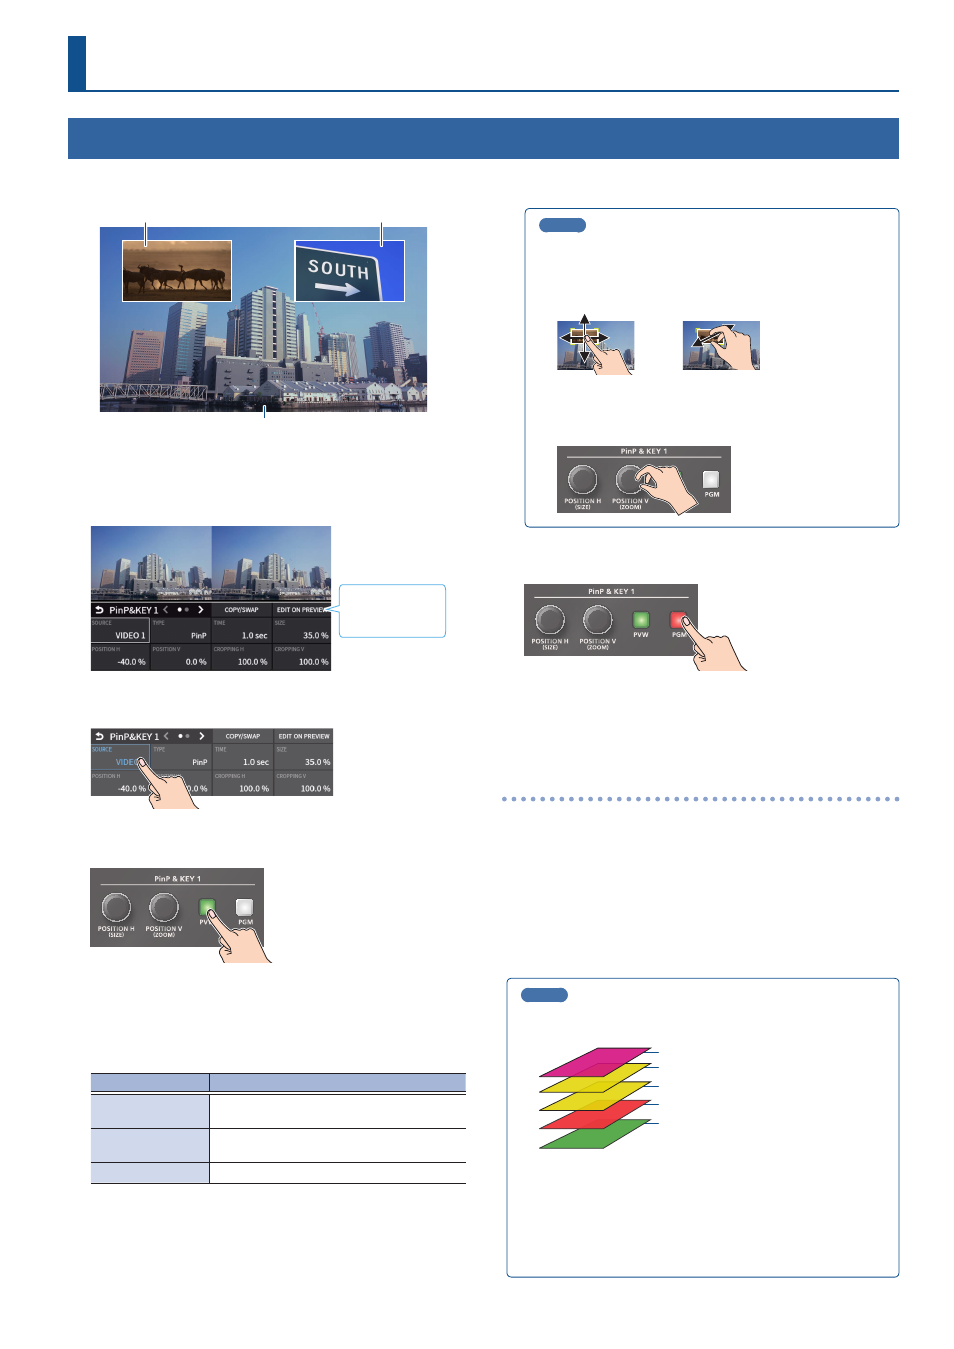
Video Composition Operations
Compositing Video with Picture-in-Picture (PinP)
Composites the inset screen on top of the background video. You can use PinP & KEY 1–2 at the same time to display two inset screens.
This example shows you how to composite video using “PinP & KEY 1”. The operation is the same when using “PinP & KEY 2”.
Inset screen 1 (PinP & KEY 1)
Inset screen 2 (PinP & KEY 2)
Background video
1 .
Press the PANEL [SETUP] button.
2 .
Touch <PinP & KEY 1>.
The PinP & KEY setup screen appears.
To EDIT on
PREVIEW screen
3 .
Touch <SOURCE> to select the video you want to set as the
inset screen.
4 .
Press the PinP & KEY 1 [PVW] button to turn on the inset
screen preview output (lit).
The inset screen appears in the PVW section of the multi-view,
allowing you to check the inset screen’s location and size. At this stage,
the final output has not yet been changed.
5 .
Touch the setup screen to adjust the position of the inset
screen.
Parameter
Explanation
POSITION H
Adjusts the horizontal position of the inset
screen.
POSITION V
Adjusts the vertical position of the inset
screen.
SIZE
Adjusts the size of the inset screen.
MEMO
Adjusting the inset screen via touch (only for the EDIT on
PREVIEW screen)
You can directly drag on an inset screen to adjust its position, and
you can pinch in/out to adjust its size.
Adjusting using the POSITION knob
Use the [POSITION H] and [POSITION V] knobs to adjust the
position of the inset screen.
6 .
Press the PinP & KEY 1 [PGM] button to turn on PinP
compositing (lit).
The inset screen is displayed on the final output.
7 .
To turn off PinP compositing, press the PinP & KEY 1 [PGM]
button once again.
Turning PinP/DSK composition on/off in tandem
with video transitions
You can make PinP/DSK composition turn on/off in tandem with the
video transitions.
1 .
After setting “PANEL OPERATION” to “PGM/PST” from the
[MENU] button
Ó
“SYSTEM”
Ó
, set “EFFECTS TRANSITION
SYNC” to “ON”.
2 .
After step 4, use the [AUTO] and [CUT] buttons to switch the video.
PinP composition turns on, and the composited result that is
previewed is sent to final output.
MEMO
¹
The output video layers are structured as shown in the illustration
below.
PST (background video)
PGM (background video)
PinP & KEY 2
PinP & KEY 1
¹
Long-pressing the [PVW] or [PGM] button for each layer shows
only the layer that is targeted for the operation while the button
is pressed (this is the spot function: from the [MENU] button
Ó
“SYSTEM”, set “EFFECTS SPOT” to “ENABLE”).
¹
Set the fade-in/out time for the inset screen from the [MENU]
button
Ó
“PinP & KEY”
Ó
“PinP & KEY 1–2”
Ó
“TIME”.