3 – names and functions of parts, Rear panel – Teac DP-32 User Manual
Page 27
TASCAM DP-32
27
3 – Names and Functions of Parts
Rear panel
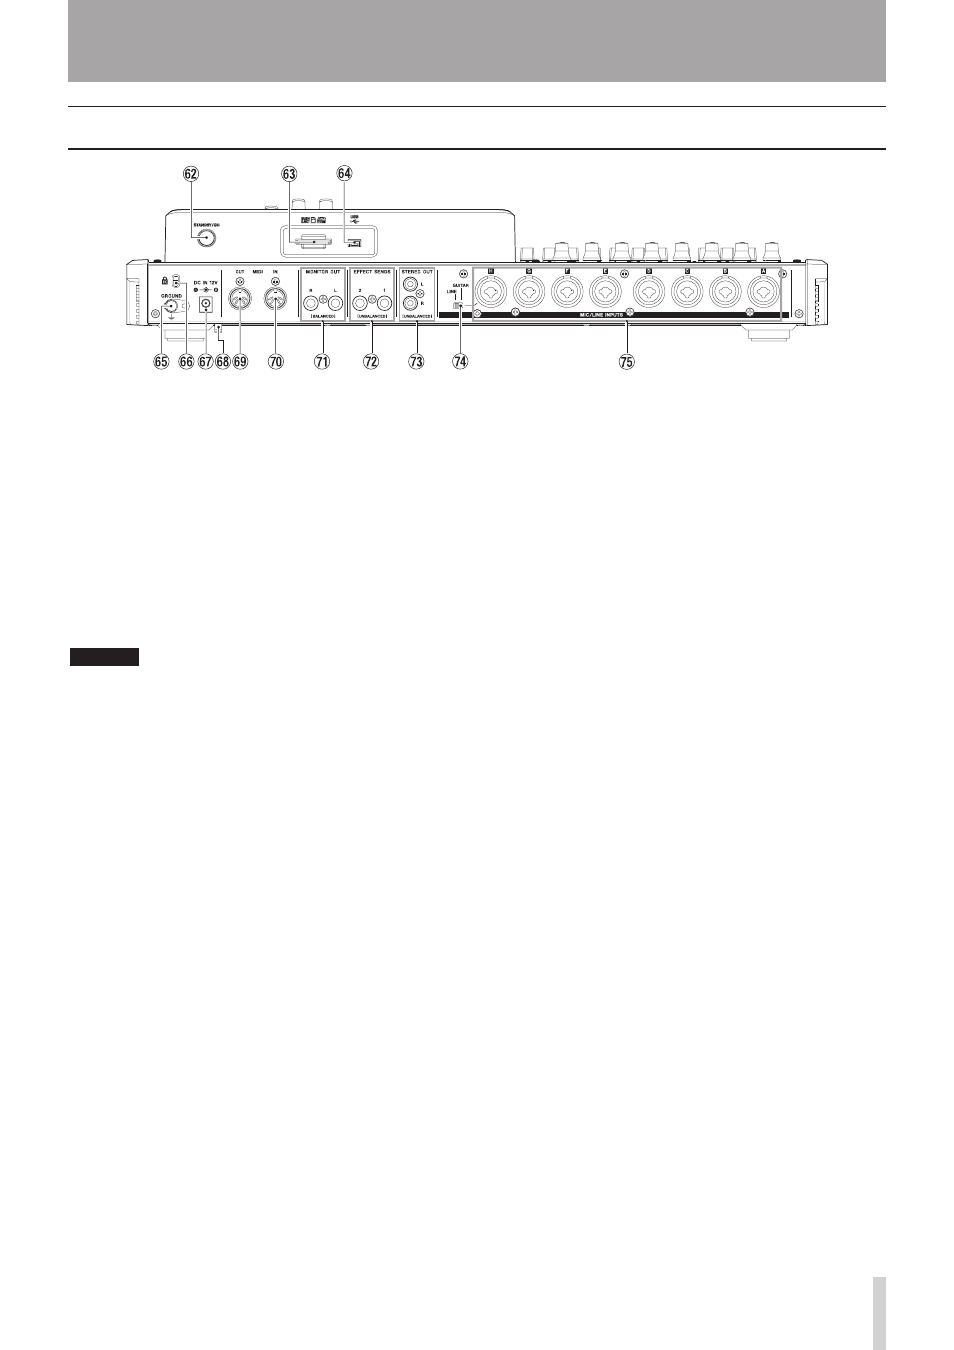
S
STANDBY/ON button
When the power is OFF (in standby), press and hold
this to turn the power on. When the power is ON, press
and hold this button to turn the power off (put in
standby). (See "Start-up & Shutdown" on page 32.)
D
SD card slot
Insert an SD card into this slot.
F
USB port
Use the included USB cable to connect with a USB port
on a computer. (See "Connecting to a computer" on
page 76.)
CAUTION
Always connect the unit directly to a computer. Do not
use a USB hub.
G
GROUND connector
Depending on other conditions in your setup, you
might hear noise when monitoring. If this occurs, use
this connector to ground the unit. (Please prepare the
necessary wiring yourself.)
H
Kensington lock attachment hole
J
DC IN 12V jack
Connect the supplied TASCAM PS-1225L AC adaptor.
K
Cord holder
Wrap the cord of the supplied TASCAM PS-1225L AC
adaptor around this hook to prevent the plug from
becoming disconnected accidentally.
L
MIDI OUT jack
Use this standard 5-pin DIN MIDI jack for MIDI signal
output.
:
MIDI IN jack
Use this standard 5-pin DIN MIDI jack for MIDI signal
input.
Z
MONITOR OUT jacks (standard balanced TRS)
These jacks output the signal selected using the
MONITOR SELECT button on the top panel. These are
standard balanced jacks.
X
EFFECT SENDS jacks (standard unbalanced TS)
These jacks output the signal for effect sends 1 and 2.
C
STEREO OUT jacks (unbalanced RCA)
These jacks output the stereo bus signal.
V
LINE-GUITAR switch
Set this switch according to the input source of the
MIC/LINE INPUT H. When connecting an electric
guitar, electric bass or similar instrument directly, set
this switch to GUITAR. When connecting a digital
instrument or other audio equipment, set it to LINE.
B
MIC/LINE INPUTS A-H jacks (balanced)
These are balanced analog XLR/TRS combo jacks for
microphone and line level input.
• XLR (1: GND, 2: HOT, 3: COLD)
• TRS (Tip: HOT, Ring: COLD, Sleeve: GND)