7 - recorder functions, Checking punch-in/out points, Rehearsing with automatic punching – Teac DP-32 User Manual
Page 55: Recording with automatic punching, Checking takes
TASCAM DP-32
55
7 - Recorder Functions
Auto Punch
appears at the top of the screen when
automatic punching is enabled.
You can also press the AUTO PUNCH button again to
return to the Home screen without enabling automatic
punching.
NOTE
You can press the AUTO PUNCH button before putting
any tracks into recording standby. Press the REC button of
any track to put it into recording standby after enabling
automatic punching.
Checking punch-in/out points
When punch-in/out points are set, you can confirm the
setting by pressing the PLAY (7) button.
The playback starts from the pre-roll point and continues
to the post-roll point. When the punch-in point is reached,
on tracks armed for recording, already recorded audio will
be muted and only input signals will be heard. When the
punch-out point is reached, already recorded audio and
input signals will both be heard.
If you want to change the punch-in/out points, locate the
desired points and set them again.
If there are no problems with the punch-in/out points
and pre-roll and post-roll times rehearse recording, as
described below.
Rehearsing with automatic punching
You can rehearse before punch in/out recording. During
rehearsal, monitoring operates the same way as in actual
recording, but no recording occurs.
1. When the AUTO PUNCH button is lit and at least
one of the tracks is in recording standby, press the
REHEARSE button.
The REHEARSE button lights.
2. Press the RECORD (0) button.
Automatic punch in/out rehearsal starts.
• Playback starts from the pre-roll point. You can
monitor both the track playback and input source
signals during the pre-roll.
• When the punch-in point is reached, monitoring
changes to only the input source signal, and the
RECORD (0) button starts flashing (indicating that
this is a rehearsal).
• When the punch-out point is reached, monitoring
of both the track playback and input source signals
resumes, and the RECORD (0) button becomes
unlit.
• Playback stops at the post-roll point.
Before starting a rehearsal, you can press the REPEAT
button to repeat rehearsal of the auto-punch interval
until you press the STOP (8) button. (AUTO PUNCH,
REHEARSE and REPEAT buttons all light in this case.)
Recording with automatic punching
After rehearsing, record with auto punch in/out.
1. If necessary, press the REHEARSE button so that it
becomes unlit.
2. Press the RECORD (0) button.
• Playback starts from the pre-roll point. You can
monitor both the track playback and input source
signals during the pre-roll.
• When the punch-in point is reached, monitoring
changes to only the input source signal, and the
RECORD (0) button starts flashing (indicating that
this is a rehearsal).
• When the punch-out point is reached, monitoring
of both the track playback and input source signals
resumes, and the RECORD (0) button becomes
unlit.
• Playback stops at the post-roll point.
Before starting punch in/out recording, you can press
the REPEAT button so that it lights. Then, you can repeat
automatic punch in/out recording up to 8 times (takes).
This uses the recorder's virtual track feature.
After recording, you can choose your favorite take
from one of the 8 takes recorded on virtual tracks. (See
"Checking takes" below.)
NOTE
You can undo auto punch in/out operations.
Checking takes
After recording one or more takes, follow these
procedures to check them.
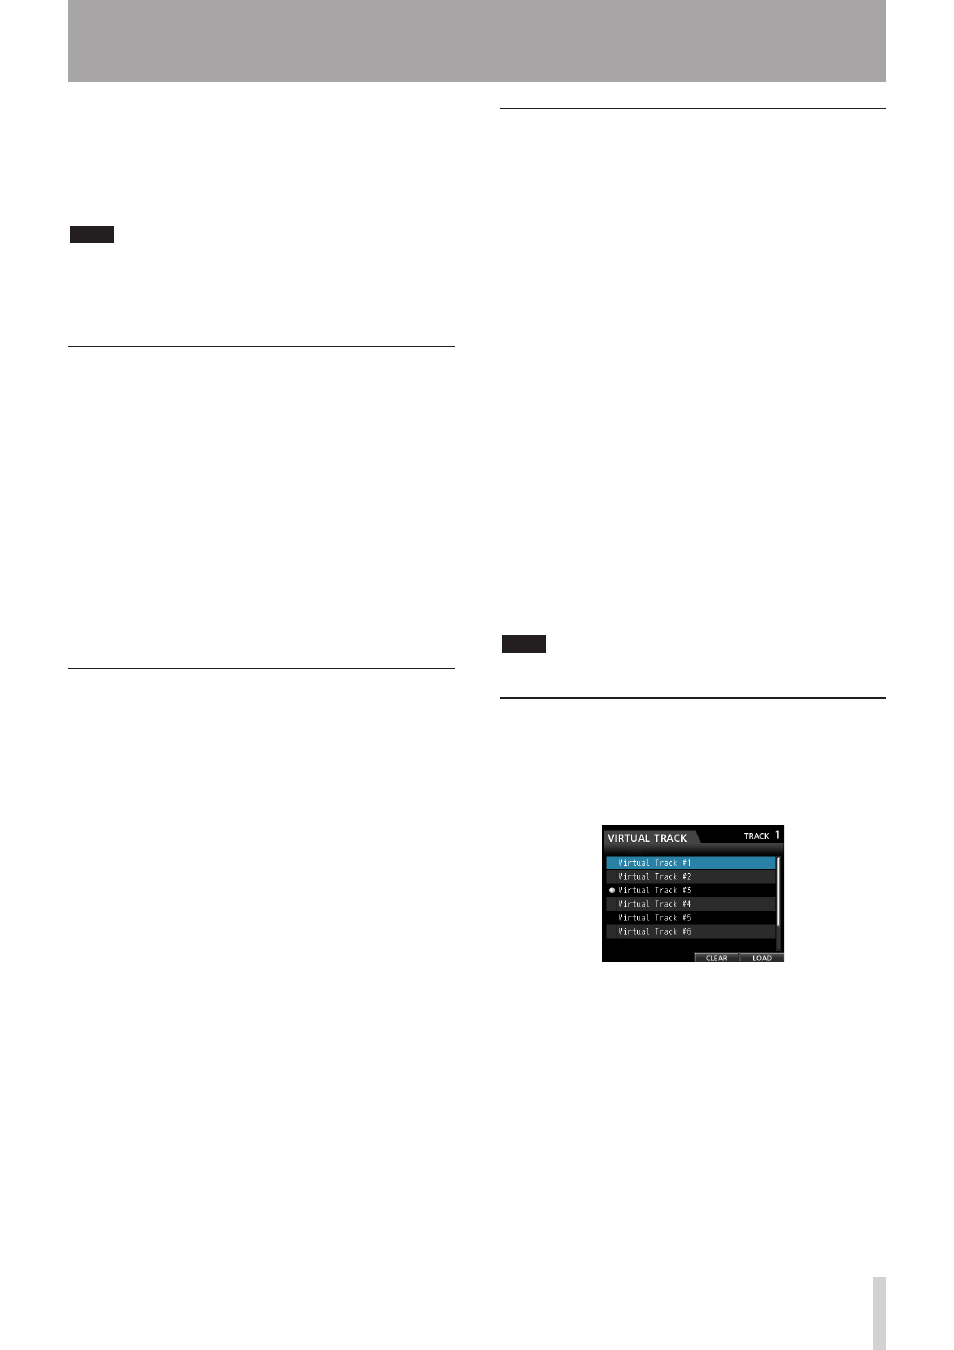
After punch in/out recording completes, the VIRTUAL
TRACK screen opens, as shown below.
1. Use the JOG/DATA dial or the CURSOR (5/b)
buttons to select (highlight blue) a take in the list.
2. Press F4 (
LOAD
) to assign that virtual track to the
physical track.
Playback the take to check it.
Repeat steps 1 and 2 to check other takes.
3. If you are satisfied with the result, press the
VIRTUAL TRACK button to close this screen.
To end Auto Punch mode, press the AUTO PUNCH
button.
If you are not satisfied with the result, press the
RECORD (0) button again and record another take.