10 - mixing down and mastering songs, Creating a master file, Send effects – Teac DP-32 User Manual
Page 65: Setting the start and end points
TASCAM DP-32
65
10 - Mixing Down and Mastering Songs
Use HIGH, MID and LOW GAIN knobs to adjust the gain
of each band.
Use the HIGH, MID and LOW FREQ knobs to adjust the
center frequency of each band.
Use the MID Q knob to set the resonance (width) of the
MID FREQ band.
Setting range:
0.25
to
16
(Default:
0.5
)
Press the EQUALIZER ON/OFF button to turn the
equalizer on or off.
Use INPUT SOURCE (A–H) buttons to select inputs to set
the equalizer. (See "Using the input equalizer" on page
43.)
3. After making the settings, press the HOME button
to return to the Home screen.
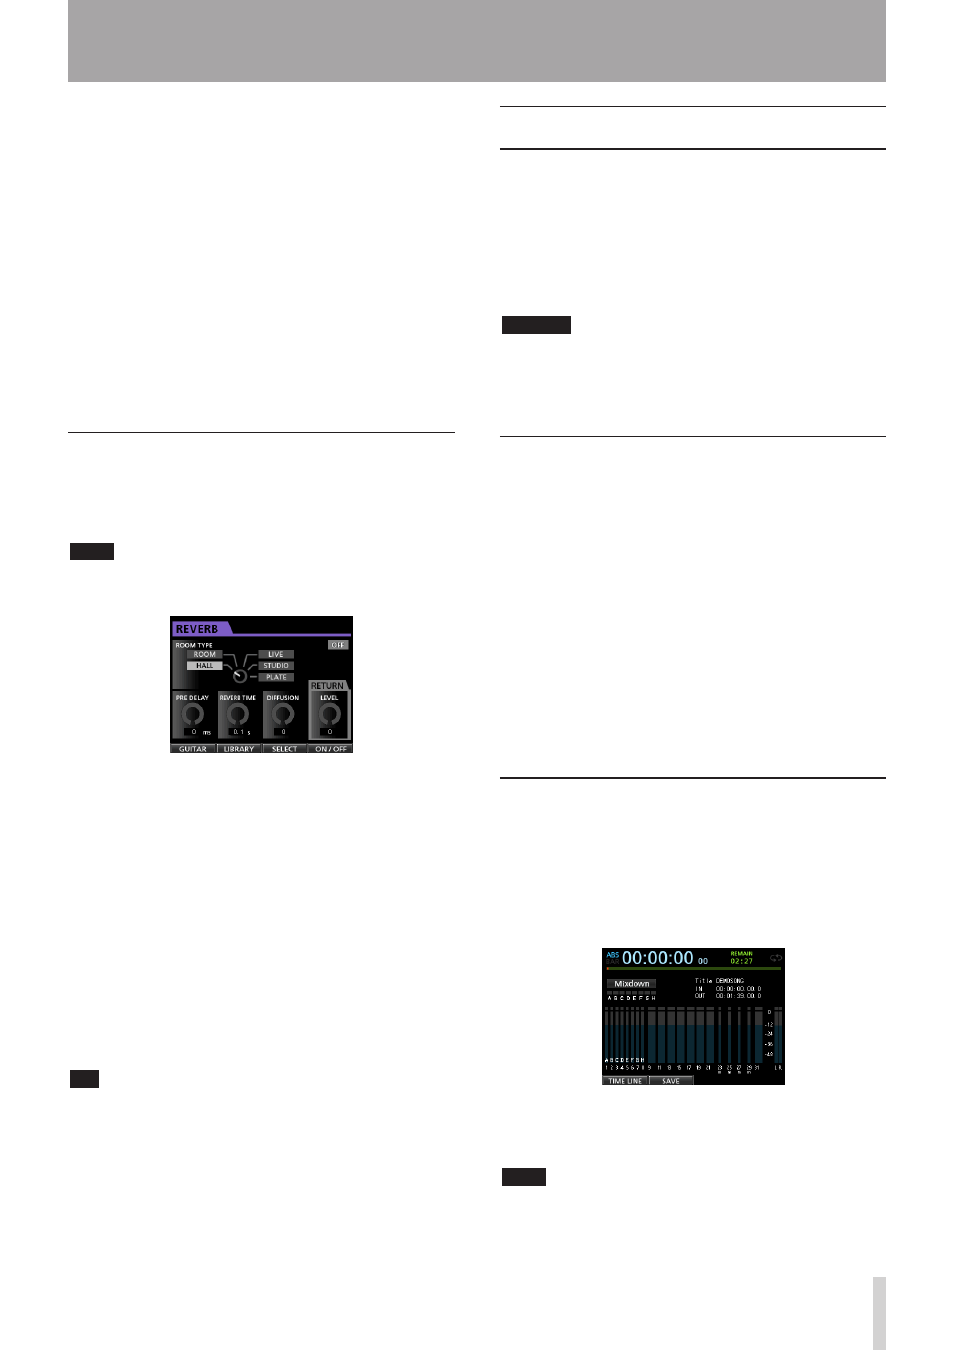
Send effects
This unit has three types of send effects.
Adjust the level of the signal sent to the effect from each
track by using their SEND EFF 1/EFF 2 knobs.
NOTE
Adjust the
RETURN LEVEL
on the Send Effect screen.
1. Press the EFFECT button to open the Effect screen.
2. Select and adjust the send effect.
Press the EFFECT button to open the Effect screen
where the last operation was performed. Press the F3
(
SELECT
) button to select one of the three available
types (
REVERB
,
DELAY
or
CHORUS
). You cannot use
multiple types of effects simultaneously.
Align the cursor with the parameter that you want to
adjust, and then use the JOG/DATA dial to adjust it.
The return from the send effect is mixed with the
stereo signal.
3. After making the send effect setting, press the
HOME button to return to the Home screen.
4. Use the SEND EFF 1 knob to adjust the level of the
signal sent to the send effect of each track.
TIP
When using an external effect, connect the output of the
external effect (EFFECT RETURN) to INPUT A to H. By
assigning the connected input to the stereo bus, you can
return the effect sound to the stereo bus. (See "Assigning
inputs to a stereo bus" on page 41.)
Creating a master file
When you are satisfied with your mix, this unit can create
a stereo master file by recording the mixed down tracks.
Master files created by this unit are saved with their songs.
A master file can be recorded by an external stereo
recorder and can also be converted by the unit into a WAV
file and stored with the same name as the song in the
song's folder on the SD card.
CAUTION
Only one master file ("[song name].wav") can be created
in each song. (When mastering, another file besides the
"[song name].wav" master file is created, but it is only
for use by the unit. Do not erase it.)
Setting the start and end points
Before creating a master file, set the start and end points
to be used for the mixed down master file. The range
between the song's IN and OUT points will be recorded as
the master file.
Usually, you will probably want to set the beginning of
the song as the IN point and the end of the song as the
OUT point.
Press and hold the MARK SET button and press the IN
button where you want to set the IN (start) point of the
master file, and press and hold the MARK SET button and
press the OUT button where you want to set the OUT (end)
point.
For more information about how to correct the IN/OUT
points, see "Setting IN/OUT points" on page 53.
Creating a master file
After setting the IN and OUT points, you are ready to
create the master file.
1. When in
Multi Track
mode, press the
MIXDOWN/MASTERING button.
The recorder switches to
Mixdown
mode and the
Home screen reopens.
If you play or record, you can hear the signal of the
mixed tracks (the signal to be recorded) through
headphones or a monitoring system.
NOTE
• In Mixdown mode,
Mixdown
appears on the upper left
corner of the Home screen.
• If the interval between the IN and OUT points is
shorter than 4 seconds, when you start to record,