Leprecon Litescape dimmer User Manual
Page 19
Overview
Litescape User’s Manual, Page 3
Clearing the Dimmer
Note: Before proceeding, you may want to refer to a later section entitled “How to Use the
Interface” for information on button and LCD screen characteristics.
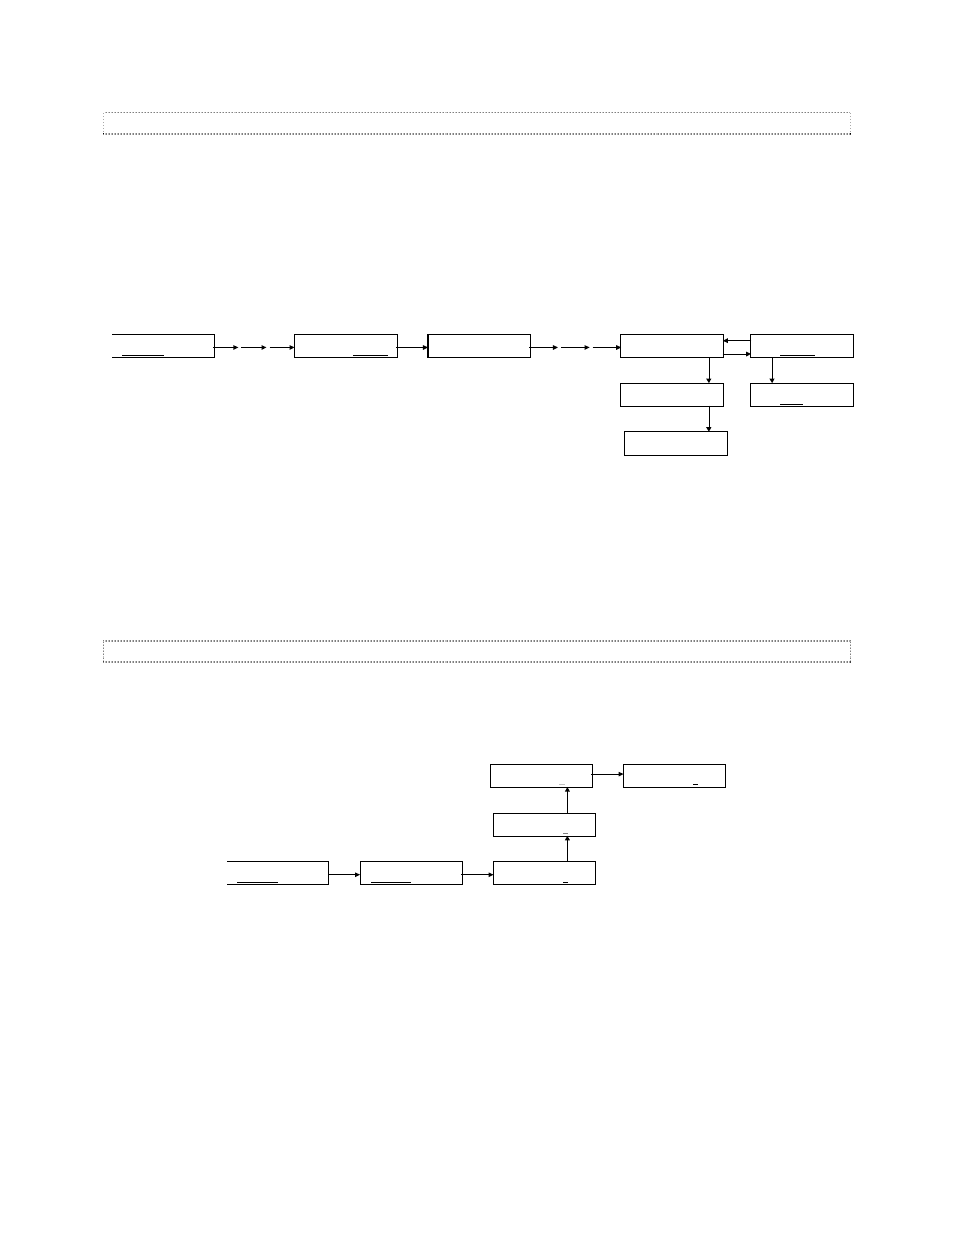
It’s a good practice to initialize all variables in the LWD-2400 when it is first put into use.
To do this, get to the
MAIN MENU then press the NEXT button until the “system” selection is blinking and
press ENTER. Now press the NEXT button several times, go through the
CLEAR ALL screen until the
MEMORY STATUS sub menu appears. If the “Locked” parameter is flashing, press DOWN so that it
changes to “Open”, then press ENTER.
MAIN MENU
dimmers scenes
NEXT
NEXT
MAIN MENU
status system
EDIT TIME:
Thu Sep 14 2000
status
NEXT
NEXT
NEXT
NEXT
CLEAR ALL? >
(ENT = Yes)
MEMORY STATUS:
Locked
NEXT
PR EV
MEMORY STATUS:
Open
DOWN
CLEAR ALL? >
(ENT again)
CLEAR ALL? >
(..DONE.. )
ENTER
ENTER
ENTER
Clearing All Dimmer Variables
Now press Lft-arrow to get back to the
CLEAR ALL screen and press ENTER twice. The screen should
respond with “(…DONE…)”, indicating that all system variable and programmable features have been set
to their initialized state.
If you are unable to access the ‘clear all’ menu, the same function can be done with a hardware reset. Set
the ‘clear all’ switch (top switch shown on previous page) to the right. Apply power to the dimmer, then
remove power after 30 about seconds. Set the switch back to the ‘normal’ operating position.
Setting the DMX Base Address
After clearing the entire dimmer in the previous step, the DIMMER ADDRESS should have been
initialized to DMX address 1. To verify this, use the NEXT and PREVious buttons to get to the MAIN
MENU “dimmer” screen and press ENTER. The “dimmer1” field should be flashing. Press ENTER again.
The current DIMMER ADDRESS value of “1” should be blank flashing.
MAIN MENU
dimmers scenes
ENTER
V
SELECT DIMMER:
dimmer1 dimmer2
DIMMER ADDRESS
dimmer1 1 >
DIMMER ADDRESS
dimmer1
2
>
DIMMER ADDRESS
dimmer1
3
>
ENTER
V
ENTER
V
UP
UP
DIMMER ADDRESS
dimmer1 3 >
Setting the DMX Base Address
To change the DMX start address for dimmer1 from “1” to “3”, press the UP key twice to change the
displayed base address to “3”. The “3” should now be inverse flashing, indicating that the new address
has not yet been entered. Press
ENTER to accept the change. The “3” should now change to blank
flashing, and the dimmer should now be responding to DMX addresses 3-14.
Use the menu keys to return dimmer1’s DMX start address to “1” before continuing.