Basic operations of the unit – Panasonic AW-RP60 Remote Camera Controller User Manual
Page 18
18
Basic operations of the unit
1.
Turn on the unit’s power.
Set the POWER switch to the ON position.
Power is supplied to the unit, and the POWER indicator turns on.
z
When the [AUTO POWER] item in the [CAMERA] SYSTEM menu
is set to [ON], the power of the remote camera turns on when the
power of the unit is turned on.
However, this only works when the remote camera is in the
standby state.
For details, refer to “How to turn on the power of the remote
cameras” (page 19).
z
Remote cameras are linked when the [CONNECT MODE] item in
the [CONNECT SETTING] SYSTEM menu is set to either [Serial]
or [LAN].
For details, refer to “Setting the connection types (serial/IP/
no connection) for remote cameras” (page 30).
2.
Select a remote camera.
Press a [CAMERA SELECTION] button to select the remote camera
to control from the unit.
3.
Adjust the direction in which the remote camera points.
When the PAN/TILT / IRIS / ZOOM / FOCUS ENABLE button
[ENABLE] indicator is on, use the PAN/TILT lever to adjust the
direction in which the remote camera points.
z
z
When turning on the power, do not touch until the status
screen is displayed on the LCD panel.
Note
4.
Adjust the zoom.
When the PAN/TILT / IRIS / ZOOM / FOCUS ENABLE button
[ENABLE] indicator is on, use the ZOOM button to adjust the lens
zoom.
When the TELE side is pressed, the zoom is set to the telephoto
mode, and when the WIDE side is pressed, it is set to the wide‑angle
mode.
z
z
When turning on the power, do not touch until the status
screen is displayed on the LCD panel.
Note
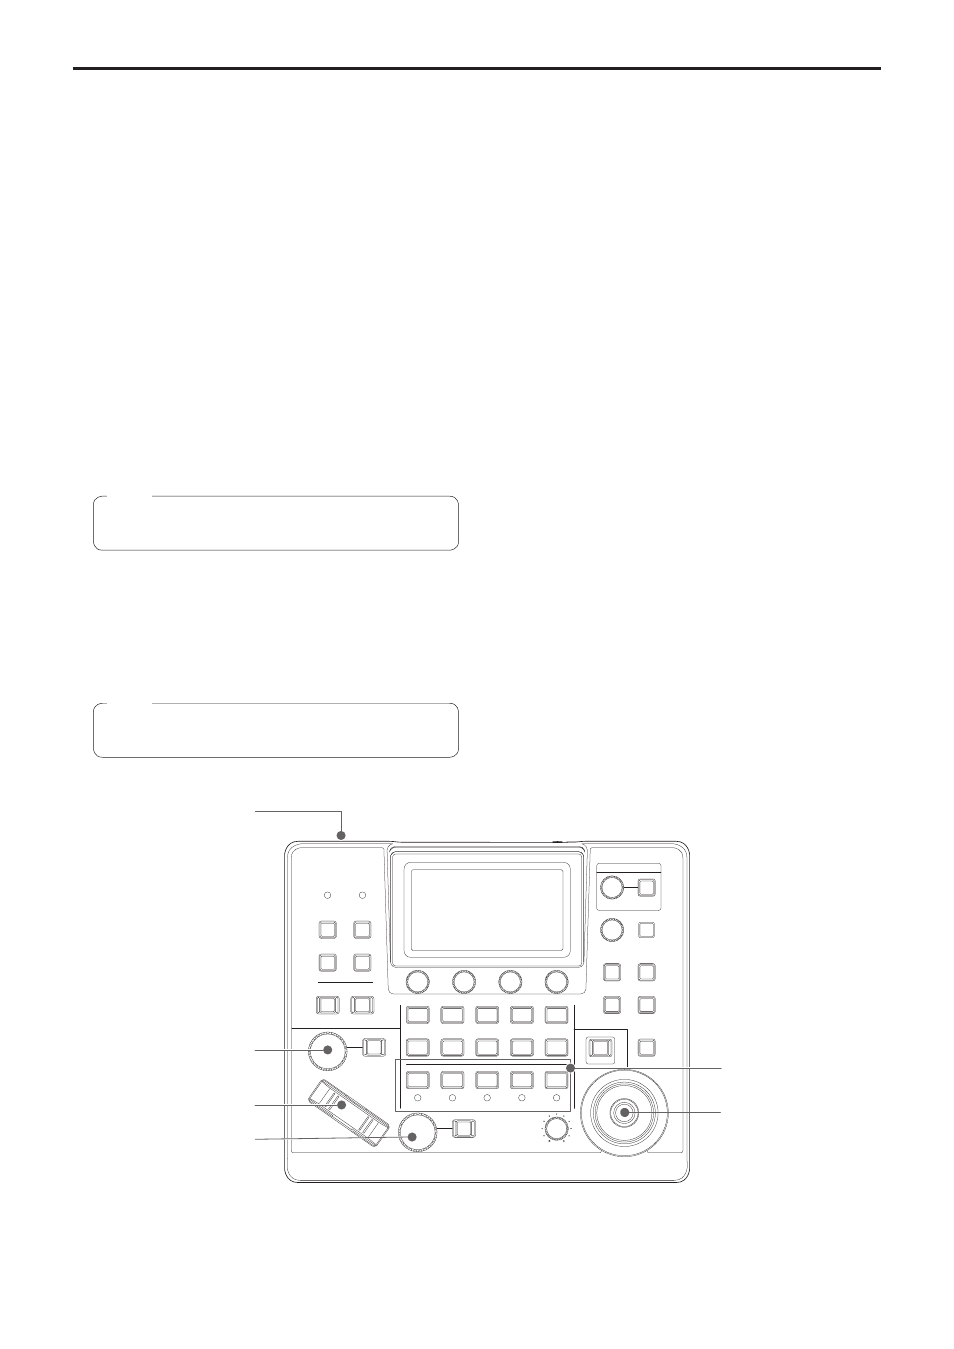
POWER
MENU
STORE
DELETE
PRESET
AWB
AUTO
IRIS
ZOOM
FOCUS
AUTO
PTZ SPEED
LOW
HI
CAMERA SELECTION
PRESET MEMORY SELECTION
OTAF
WIDE
TELE
ABB
F1
1
2
3
4
5
1
2
3
4
5
6
7
8
9
10
F2
F3
F4
SELECT
ON/OFF
CAMERA OSD
EXIT
F5
USER 1
USER 2
USER 3
ENABLE
SHIFT
PAN
TILT
USER 4
BARS
ALARM
1, 7
5
4
6
3
2
5.
Adjust the lens iris.
When the PAN/TILT / IRIS / ZOOM / FOCUS ENABLE button
[ENABLE] indicator is on (amber), turn the IRIS dial to adjust the
lens iris.
6.
Adjust the focus.
When the PAN/TILT / IRIS / ZOOM / FOCUS ENABLE button
[ENABLE] indicator is on, turn the FOCUS dial to adjust the lens
focus.
When the one‑touch auto focus button is pressed during manual
focusing, the mode switches to auto focusing mode temporarily, and
the subject is brought into focus automatically.
z
OTAF (one‑touch auto focus) is enabled for remote cameras which
are equipped with the OTAF function.
7.
Turn off the unit’s power.
Set the POWER switch to the OFF position.
The unit’s power is turned off, and the POWER indicator turns off.
z
When the unit’s power is turned off, the power of the connected
remote cameras does not turn off.
z
To turn off the power of the remote cameras, select [ALL OFF] or
[GRP OFF] in the [CAM POWER] item of the [CAMERA] SYSTEM
menu, and execute.
For details, refer to “How to turn off the power of the remote
cameras” (page 20).